Introduction
Purpose Enterprise App? Philosophy Architecture Why Groovy? Document Conventions Folder Conventions Naming Conventions Common Notations Modules
This is the high-level User Guide for the Enterprise Framework module. The goal of this document is to provide a general introduction to the important features and behaviors of the framework.
For a detailed explanation of the many options and features, see the Reference. The Groovydoc (Javadoc) API covers other details of the underlying classes. The source code is at https://github.com/simplemes/simplemes-core.
Purpose
This is the Enterprise Framework module for Micronaut. We wrote this framework as we were developing the SimpleMES application. The main goal was to allow other developers to create enterprise applications using Micronaut as quickly as possible.
Enterprise customers expect a certain level of common features within enterprise applications. Enterprise applications tend have many domain classes with a lot of business logic. Creating a few domain classes in Micronaut is simple, but the boiler-plate code needed for common features such as JSON import becomes unmanageable quickly. The goal of this framework is to speed application developing by letting you concentrate on the business logic and objects that really matter to your customers.
The framework provides many of these features with little or no coding needed in your application. The goal is to let you, the application developer concentrate on the functionality needed.
The (Groovy API) for the framework contains details on all fields and methods for most objects/services.
See Document Conventions for document notation conventions.
Enterprise App?
The term Enterprise Application is so overused that it has lost much of its meaning. For the purpose of this framework and documentation, our definition is:
An Enterprise Application is a wide application that has specific feature and
reliability requirements.  The application generally appears as one consistent
product to the users.
By wide application, we mean a large number of domain and business classes. The domain classes usually have a lot of relationships and business logic that operates on these classes. The reliability requirements tend to force a good deal of monitoring capability.
Micronaut is a great start, but it frequently gives you 90% of what you need. This framework helps you with the last 10%. For example, each domain object needs a controller to expose the basic CRUD/REST actions. The framework lets you implement this with very little code.
Philosophy
This framework is a packaged as a big module (.jar file) for Micronaut applications. Why is this so big? Because so many of the features work together, it would be difficult to keep all of the dependencies together. For example, the custom fields work with the GUI pages to allow the end user to define and move fields around the GUIs. Archiving must be able to archive custom fields. Common features such as JSON support needs to be consistent across all domain classes and needs to be handled in a central location.
Microservices
Micronaut is designed to produce microservices that are small and easy to implement. Why use a microservice framework for an enterprise application? Because many of the Micronaut features are very useful for an enterprise application. For example, quick startup time is very important if the app is host on a cloud provider.
The application (SimpleMES) is designed as a monolith. Why use a microservice toolkit for this type of application? Because we envision the application starting as monolith and evolving into a microservice app as needed. To do this, we chose to build the application in separate modules that work together inside of a single JVM. As the need arises, we can separate these modules into their own microservice.
This is monolith-to-microservice evolution is one reasonable way to build an app quickly and then evolve when needed. Not every app needs to start as a microservice-based app. There is a large cost to starting as a microservice. Some of the high costs include:
-
Development Time.
-
Testing Complexity.
-
Admin Costs.
-
Lack of Clarity.
-
Distributed Transaction Complexity.
All of these add to the initial development cost. If the app is a success and needs to evolve, then we already have clear lines to break the app into microservices. This evolution is shown below:
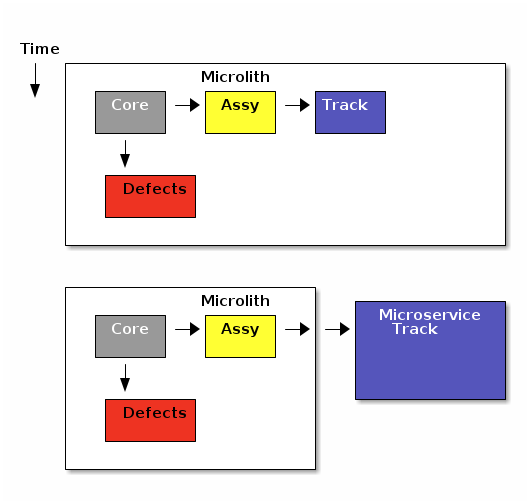
The initial release of the application bundles all of the modules into one service. These all communicate using internal JVM calls. This allows simple database transaction control and supports easy rollback.
When needed, one of the modules (Track) is moved to its own microservice. This means we will develop a distributed transaction mechanism like Saga pattern to keep the data in synch.
This whole approach means the initial release will be simpler and easier to develop. As the requirements grow over time, we can decide to pay the extra cost of supporting multiple microservices.
This does force us to keep the modules as separate entities and minimize the the method calls to other modules. Micronaut makes this easy, but it does require some discipline.
Other Key Philosophies
Boiler-plate code should be kept to a minimum. This means anything that you have to do over and over in your application should be handled by the framework with minimal trouble.
Complexity kills productivity. To reduce the complexity, we just implement features/flexibility as it is needed.
Architecture
The framework supports an the following architecture:
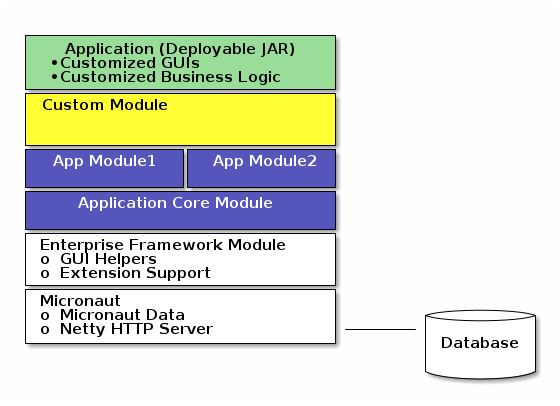
The goal of this architecture is to allow you (as the application developer) to modularize your application into multiple modules (Core module, Module1 and Module2 above). In addition, custom modules can be added to the build to add new features to your applications. Other organizations (integrators, end-users, etc) may want to mix and match various modules. These organizations may even remove optional modules of your application.
This is made possible with Micronaut’s bean framework. New beans are easily added in the modules. Add-on functional behavior are also possible using Micronaut’s ability to define multiple beans for a specific feature. For example, each module can provide custom fields on the core module domains and GUIs by implementing a bean with the AddOnFieldsInterface. The framework will use these add-on fields as if they are part of the core module.
An example extension module for the OrderService is shown below:
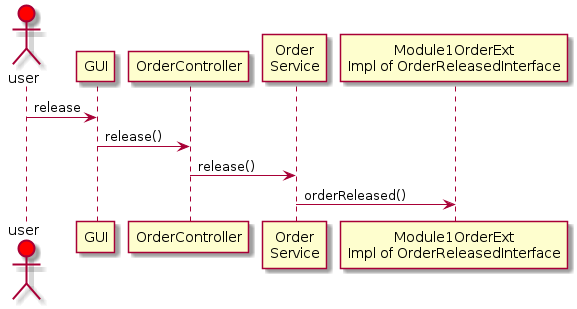
In this example, a core OrderService.release() method will call all registered
beans that implement the OrderReleasedInterface. This interface has the method
orderReleased(), which notifies the Module (Module1) that an order is released.
These extension methods can perform database actions and even rollback the transaction as needed.
Why Groovy?
Why choose Groovy over Java or Kotlin? One simple reason: clarity.
The biggest cost of successful software is the cost of maintaining the code for years or decades after you have written it. Clarity becomes critical when looking at code that was written a long time ago. For that reason, all decisions on this framework and application are driven by the need to appear simple to the user and to minimize the complexity for the application developer.
Groovy is clearer because:
-
Reduced boiler-plate code.
-
Reduction in if nesting due to the null-safe access to methods/properties.
-
The default value operator ?: .
-
List and Map usage simplifications.
-
The excellent Spock test system
-
Easy ability to modify the byte-code at compile time to add features (see Domain Entities).
-
Many other features. See 10 Reasons.
-
Null safe equality.
-
No need for checked exceptions on methods.
We don’t want to write a 10 page summary of why Groovy is clearer, but here is a short example using a pattern often seen in application code. We need to call methods on a nested set of objects that may return null.
def routing = order?.product?.determineEffectiveRouting() ?: defaultRouting Routing routing = defaultRouting;
if (order != null) {
if (order.getProduct() != null) {
if (order.getProduct.determineEffectiveRouting() != null) {
routing = order.getProduct.determineEffectiveRouting()
}
}
}Using just two Groovy features reduces the code complexity significantly. Later versions of Java help in some areas (e.g. use of var), but the overall code clarity still suffers in Java (see Streams).
One caveat: Groovy has some terse and cryptic syntax. We have chosen to avoid those types of features that are not clear to the user. Features such as method pointers are wonderfully short, but not very clear. See Groovy Features to Use or Avoid for details.
Document Conventions
This document follows certain conventions as shown below:
-
Literal values
-
File/path names
-
Class names
-
Variables, fields or parameters -
Method names -
Groovy or java code
See Naming Conventions for details on how elements are named.
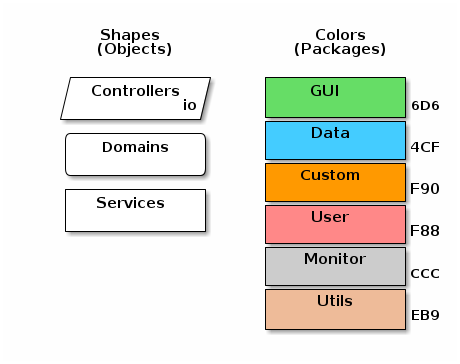
There are a number of diagrams in these documents. We follow the given conventions for these diagrams. Some colors and shapes are used to flag specific types of elements:
Document Layout
Most modules have 3 main sets of documents:
-
Guide - General overview and key concepts document.
-
Reference - In depth reference for APIs, Domains, etc.
-
Groovydoc - The generated Groovydoc (Javadoc) from the source code.
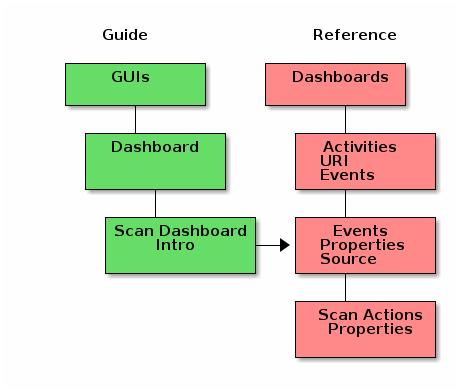
The intent of the guide is to give you a general overview of feature, but not overwhelm you with details of the implementation. The reference documentation will explain most key fields, API calls and options. The guide generally has many links into the reference documentation.
Dashboards are fairly complex. To manage this in the documents, we use the guide for concept introduction and sometime simple examples. The reference document will explain all of the activities, events and scan actions for the dashboard. Each module will have additional activities, events and scan actions. These will be documented in a similar way:
Folder Conventions
For the most part, your application should be free to use most Micronaut-supported folder conventions. This is pretty open, so the framework and application modules that we develop will follow a specific folder layout for common artifacts.
Each major package for an application module should be organized like this:
-
product (Product Definition package for the MES Core module)
-
controller
-
domain
-
page (GEB GUI Test Pages - in src/test/groovy folder)
-
service
-
The folder layouts we will use are for the src/main/groovy source folder looks something like this under the org.simplemes.eframe package:
-
application (startup and common pages "/")
-
controller
-
domain
-
service
-
-
controller (controller support classes)
-
custom
-
controller
-
domain
-
-
domain (domain support classes)
-
misc
-
security
-
controller
-
domain
-
service
-
-
system
-
test
-
web
-
request
-
view
-
builder
-
widget
-
Dependencies
This framework module depends on a number of other modules/libraries/products. The important dependencies are:
-
Vue. See GUI Dependencies for other packages.
-
GEB (GUI Testing)
You do not have to include these in your build.gradle file. This framework depends on these modules and the build system will include them in your application.
| If you include these in your build.gradle file, then you must make sure the versions are consistent with the versions this framework requires. The specific versions needed are listed in the framework’s build.gradle file. |
See Modules for details on how to design your application’s module layout.
Micronaut
This framework depends on the bean framework Micronaut . Micronaut provides the basic run-time lookup for beans, HTTP support and general logic for a normal HTTP server. Various modules provide security, UI views and management features.
Naming Conventions
Class Names
These follow the basic Micronaut conventions, but add a few conventions for simplicity. The common suffixes used are:
-
*Controller- A controller class. This is the main entry point for external clients. -
*Service- The business logic service. These are typically transactional. -
*Interface- A public interface. -
*Marker- The helper implementation for the Freemarker markers (template directive models). -
*Widget- A general GUI widget. -
*FieldBuilder- Creates a GUI field for a specific object type with edit capability. Example: LinkListBuilder. -
*Factory- Abstracts object creation for extension purposes such as FieldBuilderFactory. -
*Utils- Various utilities packages as static methods on the Utils class. Example: DateUtils. -
*Request- A POGO object that contains the values for a specific request. Usually used by services to hold all values needed for the request. -
*Response- A POGO object that contains results from a specific request. Usually used by services to hold the values returned to the caller. -
Abstract*- A prefix for abstract parent classes. -
Base*- A prefix for parent classes that have no abstract methods. -
*Spec- A Spock-based test. -
*GUISpec- A Spock-based test that use a live GUI for testing with GEB/Selenium/Webdriver. -
*APISpec- A Spock-based test that uses an embedded server to test an API feature in a server.
These are not hard and fast restrictions, since Micronaut typically allows almost any name for the defined beans. You can deviate from these conventions if needed in your application.
| The domain classes typically use the base name alone. For example Order is the order domain class. These are usually stored in a sub-package domain (e.g. order.simplemes.mes.demand.domain). |
Field Naming Conventions
Most standard objects will have these typical fields:
| Field | Description |
|---|---|
uuid |
The internal database record UUID (a unique string). Usually not visible to the user. |
key(s)/name |
One or more primary key fields for the object.
These are usually unique and provided by the user. The user will typically
retrieve the records by these key fields. The first key field is usually
named the same as the object (e.g. Order has a key field of |
title |
The single line title. This is usually a short description displayed in lists. |
description |
A multi-line description. Typically limited to 255 characters to reduce database size. |
dateCreated |
The date/time this record was created. |
dateUpdated |
The date/time this record was last updated. |
Quantity fields typically start with 'qty' and have a BigDecimal type.
Common Notations
This is a complex framework. We want to define specific notations used to indicates issues in the code and the application behaviors.
Note
This indicates something be beware of. This is frequently used to flag things that may become an issue someday. We want these flagged in a standard way to easily identify possible source of problems when a library module is upgraded. This includes some highlighting in the JavaDoc.
For example:
  /**
   * Returns all of the domain classes defined in the system.
   * <p>
   * <b>Note:</b> This method uses the internal values of the Micronaut.  (1)
                  This may change someday.
   * @return
   */
  List<Class> getAllDomains() {
    . . .
}| 1 | Flags something that may change in future releases of modules this code depends on. |
Modules
This framework is designed to let you build a modular web application. You should break your application up into modules that are as independent as possible. This also prepares your application for conversion to Microservices when that is supported by this framework.
The Modules currently planned for the SimpleMES application include:
| module | Description |
|---|---|
The core module for the SimpleMES application. |
|
The component assembly module for the SimpleMES application. |
|
The SimpleMES application itself. |
Dependencies for Module Development
You will be developing modules for this framework to provide application functionality. To simplify your build.gradle file, the framework lists most development-time dependencies as compile. This means the dependencies section of your build.gradle file can be as simple as:
dependencies {
  compile ("org.simplemes:eframe:0.5")  (1)
  compileOnly "io.micronaut:micronaut-inject-groovy"  (2)
}| 1 | Use the correct version as needed. |
| 2 | This is needed to make your controllers and other beans visible to Micronaut. |
| The final application packaging will need remove development only dependencies. This is done in the MES application. |
Guidelines
General Configuration Naming Conventions Programming Standards Internationalization Application.main()
To take full advantage of the Enterprise Framework, your application must follow some basic guidelines. You can sometimes ignore these guidelines, but some features of the framework may not work as expected or require special coding on your part. Most of these guidelines will not disrupt your application design too much.
Configuration
Micronaut and this framework have many configuration options defined at the application level. Your application needs to use a number of these settings to take full advantage of the enterprise framework.
application.yml
The application.yml file controls many of the features of your application. To avoid issues with the framework, you should use these settings:
---
micronaut:
  application:
    name: eframe
  session:
    http:
      cookiePath: /
  security:
    authentication: cookie
    enabled: true
    endpoints:
      login:
        enabled: true
      logout:
        enabled: true
    reject-not-found: false
    redirect:
      forbidden:
        enabled: true
        url: /login/auth
      prior-to-login: true
      unauthorized:
        enabled: true
        url: /login/auth
    token:
      jwt:
        enabled: true
        bearer:
          enabled: false
        cookie:
          enabled: true
          loginFailureTargetUrl: /login/auth?failed=true
          cookie-same-site: 'Lax'
        signatures:
          secret:
            generator:
              secret: ${eframe.key}
        generator:
          access-token.expiration: 1800
          refresh-token:
            enabled: true
            base64: true
            secret: ${eframe.key}
      refresh:
        cookie:
          cookie-path: '/'
          cookie-max-age: '30d'
          cookie-same-site: 'Lax'
    interceptUrlMap:
      - pattern: /assets/**
        httpMethod: GET
        access:
          - isAnonymous()
      - pattern: /favicon.ico
        httpMethod: GET
        access:
          - isAnonymous()
  server.netty.logLevel: DEBUG
  server.thread-selection: AUTO
  metrics:
    enabled: true
    export:
      prometheus:
        enabled: true
        step: PT1M
        descriptions: false
---
endpoints:
  prometheus:
    sensitive: false
---
datasources:
  default:
    url: ${DATABASE_URL}
    driverClassName: "org.postgresql.Driver"
    dialect: POSTGRES
---
dataSource:
  url: jdbc:h2:mem:devDb;MVCC=TRUE;LOCK_TIMEOUT=10000;DB_CLOSE_ON_EXIT=FALSE
  dbCreate: create-drop
  pooled: true
  jmxExport: true
  driverClassName: org.h2.Driver
  username: sa
  password: ''

---

flyway:
  datasources:
    default:
      enabled: true
      locations:
        - classpath:db/migration
      #baseline-on-migrate: true
      #baseline-version: 0.1
      #baseline-description: empty
---
assets:
  mapping: assets

---
eframe:
  maxRowLimit: 200
  archive:
  #  factory: org.simplemes.eframe.archive.ArchiverFactory
  #  topFolder: '../archives'
  #  folderName: '#{year}-#{month}-#{day}'
See Security Setup for specifics on the security elements.
build.gradle
See Dependencies for details on the changes needed in build.gradle for required plugins.
Programming Standards
Groovydoc Source Code Format Value Typing ENUMs Class/Method Design (Fluid API) Current User Exceptions Info/Warning Messages to Clients Static Methods Multiple Return Values Groovy Features to Use or Avoid ASCIIDoctor Standards
There are a number of programming and design standards that the framework follows to give you a consistent API to work with. These conventions help the framework work with your application with minimal coding on your part. These standards are described here.
Groovydoc
-
All packages must have package Javadoc (GroovyDoc) comments. Mandatory
-
All non-test methods and fields must have Javadoc (GroovyDoc) comments. All parameters must be described. Mandatory
-
All non-error handling code must have automated tests. Code Coverage must be 90+% for all groovy code. Mandatory
-
All GUI Text displayed must be looked up in the messages.properties bundle. This must be tested in unit tests where possible. Mandatory
Source Code Format
Since the source code is usually re-formatted on check-in (Intellij IDEA option), the source format is important. Using a consistent format helps identify the 'real' changes between versions. The standards we follow are:
-
All TAB characters must be converted to spaces. Mandatory
-
TAB widths must be set to 2 spaces or kept consistent within a single source file. Mandatory
-
Always use brackets for if/else statements. Mandatory
-
All messages.properties files must be encoded in UTF-8. Mandatory
-
Follow K&R bracket usage (Open bracket on if/for line). Suggested.
-
Use brackets for one line if statements. Suggested.
Value Typing
Groovy allows untyped fields/variables in your classes. This is great for internal uses. However, all APIs should use proper Java-style typing where possible. This means method parameters should not use def or Object when a real type is known.
Internal variables in methods can use the def syntax.
Class/Method Design (Fluid API)
There is a programming concept called 'Fluid API' that makes a lot of sense. This approach is needed when more than 2 values need to be passed to a method/class. After 2 values, the meaning of each value is not always obvious without a good IDE. For example:
new NumberField('lotSize', 12.3, 1.0, 45.0)In this example, it is not clear what each number is doing. To avoid this problem, the framework generally uses the Groovy map constructor approach:
new NumberField(name: 'lotSize',
                defaultValue: 12.3,
                minValue: 1.0,
                maxValue: 45.0)
This make it very clear what each number is and Groovy enforces basic types and naming with the default Map constructor.
Groovy generally creates this constructor for you, but you can create your own. When you need to define your own constructor, you can use this code to emulate the Groovy Map constructor logic:
NumberField(Map options) {
  // Copy all options to the right field.
  options?.each { k, v ->
    this[k as String] = v
  }
}
Current User
You will frequently need to log records with the user who performed some action. The obvious
solution is to add a User to the domain and just store a reference to the user in database.
This is simple, but it does have one big drawback: The referential integrity constraints
in the database makes it difficult to remove user records.
To increase database flexibility, we will use the user name itself for these types of logging actions. This also reduces the chance of accidentally exporting the user/password info in a generic JSON export. This is important for archiving since we don’t want to archive the user records or force re-creation of deleted user records when un-archiving.
An example domain record below will record the user name for a component that has been assembled:
class OrderComponent {
  . . .

  @Column(length = FieldSizes.MAX_CODE_LENGTH, nullable = false)
  String userName = SecurityUtils.currentUserName  (1)
Date dateTime| 1 | The user who is currently logged into the session for this request. |
This reduces the code since the default for the new component is the current user. No extra database access is needed.
In contrast, the logic needed to store a full reference to the User object would be slower and more complex.
ENUMs
The normal Java style enums can be used in your application.
These enums are displayed in the
standard GUIs as a drop-down list with the enums toStringLocalized(Locale) text as the displayed
value for each valid value.
Your enum should have these fields/methods to support storage in the database and display of human-readable values for each enum:
-
id- The database representation of this enum. Typically 1 character. (Required) -
toStringLocalized(Locale)- The display value for this enum. Optionally localized. Used by Jackson for JSON creation. If not implemented, then normaltoString()method will be used.
The localization can use any .properties file entry you like, but the standard approach is to use a naming convention like this (for a time interval enumeration):
reportTimeInterval.CUSTOM_RANGE.label=Custom Range
reportTimeInterval.LAST_24_HOURS.label=Last 24 Hours
reportTimeInterval.LAST_7_DAYS.label=Last 7 Days
reportTimeInterval.LAST_30_DAYS.label=Last 30 Days
reportTimeInterval.LAST_6_MONTHS.label=Last 6 Months
reportTimeInterval.LAST_MONTH.label=Last Month
reportTimeInterval.LAST_YEAR.label=Last Year
reportTimeInterval.THIS_MONTH.label=This Month
reportTimeInterval.THIS_YEAR.label=This Year
reportTimeInterval.TODAY.label=Today
reportTimeInterval.YESTERDAY.label=Yesterday
An example toStringLocalized(Locale) method looks like this:
public String toStringLocalized(Locale locale=null) {
  return GlobalUtils.lookup("reportTimeInterval.${name()}.label",locale)
}
When the enums list of valid values is shown in list (e.g. a drop-down list in a GUI), then the list of valid values is displayed in the default Java order. This is the order that the enum values are defined in the class. This means you should put the most common values first in your enum .groovy file.
Exceptions
When it is time to throw an exception, you have to decide what type of exception to throw. In most cases, it comes down to how important the message is when monitoring a live system. What exceptions should show up in the server log (main log or StackTrace.log)? The framework follows a simple rule: If an exception is a BusinessException , then it won’t show up in the log files. These type of exceptions are usually returned to the caller or displayed in the GUI.
This means most business logic should throw a BusinessException when the problem is not a system type problem. This means most errors that should be fixed by the caller will be BusinessExceptions.
More critical exceptions are thrown with the MessageBasedException . These exceptions are logged.
Error Codes
The BusinessException uses an error code to define specific errors. The error ranges are allocated to the modules as follows:
| Range | Use |
|---|---|
0-1999 |
Reserved codes for framework messages. Usually MessageBasedException’s. |
2000-9999 |
MES Application messages. |
10000-10999 |
Assembly module errors. |
11000-11999 |
Defect Tracking module. |
50000- |
Customization messages. |
Info/Warning Messages to Clients
In enterprise apps, it is quite common to display information and warning messages to the user. In an HTTP request/response world, it is difficult returning multiple messages from multiple levels in a method call hierarchy. We solve this by allowing your code to accumulate messages in a MessageHolder that is shared by all methods in the current thread. This is done using the ServerRequestContext.currentRequest to store the messages as a request attribute.
The controller will then use these messages in building its response.
The MessageHolder supports multiple messages with levels of severity. It also provides methods to store the messages in the current HTTP request as an attribute.
An example set of messages will look like this in JSON:
{
  "message": {
   "level": "warn",
   "text": "Order 'M1657334' is not enabled",
   "otherMessages": [
     "message": {
      "level": "info",
      "text": "Order 'M1657334' is marked urgent",
     }
   ]
  }
}
The standard clients will usually display all of the messages with proper styling (color/icon) in a standard message area (near the top of the page/panel).
Static Methods
Many utility classes in the framework are simple calculations that really do not need the full Micronaut bean support. Instead, we have built them with a simple static Singleton instance to access the utility method. See ControllerUtils for an example:
def (offset, max) = ControllerUtils.instance.calculateSortingForList(params)This singleton approach allows easier mocking of these methods without the overhead of making them full-fledged beans.
| A few of these utility methods may still use a true static method approach (no need for calling them via the .instance variable). These are done in frequently called areas (e.g. ArgumentUtils ). There are no plans to convert them to use the .instance approach. |
The general rule: if any method in the *Utils class needs to be mocked easily, then the whole class should use the .instance approach.
Multiple Return Values
| Philosophical Discussion Ahead! |
This is probably a tricky subject that almost everyone will disagree with :). In most complex programs, you will likely need to return multiple values from a method. The traditional Java approach to this is to create a new Java class (POJO) and populate its fields with the values. Java could also return a Map with the name/value pairs, but that is frowned upon by some in the Java programming world.
Groovy is much more flexible. It can return multiple values with multiple assignment, return a Map with the proper elements or return a simple Groovy class (POGO) with the right fields. Each of these has different pros and cons.
Guideline for Multiple Returns
Based on the pros and cons below, the framework will generally use the POGO as a return value. This follows the Micronaut Controller/Command class pattern. The main drawback is the extra files and classes to manage.
One common exception is utility classes that return two or three values. This is somewhat common in the places like ControllerUtils that determine sorting directions.
In these cases, we use the Groovy Tuple2 return value for simple two-value cases. Like Map, this should be limited to internal logic that is not frequently used. The Tuple2 method must be specified with valid types (Tuple2<Integer, Integer> below) :
def Tuple2<Integer, Integer> calculateOverallStatus() {
  ...
  return [200, 404]
}

def (code, fallback) = calculateOverallStatus()
 . . .
Multiple Return Values - Pros/Cons
This uses a List to return the multiple values and assign them to the variables in order:
// Not Allowed
def calculateOverallStatus() {
  ...
  return [200, 'OK']
}

def (int code, String text) = calculateOverallStatus()
if (code!=200) {
  throw new IllegalArgumentException()...
}
This looks concise, but it is somewhat fragile. If the order of the return values changes, then this code can break and will only be detected at runtime.
Map for Return Values - Pros/Cons
This uses a generic Map for the values returned:
def calculateOverallStatus() {
  ...
  return [code: 200, text:'OK']
}

def status = service.calculateOverallStatus()
if (status.code!=200) {
  throw new IllegalArgumentException()...
}
This is somewhat less robust than the POGO approach, but due to Groovy’s dynamic nature, it is only caught at runtime. This avoids the extra classes and the actual code that uses the value is almost the same as the POGO approach and no compile time checks are lost.
We rarely use this approach.
POGO Class as Return Value - Pros/Cons
This creates a specific POGO that defines the fields returned:
class OverallStatus {
  int code
  String text
}

def calculateOverallStatus() {
  ...
  return new OverallStatus(code: 200, text:'OK')
}

def status = service.calculateOverallStatus()
if (status.code!=200) {
  throw new IllegalArgumentException()...
}
This is pretty robust, but the extra classes this creates adds to the size of the project in the programmer’s head. We’ve all seen Javadocs with hundreds of POJOs for return and argument classes.
Most good IDEs will flag invalid assignments such as assigning a string to code above.
IDEs can also use the type information to help a lot with code completion.
One other benefit of this approach: The JSON rendering/parsing provided by JSONFactory can handle this reasonable well.
Groovy Features to Use or Avoid
Groovy is sometimes called 'a better Java'. It has a lot of features that we use to enhance clarity. It does have some features that we avoid because they are not very clear:
-
Method pointers (e.g. &methodName).
-
Operator overloading.
-
The optional return keyword. We always use an explicit return for clarity.
-
The with statement.
There are also many features we try to use because they enhance clarity:
-
Automatic getters/setters.
-
Untyped variables (use of def).
-
Null-safe dereferences (object?.method()?.value).
-
Default operator ?: (Elvis operator).
-
List/Map syntax, including add to list <<.
-
Simple loops (for value in list {…}).
-
String index with special case values (s[5..-1] to get from character 5 to end of string).
-
Apply method to all elements on a list ( list*.method()* )
-
GStrings ("Order: ${order}").
These are just a few of the useful features that make things clear in Groovy. There is an excellent series of blog posts Groovy Goodness that covers many of the features of Groovy.
ASCIIDoctor Standards
The ASCIIDoctor library is the source for documents such as this Guide. It has a few quirks that you need to be aware of when creating .adoc files.
Image Widths
The image tag has a width option. You should not use a percentage since the PDF images will
will interpret this as pixels, not percent. This will make a very small image.
image::guis/DashboardWorkList.png[Dashboard - Work List,align="center",width="600"] (1)| 1 | The width should be in pixels. 600 is typically a good value for 60% of the width. |
Internationalization
Default Labels Specific Label and Tooltip Handling Internationalization Naming Conventions Internationalized Database Values
Internationalization is a critical part of most enterprise applications. Almost all text displayed to the user should internationalized. The framework provides mechanisms in most markers to support this. Most of this support relies on naming conventions for default labels.
See the Domains section for additional messages.properties notes.
Default Labels
Most markers use a default label for most fields. This means you won’t need to specify the label in your HTML pages. It just requires an entry in your messages.properties file. For example, the [efDefinitionList] marker will use the field’s name to generate the list column header. For example, if you display a field order in your list, then the label for the header will be taken from the messages.properties file:
order.label=OrderIf this entry is not in the messages.properties file, then the text order.label will be used.
Specific Label and Tooltip Handling
Labels and tooltips are usually automatically determined by the framework for most common scenarios. Some cases require your application to specify a custom label/tooltip. For example, adding buttons to a standard list.
To simplify this, the framework follows a standard way to specify the label and tooltip with one entry.
<ef:list controller="Order" columns="order,product,qtyToBuild"
         releaseButtonLabel="release.label"   (1)
releaseButtonHandler="releaseRow"/>| 1 | The label "release.label" and the tooltip "release.tooltip" will be used (if defined in bundle). |
| This is not yet supported consistently in all markers. The markers that support this approach will be noted in the reference guide. |
This standard labelling logic is provided by
GlobalUtils
method lookupLabelAndTooltip().
If a given label is not found in the messages.properties file, then the lookup key is used instead.
Internationalization Naming Conventions
The messages.properties file follows specific naming conventions that makes it easier to internationalize your application. Some of the most common patterns are shown below:
create.title=Create {0} - {1}
customNotAllowed.message=Custom fields not allowed on the {0} domain class.
default.create.tooltip=Create a new record
fieldFormat.DATE_TIME.label=Date/Time
order.label=Order

# Error messages
error.103.message=Error creating directory {0}
Many of these use replaceable parameters (e.g. {0}) to make it clear what the user is working on.
Internationalized Database Values
As a general rule, a label stored in the database (e.g. for custom field extensions) can be localized. The system will attempt to localize the value, but if it is not found in the messages.properties file(s), it will be displayed as-is. This allows you to use some non-localized text (e.g. 'Details') or some localized text (e.g. 'details.label').
Application.main()
Micronaut requires an Application class that has a main() method to start the application
server. This enterprise framework has some logic that must be executed before the
Micronaut.run() method is called.
For example, the framework stores all date/times in the database with the UTC timezone.
This is done in your Application.main() using the
StartupHandler
:
@CompileStatic
class Application {
  static void main(String[] args) {
    StartupHandler.preStart()  (1)
    def applicationContext = Micronaut.run(. . .)  (2)
     . . .
  }
}| 1 | The preStart logic is run. This includes setting the default timezone for the JVM to UTC. |
| 2 | The normal Micronaut startup is executed. |
This preStartup method is also called in the setup logic for the BaseSpecification class.
See Dates and Timezones for details on how timezones are handled.
Domain, Controller or Service?
This section describes the standard approach to breaking up your application logic between domains, controllers and services within an enterprise application. This framework doesn’t force you to use a specific approach, but many of the features will be much easier to use if you follow these guidelines.
The basic responsibilities are:
-
Domain - Persistence and integrity within the domain and its children.
-
Controller - API Access from external callers and internal web pages.
-
Service - Business logic and database transaction control.
The basic interaction between the 3 main classes is shown below for the two most common scenarios:
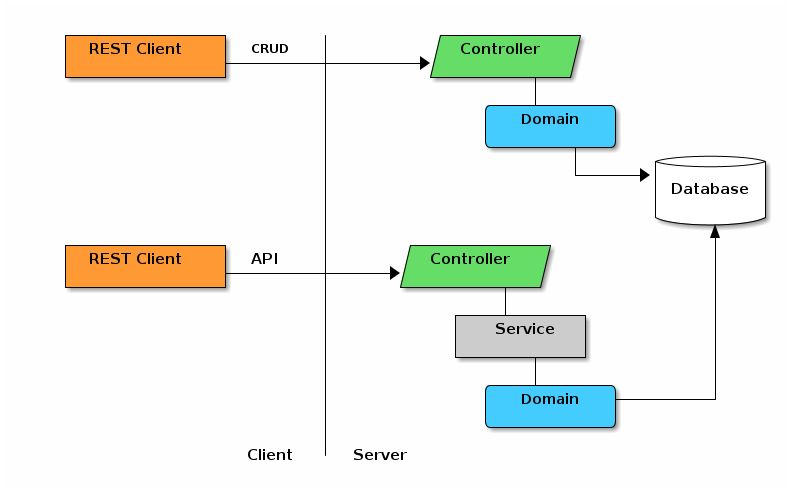
The CRUD (Create, Read, Update and Delete) actions of domain objects does not involve services. Micronaut Data with some helpers from this enterprise framework provides a good implementation of these functions. This framework adds some glue to make the pieces work better together.
When you have non-CRUD requests, there is usually some business logic and transaction control needed. In many scenarios, multiple top-level domains are used by the business logic. For these reasons, we typically put this business logic into a service. This service is accessed by the client through the controller to enforce security. This service then typically works with one or more domain classes which update the database, usually in a single database transaction.
See Controllers for an example of how the framework makes these actions simpler.
What about Domain Validation?
Validation within a domain object and its children is generally handled by the domain class. This is done to always ensure data integrity of all domain objects. If the validation spans multiple top-level domains, then we generally handle this in a service. One domain should not know very much about the details of another top-level domain.
Field Definitions
This framework operates on a centralized field definition for the domain objects. This includes defining the core fields and custom fields for that domain. This framework allows these features:
-
Use of core/custom fields in standard definition GUIs.
-
Binding of these fields to complex domain objects, including child records.
-
Saving/retrieving values from storage (e.g. from text files for archive purposes).
-
JSON access from REST clients.
The basic object structures for these field definitions looks like this:
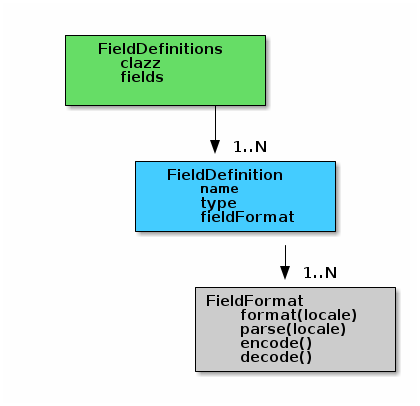
The FieldDefinitions contains the fields for a given object. These are cached in the groovy meta class for the object. In this FieldDefinitions is a list of FieldDefinition objects which have specific names, types and a FieldFormatEnum element that controls how the value is convert to/from strings for internal and for GUI use.
These field definitions are accessed like this:
def fields = DomainUtils.getFields(Order)

for (fieldDef in fieldDefs) {     (1)
   . . .
}| 1 | Access all fields with a simple loop (non-closure). Also supports the .each() {} operator. |
GUI Guidelines
Modern browser-based GUIs can be very complex. This enterprise framework gives you the tools to make a consistent user experience with common behaviors throughout your application. You will need to follow some simple guidelines to keep things consistent and easy for development.
Standard Header
Most GUIs needs some standard Javascript, CSS and assets to work correctly. To make this simpler, all of your pages should include the standard header:
<#--@formatter:off-->  (1)
<#assign title><@efTitle type='list'/></#assign>  (2)

<#include "../includes/header.ftl" />  (3)
<#include "../includes/definition.ftl" />

<@efDefinitionList/>
<@efPreloadMessages codes="cancel.label"/>

<#include "../includes/footer.ftl" /> (4)| 1 | For Intellij, we recommend you turn off formatting in .ftl files. The IDE formatting will really mess up your file. |
| 2 | The title is defined by your page, with use of the [efTitle] marker. |
| 3 | The standard header. Brings in the assets for the framework and the [GUI Toolkit]. |
| 4 | A standard footer (no visible content). |
| This standard header (header.ftl) also includes any Assets Provided by Additions. This is done with the [efAddition] marker with the 'assets' option. |
Message Display
Most GUIs need to display messages at some time. We have standardized on showing most error/info messages at the top of the page. Most messages will be shown by framework logic in this standard messages DIV created by the standard header.ftl:
<@efMessages/>The standard header.ftl above uses the [efMessages] marker to create the standard <div> marker
to position the messages at the top of the page.
For example, server-side errors found by the javascript Ajax function ef.get are usually displayed in this standard area with a red highlight:

The standard message area (id='messages') is created by the header.ftl and is located under the standard header/toolbar.
The server-side code can store these messages using the StandardModelAndView :
@Controller("/status")
class StatusController {

  @Get("/display")
  StandardModelAndView show(HttpRequest request,Principal principal) {    (1)
    def modelAndView = new StandardModelAndView('status/show', principal, this)
    def messages = new MessageHolder(text: 'a bad message', code: 103)    (2)
    modelAndView[StandardModelAndView.MESSAGES] = messages  (3)
    return
  }

}| 1 | The show method returns a StandardModelAndView, which Freemarker will use to render the page. |
| 2 | An error message is created for the display. |
| 3 | The message holder is stored in the model for the view, under the key '_messages'. |
These messages will be displayed by the [efMessages] marker in the Standard Header.
| Dialogs can also be configured to display messages if needed. See displayDialog for details. |
Message Access from .ftl Files
The standard Message Display logic relies on the messages being stored in a common place in the Freemarker data model. The messages are accessible like this:
${messageHolder.text} (1)| 1 | Displays the primary message. See MessageHolder for details on methods available. |
Setup
Enterprise applications frequently need extensive setup. To make this simpler for your customers, the framework provides some utilities to make setup easier.
For security setup, see Security.
Initial Data Load
Domain Method initialDataLoad initialDataLoadBefore and initialDataLoadAfter Loading from Non-Domains Initial Data Loading and Tests
Initial data loading is one of the common setup needs for large applications. These applications usually have a number of status codes or numbering sequences that need some sort of initial values. If you don’t have some reasonable defaults, then your first-time customers may spend hours trying to configure your product. This will discourage most normal customers.
Domain Method initialDataLoad
To trigger the initial data load on startup, you will need to add a method to your domain class. This method will be executed on application startup. The method should check for the existence of the record before attempting to create it. You should also minimize the logic to reduce startup time. Don’t add extensive or slow logic if you can avoid it.
An example is shown below:
static initialDataRecords = ['User': ['admin']]

static Map<String,List<String>> initialDataLoad() {
  if (!findByUserName('admin')) {  (1)
    def adminUser = new User(userName: 'admin', password: '****', title: 'Admin User').save()
    log.debug('Created initial admin user {}', adminUser)
  }

  return initialDataRecords  (2)
}| 1 | Create the admin user, only if it does not exist already. |
| 2 | Always return the records that are provided by the initial data load process, even if they already exist. This lets you specify which records to leave in the database after a test is run. This helps with the issue of Test Data Pollution. The format of these strings is important. These strings should match the format of the toShortString() on the domain record. See Initial Data Loading and Tests for more details on the format of these Lists of Strings. |
Keep this initialDataLoad() method simple. Any errors could affect startup, which will frustrate your users.
If you want to avoid this problem, then you can write code to handle exceptions and allow the startup. In most
cases, this would not be wise. Your application may not run properly without these records.
Most applications will allow the users to modify the defaults using normal GUIs or APIs. It is important that your
initialDataLoad() method never alter existing records. If the user deletes your records, then the record(s) will
probably be re-created on the next application startup.
|
If you need to load data for domains that are in a module (e.g. new User Roles for the module), then look at Loading from Non-Domains.
initialDataLoadBefore and initialDataLoadAfter
The order these initial data records are loaded is sometimes important. Validation of references to other records can fail if the records are loaded in the wrong order. To solve simple precedence problems, we support simple 'load after' and 'load before' features.
These 'load after' and 'load before' are defined in the domain that needs the precedence. These are lists that define which other domains should be loaded before or after the domain. The list can contain full class names (including packages) or the Class object itself.
Below are two examples of their use:
@MappedEntity
class User {
  static initialDataLoadAfter = [Role]  (1)
  . . .
}| 1 | The User domain’s initial data should be loaded after the Role domain. |
static initialDataLoadBefore = ['org.simplemes.eframe.security.domain.User']@MappedEntity
class Role {
static initialDataLoadBefore = [User] (1)
. . .
}| 1 | The Role domain’s initial data should be loaded before the User domain. |
| If the 'before' and 'after' lists are both specified in one domain, then the before takes precedence. You should use only one for clarity. |
Loading from Non-Domains
Sometimes, a module will need to add records to a core module’s database. This is common with user Roles. To avoid creating dummy domain classes for this, we suggest you use a feature for Addition. See Initial Data Loaders and Additions for details.
Initial Data Loading and Tests
Functional tests that use the embedded test server will use an in-memory database. This database is active for the entire test suite, so each test needs to clean up it test data as described in Test Data Pollution.
The problem is with the data loaded by initial data loaders. This data should be left alone since later tests may need it.
For example, a module adds some roles to the database for its security checks. We don’t want those records to be considered Test Data Pollution. This would cause every test to fail. We want those records left in the database after every test.
To avoid this, your initial data load method should return a list of values that will be ignored by the test data pollution check.
static initialDataRecords = ['User': ['admin']] (1)

static Map<String,List<String>> initialDataLoad() {
  if (!findByUserName('admin')) {  (2)
    def adminUser = new User(userName: 'admin', password: '****', title: 'Admin User').save()
    log.debug('Created initial admin user {}', adminUser)
  }

  return initialDataRecords  (3)
}| 1 | The static list of records created for the 'User' object. The strings here (e.g. 'admin')
will be the record’s TypeUtils.toShortString(record). This should be safe for most
scenarios used in tests. The Map key is the domain class’s simpleName (e.g. 'User' above). |
| 2 | Create the admin user, only if it does not exist already. |
| 3 | Always return the records that are provided by the initial data load process, even if they already exist. These values returned will be ignored when checking for Test Data Pollution. |
This example will create a record for the admin user. The returned map is used by BaseSpecification to know which records to ignore for each domain class.
Security
Security is critical in enterprise applications. This framework depends on Micronaut Security - JWT Cookies for the bulk of the security features.
If you need to know the current user, see Current User.
Security Design
This enterprise framework needs to support a few key configurable scenarios:
-
User browser session timeout of short duration (e.g 30 minutes or less).
-
Longer user browser session timeout (14+ days).
-
JWT support for security on the API calls.
To support all of these cases, we chose to use JWT (Json Web Tokens) via browser cookies. This allows a short JWT lifetime, with a long (configurable) automatic refresh mechanism for browser-based clients.
One other important point: Most requests should be authenticated with a stateless mechanism. This means the JWT is used to authenticate most requests since it does not use the DB or a session state to authenticate the request. Instead, it simply checks for validity.
Once the JWT expires (e.g. after 15 minutes), the token refresh is triggered that checks for a valid refresh token (in the DB) from the original login. It also checks the User record in the DB for the user’s status.
Token Timeouts
With this approach, the timeouts for the JWT and JWT_REFRESH_TOKEN are important. If the values are too small or too large, then performance may suffer or your exposure to security lapses may be too large.
See Security Setup for details on setting these timeouts.
Refresh Token Flow
| This section assumes the access token timeout is set to the default 15 minutes and the refresh token timeout is set to the default 24 hours. These numbers will used below without noting that they are the configurable values. See Security Setup for example settings. |
The basic refresh flow is:
-
Successful login sends access token (JWT) and refresh token (JWT_REFRESH_TOKEN) cookies (15min and 24 hours).
-
All requests are checked for expired JWT. If the JWT is expired, then the auto refresh of the token is attempted. The response will include the new JWT.
-
If any of these refreshes fail, then the user will be forced to login at the next user request to the sever (e.g. on the nest page load or save).
The browser client-side logic requires no changes. The normal browser cookie handling logic should cover mode cases.
Any non-browser clients can request a refresh using a process similar to OAuth /oauth/access_token Endpoint Use mechanism.
Refresh Token Details
Internally, the logic is a little more complex. There are two Micronaut beans involved in this:
-
AutoRefreshAuthenticationFetcher This detects the expired JWT and triggers an auto token refresh for the request. This class stores the new cookies in a request attribute for use by the other object.
-
AutoRefreshTokenFilter This gets the cookies from the request and puts them in the response.
These two beans, along with the RefreshTokenService will only allow the refresh token to be used a limited number of times. If used too many times, then the existing refresh tokens for the user will be disabled and force a new login.
OAuth /oauth/access_token Endpoint Use
This endpoint is intentionally broken. The replacement /login/access_token provides a limited-use replacement refresh token cookie when used. The RefreshTokenService.getUserDetails() RefreshTokenPersistence implementation intentionally prevents use of the tokens via the OAuth /oauth/access_token endpoint.
Security Setup
Setting up security is not too tedious. By default, a single user admin is created with all roles available. The password defaults to admin and must be changed on the first login.
This admin user can be deleted, but should only be deleted after another user record is created. This user will be created on startup if there are no users in the database. You should make sure there is at least one user with the ADMIN role in the system.
application.yml
Your application’s application.yml needs a few entries for security to work as expected:
micronaut:
  application:
    name: ???
  session:
    http:
      cookiePath: /
  security:
    authentication: cookie
    enabled: true
    endpoints:
      login:
        enabled: true
      logout:
        enabled: true
    reject-not-found: false
    redirect:
      forbidden:
        enabled: true
        url: /login/auth
      prior-to-login: true
      unauthorized:
        enabled: true
        url: /login/auth
    token:
      jwt:
        enabled: true
        bearer:
          enabled: false
        cookie:
          enabled: true
          loginFailureTargetUrl: /login/auth?failed=true
          cookie-same-site: 'Lax'
        signatures:
          secret:
            generator:
              secret: ${EFRAME_KEY}  (1)
        generator:
          access-token.expiration: 1800  # 30 minutes  (2)
          refresh-token:
            enabled: true
            base64: true
            secret: ${EFRAME_KEY}
      refresh:
        cookie:
          cookie-path: '/'
          cookie-max-age: '30d'  (3)
          cookie-same-site: 'Lax'
    interceptUrlMap:
      - pattern: /assets/**
        httpMethod: GET
        access:
          - isAnonymous()
      - pattern: /favicon.ico
        httpMethod: GET
        access:
          - isAnonymous()
  server.netty.logLevel: DEBUG
  server.thread-selection: AUTO
  metrics:
    enabled: true
    export:
      prometheus:
        enabled: true
        step: PT1M
        descriptions: false
---
endpoints:
  prometheus:
    sensitive: false

---
eframe:
  security:
jwtRefreshUseMax: 100 (4)| 1 | This value comes from the environment variable 'EFRAME_KEY'. The JWT encryption provider requires a 256 bit or longer key (32+ characters). See Micronaut Configuration for more details. |
| 2 | The access token timeout. Suggest value between 15-30 minutes. Too small, and the token refresh mechanism will be invoked too often. Too large and the JWT token will be valid for too long. This means disabling a user account will not take effect until the JWT token has expired. See Security Design for details on these trade-offs. |
| 3 | The expiration time for the refresh token (seconds). Defaults to 30 days ('30d'). |
| 4 | The number of times a refresh token can be used by the user. (Default: 100). Set this to 1 for strictest security. 1 means that each refresh token can only be used once. This might be useful in detecting IP address forgery in your network. This will generate more REFRESH_TOKEN database records, but they are cleaned up after they have reached their expiration date. |
This configures JWT Security to force all controller requests to be authenticated. It also allows access to some pages/assets without a login. (See Roles below for details).
Security Setup for Controllers
By default all controller methods must be secured. See Controller Security for details.
Important Security Options
access-token-expiration (micronaut.security…)
Suggested value: 1800 (30 minutes).
This setting defines the number of seconds for the JWT token will live after it is created. This means that any request with this token during that lifetime will be allowed. There will be no check for the User’s status or for any other validations.
Making this value larger than 30 minutes means your exposure to security lapses will last 30+ minutes. If someone compromises your network and gets the JWT token, they can make requests on the system. If your JWT tokens expire quickly, then the exposure is short.
Making this value less than 5 minutes will force too many expensive refresh requests that access the database.
| If your network or devices are badly compromised, then there is little that the framework can do to prevent issues. We can detect certain issues such as two users using the same refresh token. |
micronaut.security.token.refresh.cookie.cookie-max-age
micronaut.security.token.refresh.cookie.cookie-max-age': '10m'
refresh: cookie: cookie-path: '/' cookie-max-age: '13m' cookie-same-site: 'Lax'
Suggested value: 1-14 days. Defaults to 20days.
This age defines how long a refresh token can be used. This is similar to the traditional session timeout used by older web applications. This is the time when the framework will force the user to login again.
Every time a JWT token expires, the refresh mechanism will usually be triggered. This refresh checks the database for the token. It must be enabled, un-expired and never used before. The User’s setting in the database is also checked.
Setting this value too large means the refresh token can be used a long time. If the refresh token is leaked, then it can be used to provide access to the system for longer period of time.
This is mitigated by the fact that the token can only be used once. The second attempt to use the refresh token will disable all tokens for the user. This will force the user to re-authenticate by logging in again. A message is logged indicating a re-use was attempted.
Setting this value too small means your users will have to login more frequently. There is no real downside to this beyond user expectations.
Roles
The roles created automatically by the framework form the basis for your application’s roles. These roles are the ones used by the framework setup and administration pages and are required for most actions. If these roles are deleted from the database, then they will be re-created on the next startup.
The roles provided by the framework are:
-
ADMIN - General Administration actions.
-
CUSTOMIZER -Views/Updates non-GUI customization features.
-
DESIGNER - Views/Updates framework display features (e.g. List columns, Custom Definition features, etc).
-
MANAGER - Views/Updates most framework manager features (User Definition).
| Each roles do not have built-in hierarchy. For example, the ADMIN role does not automatically give MANAGER roles. See the |
Some of the pages available to each role is shown below (not an full list):
(No Role or Anonymous)
-
Login Pages.
-
Overall System Status Pages.
-
Assets (images, javascript, etc).
ADMIN
-
Clear Statistics action on Overall System Status Pages.
MANAGER
Users with this role manage day-to-day operations of the system.
-
User Definition (Create new User, reset password, assign role (permission), etc)
CUSTOMIZER
Users with this role create non-GUI extensions to the system. These include new fields and logic that can have far-reaching impact on performance, behavior and data integrity.
-
Field Extension Definition
-
Flex Type creations
DESIGNER
Users with this role can make GUI-level changes to the system. This generally has a smaller impact on the system, but still has the potential to impact large number of users but not as big an impact on data integrity.
-
Configure Default list layout
-
Configure Custom GUI features (e.g. dashboards, definition GUIs, etc).
-
Define named list definitions for other users
Combines Role Lists
Frequently, you will want to specify a controller is accessible for multiple roles. For example, you might want to allow ADMIN and MANAGER roles. To make this simpler, some combine role arrays are defined in the Roles class:
@Secured(Roles.MANAGER_AND_MANAGER)
@Controller("/somePath")
class SomeController extends BaseCrudRestController {

  . . .

}
Security GUIs
The framework comes with basic GUIs for creating/maintaining users and roles. It also provides standard login/logout mechanisms. The login page is automatically displayed by the Micronaut Security module. The logout action is added to all GUIs in your by code in the views/includes/header.ftl include file.
<#assign title>Home Title</#assign> (1)

<#include "../includes/header.ftl" /> (2)

 . . .

<#include "../includes/footer.ftl" />| 1 | Sets the title for the header to use. |
| 2 | Starts the HTML page, including <head> and <body> blocks. |
This adds a form that submits the logout request with the POST method. The logout link is only shown if a user is currently logged in.
This POST/Form mechanism is needed for the default configuration for the security module.
Domains
General Micronaut Data Domain Entities Reserved Domain Names Domain Requirements Duplicate Data (Sub-Classes)
Fields Field Types Field Names Reserved Field Names Key Fields Unlimited Length String Fields Field Ordering Supported Annotations
Persistence Repository Requirements Event Methods Transactions Initial Data Load Locking SQL Database Definition
Relationships/Encoding Relationships Encoded Types Choice List Dates and Timezones Configurable Types
Domain Introduction
Your domain classes have a few requirements to be easily used by various pieces of the framework. Your domain classes should be in proper packages, but that is not required. See Domain Testing for details on testing.
Micronaut Data
The Micronaut Data persistence module is used by this framework to help you persist your data. We use the Micronaut Data JDBC approach to avoid bringing in Hibernate or too many JPA modules.
Why Micronaut Data? Simply, the GORM/Hibernate approach is very complex and brings in many dependencies. The most important problems include:
-
Sessions - Hibernate sessions are needed to access the database. Micronaut/Jackson tends to access the fields/proxies in other threads, outside of sessions. This triggers the common 'no session for current thread' exceptions. This problem forced us to add many work-arounds to add sessions to many locations.
-
Interceptor Issues - GORM/Hibernate supports a save interceptor. The problem is that it was not very reliable.
-
Session Cache - The session cache is awesome and painful. Just search the web for "why I hate Hibernate". We don’t hate hibernate, but the session cache can easily get out of synch with reality. That causes data corruption issues or bewildering exceptions. NonUniqueObjectException, DuplicateKeyException and HibernateSystemException are just a few of the hard-to-debug issues.
-
Unsaved Data - Hibernate has a great feature that skips updates if no columns are changed. This causes problems when the changes are made that Hibernate is not aware of. This forced us to change fields, just to trigger the update and the event interceptor.
Because of these fragility issues, we decided to move closer to JDBC/SQL by using Micronaut Data.
This means we had to add some usability features (e.g. save() methods on @DomainEntity, etc).
But, the odd and bewildering exceptions for Hibernate are gone.
We found that very few of the Hibernate features were very important. This includes:
-
Lazy Loading or Proxying of Associations - Important, but we added work-arounds for the key cases (Simple Foreign Reference and Parent/Child Relationships (One-To-Many).
-
Optimistic Locking - We implemented a work-around for this too.
The features we did not really need include:
-
Dirty Checking - Not important for most application scenarios.
-
Persistence Contexts / Sessions - More of a problem than a feature.
-
First Level Caching - Useful, but not as critical as originally thought. This lack makes the application code a little more complex to pass around the values.
-
Second Level Caching - Only used in a few places, so we decided to implement in those places specifically (e.g. UserPreference).
The drawbacks for Hibernate out-weighed the benefits, so we migrated to a simpler solution.
Domain Entities
You define domain entities using annotations from Micronaut Data and this enterprise framework. These annotations, along with repositories (see Repository Requirements), provide a simplified API on the domain to process domain records. It adds methods such as:
-
save()
-
delete()
-
withTransaction()
-
Lazy loaders for Simple Foreign Reference and Parent/Child Relationships (One-To-Many)
-
Access to all repository interface methods (e.g. list(), findBy…() and others))
Do not call the repository save(), update() or delete() methods directly. There
are a number of features such as Searching that will not work when the repository methods
are called directly. You should use the convenience methods on the domain.
|
A short example is shown below:
@MappedEntity
@DomainEntity
class Order {
  String order
  Product product
  @Id @AutoPopulated UUID uuid  (1)
}

interface OrderRepository extends BaseRepository, CrudRepository<Order, UUID> {
  Optional<Order> findByOrder(String order)  (2)
  Optional<Order> findByUuid(UUID uuid)
  List<Order> list()
}| 1 | Required for all domains. |
| 2 | Exposed in the domain as Order.findByOrder(). |
Reserved Domain Names
This framework has features that slightly restrict the name of the domain classes you can created. This is mainly because of the way [Markers and Models] work. A few names are used to store elements in the marker model (a Map). You should avoid the names used by the [StandardModelAndView].
Domain Requirements
There are a few requirements needed to implement domains in this framework:
-
A UUID identifier with the name 'uuid'. DB column type is uuid.
-
A version field (integer) for optimistic Locking.
-
See Repository Requirements for more requirements on the domain’s repository.
Duplicate Data (Sub-Classes)
Sometimes, you have common features that have the same fields in two or more related domains. Normally, you could use inheritance to define a common base class with the common fields. This would reduce the duplicate code to define the fields in multiple places. The enterprise framework could use this with the common fields used by the FlexField and FieldExtension .
Micronaut-data currently does not really support use of sub-classes as domain classes. This means you will have to duplicate the fields in both domains.
This duplication is not as bad as it seems. Domains are usually simple data objects with no real behavior. Any common logic should be placed in a common service that can act on the related domains. You should use a normal interface to define the getters/setters for the common fields. This will let the service work with all of the related domains.
This also has one other side-effect: the domains will be stored in separate tables. This could be avoided with some annotations, if needed.
Field Names
Almost every piece of text displayed in a web-based GUI should be translatable to the user’s language. Since most of the fields in your domain classes will be displayed somewhere, the framework uses some labelling conventions to reduce the boiler-plate code in your application.
Most of the GUI markers will determine the right label needed for a domain field based on the field’s name. For example, if you want to display a list of orders, you would use the [efDefinitionList] marker in your pages like this:
<@efDefinitionList columns="order,product,status,qtyToBuild"/>The messages.properties file for you application would include these entries:
order.label=Order
orders.label=Orders
product.label=Product
status.label=Status
qtyToBuild.label=Quantity To Build
Note the use of the plural form of "Order" that is used for fields that show multiples (e.g. for the list’s message '1 to 8 of 200 Orders'). Most fields will not use a plural, but they are used frequently for the top-level domain elements in GUI lists.
If you have not defined the entry in the messages.properties file, then the framework will show the key ('order.label', etc).
Reserved Field Names
Micronaut Data and this framework use several domain field names for internal use and your domains must have them:
| Field Name | Description |
|---|---|
uuid |
The internal database UUID field. |
version |
The version of the record in the DB. Used for optimistic locking. Automatically maintained by the framework. |
Key Fields
All domain objects in most enterprise applications need some sort of key field definitions. These are the specific key(s) needed to find and uniquely identify the object. A common example is an order object. It will have a unique order name (ID) that customers will reference when creating or working with the order.
A number of the framework features rely on this key field definition to make your application coding simpler. For example, the [efDefinitionList] marker relies on the key field to implement the standard filter/search feature and the hyper-links in lists.
Identifying Key Fields in Your Domain Classes
In all domains, you usually have one or more key fields.
This framework uses the Field Ordering mechanism and optional keys definitions to flag the right
key fields. For example, a work center domain might look like this:
class WorkCenter {
  String workCenter
  String title

  static fieldOrder = ['workCenter', 'title']
}
In this case, the key field is assumed to be the workCenter field.
Sometimes, your fieldOrder list does not start with the key field, or you have two key fields.
This can be done with the keys static field:
class Order {
  String order
  Customer customer
  BigDecimal qtyToBuild = 1.0

  static fieldOrder = ['customer', 'order', 'qtyToBuild', 'status']

  static keys = ['order']  (1)
}| 1 | The keys values are used to find the key field. |
Primary Key Field
Many of this module’s features require a single primary key field to reduce boiler-plate code. For example, the @JSONByKey mechanism uses the primary key field to find other domain objects when creating a foreign reference. This is much simpler when you have a single key field.
To find this primary key field, the framework assumes the first key field is the primary key field.
If you have domains with multiple key fields, then you should avoid using features like @JSONByKey. You will most likely get a domain record not found if you try to de-serialize using @JSONByKey with multiple key fields.
Unlimited Length String Fields
Sometimes, you need an unlimited length text field in your domains. To do this, you will need to specify the column type for the DB:
  @Column(nullable = true)
  @MappedProperty(type = DataType.STRING, definition = 'TEXT')
  String preferencesText
Field Ordering
Frequently, the framework features will need to list or display your domain fields in a logical order.
Framework markers such as [efShow] will show the fields in any order you like, but you would have to
update the <@efShow/> marker for every new field added to the domain class.
To simplify this maintenance task, the framework supports an optional
fieldOrder
static variable in domain classes.
| Philosophical Discussion Ahead! |
Field ordering is not traditionally part of a domain class’s definition. Following the 'Don’t Repeat Yourself' philosophy, a central place to store the field ordering 'hints' is needed. We chose the domain class. This is optional. If you don’t want to embed field ordering in your domain classes, then you can specify the field ordering on the respective efShow markers in your HTML files. This means updating 3 files whenever you add a new field to a domain class. This is your choice.
See fieldOrder for more details.
clientDefaults
To make life easier for the end users, we provide several mechanisms for default values. The simplest is the default value in the domain fields (e.g. String title="ABC"). This works well for most cases, but fails for some client-side use cases. In particular, the adding of new rows in inline grids on the client requires some special client-side processing.
To support this client-side default mechanism, you can add a static property to your domain to provide the default values. For example, the fields for Flex Types uses as sequence default to reduce the user input on the client. This is defined in the FlexField using this definition:
class FlexField {
  BasicFieldFormat fieldFormat = StringFieldFormat.instance  (1)
  HistoryTracking historyTracking = HistoryTracking.NONE

  static clientDefaults = [sequence:  "_max('sequence')+10",  (2)
                           fieldName: "'field'+(_max('sequence')+10)"] (3)
}| 1 | Normal server-side default value for two enum fields. |
| 2 | Uses the current max 'sequence' from the inline grid rows and adds 10. |
| 3 | Creates a string fieldName using like 'field20'. |
The _max() method is defined for the inline grid client-side element. The default
string is javascript than is executed on the client when the user clicks the 'Add'
row button.
| The clientDefaults will override the normal field default values when both are defined for the domain class. |
Supported Annotations
There are many annotations that the enterprise framework has been tested with Micronaut Data. This includes:
| Annotation | Source | Description |
|---|---|---|
@MappedEntity |
Micronaut |
Defines a domain object. |
@Transactional |
JPA/Jakarta |
Specifies a method (or all methods) are transactional. |
@Column |
JPA/Jakarta |
Defines the column name, length and nullable flag (nullable default: true). Note: If this is used with @Nullable, then the @Column setting takes precedence. |
@Nullable |
Java |
Marks a field as nullable. @Column is a better choice. |
@ManyToMany |
JPA/Jakarta |
Defines a link between two domains in a many-to-many relationship. Uses a join table. |
@ManyToOne |
JPA/Jakarta |
Defines the child side of a Parent/Child Relationships (One-To-Many). |
@OneToMany |
JPA/Jakarta |
Defines the parent side of a Parent/Child Relationships (One-To-Many). |
@Join |
Micronaut |
Defines the join logic for a query. Suggested to only use on required foreign reference fields. |
@ID |
Micronaut |
Marks a field as the ID field. Only UUID is supported. |
@GeneratedValue |
Micronaut |
Marks the field as auto-generated by the Micronaut Data layer. |
@DateCreated |
Micronaut |
Defines the date/time the record was created. |
@DateUpdated |
Micronaut |
Defines the date/time the record was last updated. |
@MappedProperty |
Micronaut |
Specifies the SQL type for the column. |
Repository Requirements
A repository is a Micronaut Data mechanism to access your data. These repositories follow a number common patterns such as extending specific interfaces and implementing specific methods. Most methods in the repository are automatically added to your domain class, so you rarely need to use the repository directly.
Base interfaces include:
-
BaseRepository
-
CrudRepository<Domain, UUID>
Do not call the repository save(), update() or delete() methods directly. There
are a number of features such as Searching that will not work when the repository methods
are called directly. You should use the convenience methods on the domain.
|
Standard Repository Methods
Micronaut Data provides access to the database records using a number of naming patterns. If your repository interface has a method that matches one of these patterns, then the SQL will be generated automatically.
Some of the standard methods expected are:
interface OrderRepository extends BaseRepository, CrudRepository<Order, UUID> {
  Optional<Order> findByUuid(UUID uuid)  (1)

  List<Order> list(Pageable pageable) (2)

  Optional<Order> findByOrder(String name) (3)
  List<Order> list()  (4)
}| 1 | Reads a single record for the given ID. Used by many framework functions to find related records. |
| 2 | Finds all records (with paging/sorting support). Used by BaseCrudController to find records for the List [Definition Pages]. |
| 3 | Find by primary key. Not used in framework, but useful for some application logic. |
| 4 | Lists all records. Not used in framework, but useful for some application logic and debugging. |
Most top-level domains that have List [Definition Pages] should provide the list(Pageable) and
count() methods.
Event Methods
The object life-cycle events methods are called when certain events take place:
validate Method
You can add domain-specific validations to your domains with the validate() method:
def validate() {
  if (fieldName && !NameUtils.isLegalIdentifier(fieldName)) {
    //error.201.message="{1}" is not a legal custom field name.  Must be a legal Java variable name.
    return new ValidationError(201, 'fieldName', fieldName)  (1)
  }
  return null
}| 1 | Validation failures can return a ValidationError or a List<ValidationError>. Returning null means no errors were found. |
beforeValidate Method
Sometimes you need to execute some logic in your domain class before validate() is called.
For example, you need to encrypt a password on save/validate. If you define a beforeValidate()
method on your domain, then it will be executed by the helper’s validate() method. For example:
def beforeValidate() {
  encryptPassword()
}
This will call the encryptPassword() before the validation is performed on the domain.
beforeSave Method
Sometimes you need to execute some logic in your domain class before every save(). For example,
you need to encrypt a password on save. If you define a beforeSave() method on your
domain, then it will be executed by the domain’s save() method.
beforeDelete Method
Sometimes you need to execute some logic in your domain class before every delete().
For example, you need to remove related records from other domains.
def beforeDelete() {
  FieldGUIExtension.removeReferencesToField(domainClassName, fieldName)
}
Transactions
Database transactions are critical to enterprise applications. The data must be saved in a consistent state across several domains. To support this, the framework uses Micronaut Data for database access and forces transactions around all database updates/insert/deletes.
Most transactions are initiated at the Services layer, but also sometimes in the controllers.
You can use the @Transactional annotation in beans or the withTransaction() method.
Order.withTransaction {  (1)
  def order = Order.findByOrder('1234')
  ResolveWorkableRequest req = new ResolveWorkableRequest(lsn: order.lsns[0], order: order)
  def workable = resolveService.resolveWorkable(req)[0]
}| 1 | Starts the transaction, if not already in a DB transaction. This reads a domain that is passed to the service method. |
| The framework checks for an active transaction on every insert/update/delete SQL statement. You will need to wrap those database method calls with @Transactional, @Rollback or withTransaction. |
The @Transactional annotation only works in classes that are processed as beans in Micronaut. This means you can’t use this annotation in most test classes or in POGO/POJO logic.
Transactions and Prepared Statements
Some internal logic in the framework needs to be executed in a transaction. This is done to avoid a DB connection leak that happens with PreparedStatements. This means sometimes you may need to wrap some logic with a transaction. If you find an IllegalStateException with the note: 'No active transaction for SQL statement', then you may need to wrap the logic with a transaction.
The most common cases are automatically wrapped when needed in the framework.
Locking
Database locking is a tricky subject. We take a very simplistic approach to locking:
Most updates take place using optimistic locking with a version field.
Pessimistic locking is possible with a specific query annotation.
Also, we enforce that all UPDATE/INSERT SQL requests must be in a database transaction.
Optimistic Locking
Optimistic locking is handled by altering the update queries to add 'and version = :version' and to increment the version during the update. This means an exception will be thrown if a version field is not given or the record was updated by another user.
This optimistic locking check is done on every update of a single record that has a
version field. An exception will be thrown if another user has updated the record.
Pessimistic Locking
Pessimistic locking is handled by using an explicit SQL query in your repository. You must handle this in your application code. For example:
interface LSNSequenceRepository extends BaseRepository, CrudRepository<LSNSequence, UUID> {
  @Query("select * from lsn_sequence o where o.uuid = :uuid for update ")  (1)
  Optional<LSNSequence> findByUuidWithLock(UUID uuid)  (2)
}| 1 | Forces a lock on the record when read. |
| 2 | We recommend that you add 'withLock' on the method name. |
This will place the lock on the record when the query is executed. It also means the lock
record values are returned with the find() method. This prevents all other users from
changing this record until you commit/rollback the transaction.
SQL Database Definition
DB Creation Scripts
The database for production/development/test is Postgres SQL. This framework uses the Flyway Database Migration for creation and migration of the SQL schema used in Postgres. The DDL scripts are stored in these directories.
-
src/main/resources/db/migration - The production tables.
-
src/main/resources/db/sampleMigration - Scripts for creation of sample/test tables.
Inside of these folders are files such as:
-
V1_0_0__CreateTables.sql - The base scripts to create the tables for the 1.0 release.
-
V2_0_0__CreateTables.sql - The base scripts to create the tables for the 2.0 release.
Flyway will only run a given SQL file against the schema one time. If you later change the file, then it will log an error. To avoid this, we use the last digit as a counter to allow multiple files to be created over time within a single release. The last digit of the release (e.g. 0 in V1_2_0) is an incremental counter used to make sure the files are unique. This allows developers to add new tables during development of the 1.2 release.
You can use the Flyway repair command to help with this issue.
|
Indexes and Constraints
SQL databases use indexes and constraints to help control relationships between tables. For the framework and application modules, we try to use these base rules:
-
PRIMARY KEY - This is the UUID for the record. Every record has one (except for many-to-many join tables).
-
FOREIGN KEY - A UUID field that references a record in another table. This key almost always has an index created for it. This is usually implemented as a REFERENCES option in the .sql file. These generally have indexes created in the .sql for speed.
-
UNIQUE - A unique constraint. This is usually done on the natural key for the table.
Relationships
Domain relationships are generally defined in the domain classes and handled with the @DomainEntity annotation. This annotation adds the correct save(), delete and lazy loader methods for some of the more common relationships.
Simple Foreign Reference
Simple foreign references are supported by the framework. This means your domains can refer to other domains and access the other domain’s members as needed. To do this, you have to define your domain in a very specific way:
@MappedEntity
@DomainEntity
class Order {
  @ManyToOne(targetEntity=Product)  (1)
  Product product
}

class OrderService {
  void validate(Order order) {
    if (order.product.lotSize> 1.0) {  (2)
      thrown new Exception(...)
    }
  }
}| 1 | Defines the reference as a simple foreign reference. The targetEntity is required for simple foreign references. This distinguishes it from a Parent/Child Relationships (One-To-Many) relationship. |
| 2 | Reads the product record on first access. |
This adds a lazy loader mechanism in the getProduct() method. On first access, this will read
the Product (if not-null).
| This targetEntity is used as a marker for a simple foreign reference. Do not use the targetEntity option for Parent/Child Relationships (One-To-Many) relationships. This is the mechanism for distinguishing between simple references and the parent side in parent/child relations. |
Join and Nullable References
A simple foreign reference is handled by Micronaut-Data in different ways depending on whether the reference is nullable. Nullable references require the use of the SQL OUTER @Join option. Non-nullable references can use the LEFT join logic:
interface OrderRepository extends BaseRepository, CrudRepository<Order, UUID> {
  @Join(value = "product", type = Join.Type.LEFT)  (1)
  Optional<Order> findByUuid(UUID uuid)
}| 1 | This will read the Product record using an SQL join. It can be accessed with order.product…. |
This works fine for non-nullable fields. To make it work for nullable fields, we need
to use the OUTER join mechanism. To access
the Product record in that case, you would need to add findByUuid() calls in your code.
To avoid this extra code, the enterprise framework will add a simple lazy-loading getter method to your domain class. This will load the foreign reference on its first access.
If you do use @Join with your finders, then this lazy loading will avoid an extra DB read
as long as you have a dateCreated property in your domain class.
Parent/Child Relationships (One-To-Many)
Parent/Child relationships are quite common in enterprise applications. The children are fully-owned by the parent. Updates and deleting on the parent should update/delete the children.
The @DomainEntity annotation will add a lazy loader method (e.g. getChildren() in the example
below). This loader uses the findAllByParent() method in the repository.
@MappedEntity
@DomainEntity
class Parent {
  @OneToMany(mappedBy="parent")
  List<Child> children  (1)
}

@MappedEntity
@DomainEntity
class Child {
  @ManyToOne
  Parent parent  (2)
}

interface ChildRepository extends BaseRepository, CrudRepository<Child, UUID> {
  List<Child> findAllByParent(Parent parent) (3)
  Optional<Child> findById(UUID uuid)
  List<Child> list()
}| 1 | The child list must default to null, not an empty list. The lazy loader sets the field
to an empty list when no records are found in the DB.
This reference either needs a parameterized List<> type or the @OneToMany needs to
specify a targetEntity. |
| 2 | The reference to the parent record is one of the primary keys in the child record. |
| 3 | The finder findByXYZ() must be defined to find the child records. This is used by the lazy
loader. |
| On the @ManyToOne annotation, do not use targetEntity. It is used as a marker for a Simple Foreign Reference. |
Also, if the child class implements the Java Comparable interface, then the list will be sorted before it is saved and after it is loaded. Do not implement this interface if the list is likely to be huge (>1000 records).
Many-to-Many Relationships
Many-to-Many relationships are implemented using a join table that contains a reference to the parent and to the related record. This is sometimes referred to as a list of foreign references. You can implement them in two different ways:
-
Many-to-Many - Join from a
find()method.
You can use either approach or a combination of the two. If you don’t define a JOIN option
on the find() method, then you can still rely on the lazy loader to load the list on demand.
The @DomainEntity annotation adds the save() and delete() logic to handle this join table.
Both approaches require a @ManyToMany annotation.
Many-to-Many - Join
The Join approach requires the finders be defined with a @Join annotation to join the values from
the DB. This uses the @ManyToMany annotation (from Jakarta) and a @Join annotation to
the findBy…() method in your repository.
An example is shown below:
class User {
  @ManyToMany(mappedBy = "userRole")
  List<Role> userRoles (1)
}

interface UserRepository extends BaseRepository, CrudRepository<User, UUID> {
  @Join(value = "userRoles", type = Join.Type.LEFT_FETCH)
  Optional<User> findByUserName(String userName)
}| 1 | A null list allows the lazy loader logic to be used too. |
This will create a user_role table with a user_id and role_id field to link the two records.
Many-to-Many - Lazy Loader
The lazy loader approach is simpler. It just requires the @ManyToMany annotation (from Jakarta). On first access, the list of references will be loaded and the foreign domain will be populated.
An example is shown below:
class User {
  @ManyToMany(cascade = CascadeType.ALL, mappedBy = "userRole")
  List<Role> userRoles (1)
}

interface UserRepository extends BaseRepository, CrudRepository<User, UUID> {
  Optional<User> findByUserName(String userName)
}| 1 | A null list allows the lazy loader logic to be used too. |
This will create a users_role table with a user_id and role_id field to link the two records.
Choice List
You will frequently need to present your user with a drop-down list of options to choose from. This list can be fairly static, expandable or database-driven.
You can create these list in several ways:
-
Enumerations (static list).
-
Encoded Types - Expandable List - Code-Based (expandable in add-on modules).
Enumerations
If you have a very static list of valid values, you can use an
enumeration. Your enumeration should provide a toStringLocalized() method to help
generate the drop-down list.
The normal [Definition Pages] support this type of field.
A simple example is shown below:
enum ReportTimeIntervalEnum implements Comparable {
  TODAY( . . .),    (1)
  YESTERDAY(. . .})
    . . .
  String toStringLocalized(Locale locale = null) {    (2)
    return GlobalUtils.lookup("reportTimeInterval.${name()}.label", null, locale)
  }
}| 1 | The list of valid values. These are displayed in the order they are defined here. |
| 2 | The method that will generate a human-readable form of the enumeration for the drop-down list.
Typically based on a lookup() in the messages.properties file. |
class Product {
  ReportTimeIntervalEnum reportTimeInterval (1)
}| 1 | This creates a single column (normally 255 chars wide) to hold the enumeration’s toString() value.
For example 'LAST_24_HOURS'. |
reportTimeInterval.LAST_24_HOURS.label=Last 24 Hours
reportTimeInterval.LAST_7_DAYS.label=Last 7 Days
reportTimeInterval.LAST_30_DAYS.label=Last 30 Days
 . . .
Encoded Types
This is a list of values defined in your code, but it can be expanded by other modules. This is commonly used for status codes that can be applied to a domain object. Instead of using a separate domain class with a new database table, you define a class hierarchy that defines all of the available status codes.
| Each module can define additional encoded types. See Encoded Types Provided By Additions. |
For example, you might have a BasicStatus that can be EnabledStatus or DisabledStatus. You want these to be stored in an Order domain field like this:
class Order {
  String key

  @Column(length = 12, nullable = true)
  @Nullable BasicStatus status = EnabledStatus.instance (1)
  BasicStatus status = EnabledStatus.instance

}| 1 | A simple reference to the BasicStatus, with a default value. The status database column will be a small length (12 chars in the example). If not specified, then the column will default to 255 characters. |
The mapping of the BasicStatus to a database column is handled automatically by the custom EncodedType .
If you create custom EncodedTypes, then you will need to register the base class (like BasicStatus above) in an Addition
Then your code that checks the status can be simple and clear:
def order = . . .
if (!order.status.enable) {
  throw new SomeException('Order is not enabled')
}
The GUI [Definition Pages] will show these two options in a drop-down list with localized text (e.g. 'Enabled' and 'Disabled'). When saved, the selected status is stored in an encoded column in the database automatically.
This all works by defining your types correctly. See BasicStatus for an example.
The parent class for the encoded/choice list provides the main contact point for most of the GUI and database features. The sub-classes provide the individual choices in the list. The parent class must provide a list of valid values for the sub-classes defined in the core code.
The basic class structure is shown below:
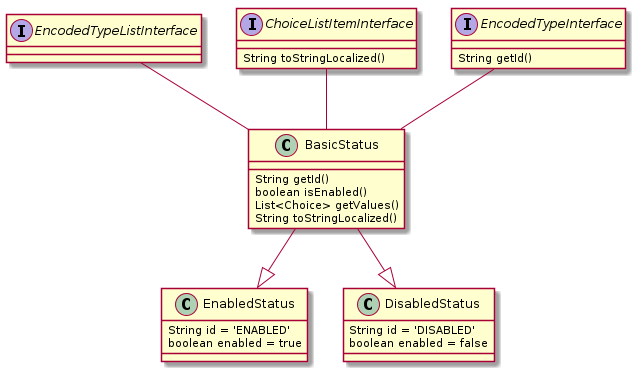
This BasicStatus
is used in the core framework and most
application modules. These application modules define their own status codes (e.g.
OrderStatus) that are used throughout the application. These include more states
such as isDone() and isHold(). See the source code for details on
how to implement these types of statuses.
The EncodedTypeListInterface and EncodedTypeInterface are used to provide the valid choices and to store/retrieve the value from the database.
Database Values
The most flexible approach to lists of valid values is to use a database reference. This allows your users to (normally) create new values of the records. This is usually more work since a new set of [Definition Pages] must be built and tested.
In the example below, we will reference a Product from an Order record.
class Product {
  String product
  String title
   . . .
}class Order {
String order
BigDecimal qty
Product product (1)
. . .
}| 1 | The order is defined to build a certain qty of a Product. This is the reference to an existing domain object. |
| This Product is not a direct child of the Order. The Order can be deleted and the Product will still be in the database. |
This type of relationship will usually be displayed as a single-selection combobox in the normal edit/create pages.
Dates and Timezones
Dates and timezones are a common problems with enterprise systems. Most common SQL databases don’t support timezones for values stored in the original SQL date/time columns. Also, the GUI toolkit doesn’t support timezones. The toolkit doesn’t need to know the timezone since the GUI elements don’t need it.
To keep the date/times consistent in the database, we always force the time to be stored in the UTC timezone. Then, when the date/time is displayed to the user, a global UI timezone is used. This global UI default timezone is set to eastern US timezone by default.
To make this work, the JVM’s default timezone is set to UTC by the StartupHandler. This means the JDBC drivers and the data layer will store the time in UTC. Then, when the value is retrieved from the database and sent to a client using JSON, the ISO date is sent with the timezone offset. Then on the client, the Javascript time is created by discarding the timezone offset. This means the time will be displayed by the toolkit with no adjustments.
toShortString()
Many GUI-related parts of the framework need a short, human-readable format of your domain objects.
For example, you want to display the Order ID in drop-down, but the toString() method
returns all of the order’s fields. The framework supports a standardized toShortString()
method on most domains for this display. This is normally a short string for the given object
(e.g. its primary key).
By default, this short string is usually just the first key field (as a string). The TypeUtils utility class provides an easy way to get this short string.
If the first key field is not suitable, then you can implement a toShortString() method. This
is useful when the first key is another domain object.
class Order {
  String toShortString() {
    return order
  }
}
This mechanism allows you to use the normal toString() methods to display detailed information
for use in log messages. The TypeUtils.toShortString(object) utility will use your
toShortString() method, if defined.
If you are using a domain as a reference in a grid, then you should also implement
toStringLocalized(). This toStringLocalized() methoud could just call toShortString().
|
toStringLocalized()
A number of places in the framework rely on the toStringLocalized() in the
GlobalUtils
utility class.
This allows the framework to provide a human-readable representation of your domain record for display.
For example, this is used in the [efDefinitionList] marker to build the
hyper-link text for the links generated. Also, drop-down lists and archiving use this short
string format.
Most domains will not need to implement this method. You won’t need to implement this methods if your domain has a single key and it is the first field in the fieldOrder static value.
Dynamic SQL - PreparedStatement
Sometimes, you just have to use SQL directly in your application code. This is needed when the where clause criteria is flexible and changes based on user input. You will need to use the SQL directly. This framework provides some helper classes to make this easier. It also tries to make sure you use safe and portable SQL capabilities.
If you need dynamic sorting, then we recommend you the Pageable support on most list()
repository methods. See Standard Repository Methods for an example.
The most common scenario is to use a dynamically-generated SQL statement to find domain records. The framework provides a simplified way to handle the most common case:
String sql = "SELECT * FROM LSN where order=?" (1)
def list = SQLUtils.instance.executeQuery(sql,                   (2)
                                          LSN,                   (3)
                                          Pageable.from(0, 20),  (4)
order.uuid.toString()) (5)| 1 | We want to find a list of LSN records for the given Order (using UUID). This SQL could be created based on dynamic needs. See SQL Injection below for restrictions on this SQL query. |
| 2 | The execute() method will execute the SQL, and return a list objects from the result set. |
| 3 | The Domain object return (in a list). |
| 4 | The results are limited to the first 20 rows. Default: Page 0, page size 100. |
| 5 | The parameters used in the SQL. |
This will return a list of objects that match the selection criteria. You need to make sure the SQL includes at least one replaceable parameter.
| To avoid SQL Inject attacks on your application, always use static SQL queries. Never build the SQL directly from user inputs. This method will reject queries that look like they might be used for injection attacks. See SQL Injection below for details. |
| To avoid connection leaks, the SQL must be executed in a transaction. This is enforced by the framework. |
You can also use Map as the result class in the query. This makes simple SQL COUNT(*) cases easier to use:
def tableName = DomainEntityHelper.instance.getTableName(Order)  (1)
def list = SQLUtils.instance.executeQuery("SELECT COUNT(*) as count FROM ${tableName}", Map) (2)

def count = list[0].count (3)| 1 | The Order table name is ordr. |
| 2 | We want to count the total number of records in the table. |
| 3 | The count is saved in a map in row 0, with a name of 'count'. The column name is shifted to lowercase. This handles databases that always return column names in upper case. (e.g. Postgres). |
As an alternative, you can process the result set yourself if the normal binding mechanism doesn’t handle the cases you need (complex joins, etc).
def list = []
String sql = "SELECT * FROM LSN where order=?"  (1)
PreparedStatement ps
ResultSet rs
try {
  ps = SQLUtils.instance.getPreparedStatement(sql)
  ps.setString(1, order.getUuid().toString())
  ps.execute()
  rs = ps.getResultSet()
  while (rs.next()) {  (2)
    list << SQLUtils.instance.bindResultSet(rs, LSN)  (3)
  }
} finally {  (4)
  try {
    rs?.close()
  } catch (Exception ignored) {  (5)
  }
  ps?.close()
}| 1 | We want to find a list of LSN records for the given Order (using UUID). |
| 2 | Loop on the result set to build the domain object(s) (without saving). |
| 3 | Will bind the columns from the result set, where possible. Ignored columns will be logged as warning messages. |
| 4 | Must always close the prepared statement and result set. |
| 5 | Need to make sure the prepared statement is closed, even if the result set close fails. |
SQL Injection
SQL Injection is a serious security threat to all web-applications that use SQL. The simplest way to avoid this is to never use any sort of dynamic SQL. Chances are, your application will require some sort of dynamic capability.
The framework provides this SQL access with some limitations. These limitations reduce the chance that an SQL injection attack will work on the query.
The limitations include:
-
All dynamic SQL features will use the JDBC PreparedStatement approach. PreparedStatement prevents most forms of SQL injection attacks using the values. It does not prevent attacks if you build the SQL in an unsafe manner.
-
Quotes (single or double) not allowed. For example, WHERE column='READY' is not allowed. You will need to use a parameter for cases like this.
The execute methods will fail if your SQL violates these rules.
Configurable Types
Configurable Type Persistent Storage Domain Validation GUI Marker Support Controller Support Configurable Type API Access Configurable Types and POGOs
Enterprise applications need to support user-configurable elements. This allows your users to tailor the behavior to suite their needs.
How do you provide an open-ended list of options configured by the user? Use Configurable Types.
For example, the RMA (Return Material Authorization) information for consumers is different from the information provided by retailers. In addition to other data, the consumers might be required to enter this information:
-
Last Name
-
First Name
-
Address
A retailer might need to enter this information:
-
Retailer ID
-
Location ID
-
Return Code (Defective, etc.)
You could add all of these fields to the RMA object and expect the user to decide which fields are important. Or, you could use some sort of configurable mechanism to decide which fields are valid.
When creating the RMA record, the user will choose the RMA Type and the input fields for the user will be configured based on that type. This will look something like this:
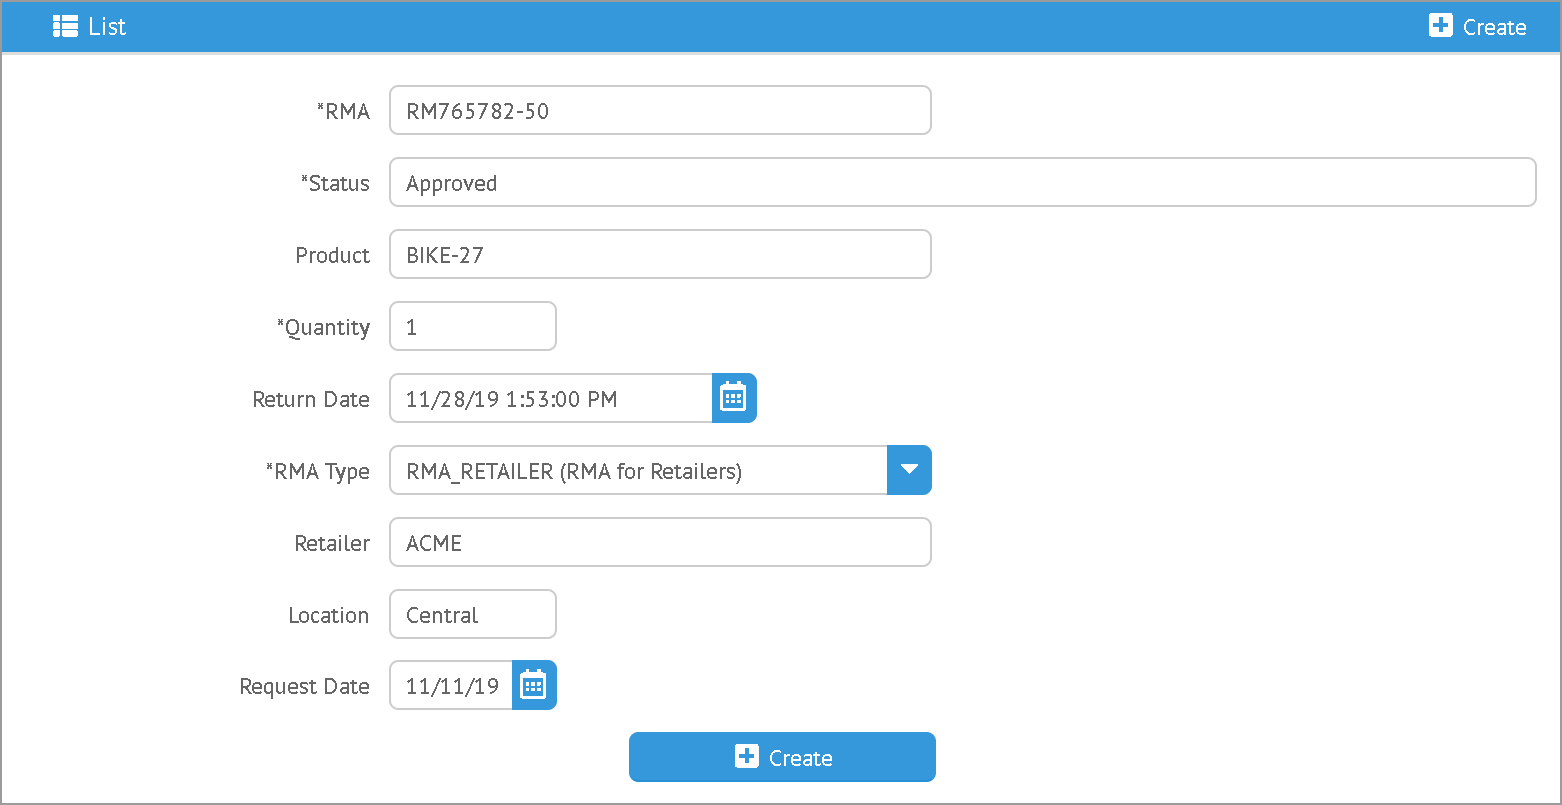
When the user selects 'Consumer' as the type, then the consumer fields will be displayed. When the user selects 'Retailer' as the type, then the retailer fields will be displayed.
The [Definition Pages] and the [efField] marker support this type of configurable field when you use a Flex Types field or any field with a ConfigurableTypeInterface . This allows you to simply use the core FlexType class in a domain and the data is automatically displayed and saved in the definition pages:
class RMA {
  String rma
  String product
  BigDecimal qty
  Date returnDate

  @ManyToOne(targetEntity=FlexType) (1)
  FlexType rmaType

  @Nullable
  @ExtensibleFieldHolder  (2)
  @MappedProperty(type = DataType.JSON)
  String fields

}| 1 | The field rmaType will hold the reference to the appropriate flex type. The actual
values will be stored in the fields field as described
in Configurable Type Persistent Storage.
Note the @ManyToOne usage is needed for this Simple Foreign Reference. |
| 2 | The FlexType requires a place to store the values for RMA records created. This is done in the normal location for Field Extensions. |
It is also possible to define configurable types that are not based on Flex Types. This requires more programming to provide the information needed. One example is in the display/editing of the [Report Filter Panel] mechanism.
The flex type definition will look something like this:

Domain Validation
Your domain will need to handle most validations on the values entered for the configurable
type. For enforcement of the simple required flag on the field, you can use the
ExtensibleFieldHelper
method validateConfigurableTypes() to validate the added field(s).
For example:
@MappedEntity
@DomainEntity
class RMA {
  String rma

  @Nullable
  @ManyToOne(targetEntity = FlexType)
  @MappedProperty(type = DataType.UUID)
  FlexType rmaType                       (1)

  @Nullable
  @ExtensibleFieldHolder
  @MappedProperty(type = DataType.JSON)
  String fields                          (2)

  . . .

  void validate() {   (3)
    return ExtensibleFieldHelper.instance.validateConfigurableTypes(this,'rmaType')  (4)
  }

}| 1 | The Configurable type (Flex Type) that user may select in a GUI. |
| 2 | The field that custom fields are stored (as JSON). |
| 3 | The standard domain validate method. |
| 4 | The helper method that validates required configurable type fields. |
Configurable Type Persistent Storage
The current 'type' is typically stored in the domain record field (e.g. the FlexType rmaType field above).
The actual values are stored in the normal custom field location for Field Extensions.
See ExtensibleFieldHolder Annotation for details on the storage and internal format. An example of the raw data stored in the database column is shown below.
{
  "_fields": {
    "retailerID": "ACME-101",
    "returnCode": "DEFECTIVE"
  }
}
See Configurable Type API Access for details on accessing these fields.
GUI Marker Support
The framework markers that support these configurable types include:
Controller Support
The above markers use Javascript to dynamically build the input fields for a given configurable type. The BaseCrudController provides support for this.
Configurable Type API Access
Programmatic access to these values is provided by accessor methods based on the
FlexType field name (first letter uppercase shifted):
  def rma = new RMA()
  rma.setFieldValue('address','P.O. Box 8675309')

  . . .

  def lastName = rma.getFieldValue('lastName')
The access to the configurable types via the API Formats is similar. The field names are the same as described in Configurable Type Persistent Storage above. An example of the JSON format for an RMA is shown below:
{
  "rma": "R10102-23",
  "qty": 12.2,
  "_fields": {
    "retailerID": "ACME-101",
    "returnCode": "DEFECTIVE"
  }
}
Configurable Types and POGOs
Configurable types such as Flex Types are normally used with domain classes, but they can also be used with POGO classes. This limits the Configurable Type API Access to just these features:
-
setFieldValue() -
getFieldValue()
This is designed to work with transfer objects that copy values between POGOs and domain objects.
For example, you might use this transfer POGO with the above RMA examples:
class RMAResponse {
  String rma
   . . .

  FlexType rmaType  (1)

  @Nullable
  @ExtensibleFieldHolder  (2)
  @MappedProperty(type = DataType.JSON)
  String fields
}| 1 | The field rmaType will hold the reference to the appropriate flex type. The actual
values will be stored in the fields field as described
in Configurable Type Persistent Storage. |
| 2 | The FlexType requires a place to store the values for this POGO. This is done in the normal location for Field Extensions. |
When you need to copy the values between this POGO and the domain, you will need to copy both fields:
def rma = RMA.findByRma('RMA1')

def response = new RMAResponse()

response.qty = rma.qty
response.rmaType = rma.rmaType  (1)
response.fields = rma.fields| 1 | You need to copy the flex type field and the values holder (typically fields). |
Controllers
Controller Names Controller Method Names Controller Security Controller Base Classes Logging Controller Task Menus Standard Domain Model and Markers Controller Method for Page Display
Your controller classes have a few requirements to be easily used by various pieces of the framework. Your controller classes should be in proper packages, but that is not required. See Controller Testing for details on testing.
Controller Names
Your controller class provide the main access to your application for GUIs and JSON access. In general, you should follow the normal Micronaut standard: domainName plus 'Controller'. For example, the domain class Order should have a corresponding controller named OrderController.
Controller Method Names
To make the application and framework simpler, the framework assumes some specific naming conventions. This is part of the 'coding by conventions' that we try to apply to the framework. It makes your application-level code simpler.
Controller name, URI and View path are the same
The controller name is the same as the page. For example, controller Order has these views:
views/order/index.ftl
views/order/show.ftl
 . . .
In the controller, you have these methods:
@Secured("ADMIN")
@Controller("/order")
class OrderController {

  @Get("/")
  StandardModelAndView index(@Nullable Principal principal)  (1)

  @Get("/show/{i}")
  StandardModelAndView show(String i, @Nullable Principal principal)  (2)

}| 1 | Usually provided by BaseCrudController. |
| 2 | Usually provided by BaseCrudController. |
This allows some underlying code (such as BaseCrudController) to handle a lot of the basic features of the show and index pages. This reduces the amount of code you have to write.
Controller Security
See Security for details on securing your controllers. By default all controller methods must be secured. See Controller Testing for details on testing these security requirements.
| To enable access, all controller methods should have a Principal argument: |
@Secured("ADMIN")
@Controller("/path")
class AController {

  @Get("/list")
  Map list(HttpRequest request, @Nullable Principal principal) {
    . . .
  }
}
If the Principal argument is not an argument to your methods, then you will get an access denied response (HTTP Status 403-Forbidden).
Controller Base Classes
Most of your controllers that support CRUD and API access can use common implementations of those functions. For example, a CRUD controller can implement the BaseCrudController . This will provide common methods for CRUD actions that the standard GUIs will use. This will reduce your code considerably.
You can override these methods with your own implementation.
Your controller will define the HTTP path your controller handles and the overall security requirements for methods:
@Secured("ADMIN")    (1)
@Controller("/user") (2)
class UserController extends BaseCrudController {
  . . .
}| 1 | All methods require the ADMIN role. |
| 2 | This controller handles request on the /user path (e.g. /user/list). |
The common controller base classes include:
-
BaseController - Provides standard error handler.
-
BaseCrudController - Provides standard CRUD actions.
-
BaseCrudRestController - Provides standard REST/JSON API actions.
BaseCrudController
The BaseCrudController base class provides many of the common controller methods used in standard CRUD pages. This includes methods like list(), create(), edit() etc.
GUI [Markers] such as [efDefinitionList] rely on methods in this base class to display data for the domain.
BaseCrudController Options
The BaseCrudController has a few optional fields/methods you can use to adjust the behavior of the standard methods. For example, you can specify a different domain class than the default name.
domainClass
Sometimes, you will need to associate a controller with a different domain class than the default name. You can do this with the static field:
@Controller("/somePath")
class SomeController extends BaseCrudController {

   static domainClass = Order

}
This affects the BaseCrudController.
Also, you should implement a number of methods as described in Repository Requirements.
getView Method
The view page file names are usually derived from the controller’s domain class.
The default behavior may be wrong for your situation. You can override the getView()
method in your controller class to use any path needed. Keep in mind that the view system
adds 'views/' to the view to find the real view path.
@Controller("/somePath")
class SomeController extends BaseCrudController {

  String getView(String methodName) {
    return "someOtherPath/forViews/$methodName"  (1)
  }

}| 1 | An alternate path is generated, using the basic method name. |
bindEvent Method
If you use the BaseCrudController, then you may need to do additional binding of HTTP parameters
to the domain object upon save. When the editPost/createPost methods are called, then they
will call your bindEvent() method to do the additional binding/validations.
You can also trigger a validation error as shown below. This example shows how a user’s password
can be changed by entering the value twice in a GUI (_pwNew and _pwConfirm fields).
This bindEvent() method makes sure the two values are the same.
void bindEvent(Object record, Object params) {
  if (params._pwNew) {
    if (params._pwNew != params._pwConfirm) {   (1)
      throw new Exception(...)
    } else {
      record.password = params._pwNew  (2)
    }
  }
}| 1 | Compares the new password and the confirmation password. If different, then an error is triggered. |
| 2 | If valid, then the password is stored in the User record for later encryption upon save. |
Delete Actions
The BaseCrudController and BaseCrudRestController delete() methods will delete the given
domain record and all of its children. This method
will also delete any related records that are not true child records. This uses the same
findRelatedRecords() mechanism used by Archiving Related Records.
| The related records are deleted before the main record is deleted. This means you have take care of referential integrity issues. |
BaseCrudRestController
The BaseCrudRestController base class provides many of the common controller methods used in standard CRUD Rest API methods. This includes the HTTP methods GET, PUT, POST and DELETE.
Endpoints
The BaseCrudRestController has a the normal Rest-style API endpoints:
-
{domain}/crud/uuid (GET) - Read a single record by UUID or primary key.
-
{domain}/crud (POST) - Create single record.
-
{domain}/crud/uuid (PUT) - Update a single record.
-
{domain}/crud/uuid (DELETE) - Delete a single record.
The ID-based methods use the URL to define the UUID or primary key for the the record being processed. See Rest API for details.
BaseController
The BaseController base class provides the single error() handler method. This returns an exception in a standard format for display to the user. This is a local error handler. Currently, no global error handler is provided for controllers.
The standard error response JSON look like this:
{
  "message": {
   "level": "error",
   "code": 1003,
   "text": "Order 'M1657334' is not enabled"
  }
}
See Info/Warning Messages to Clients for more details.
Controller Task Menus
Controllers are the main way users will access your application from a browser. The framework provides a way to define [Task Menu] from your controller. These usually refer to the main (root or index) page of your controller.
Also, you can mark these tasks as a clientRootActivity. This means the the javascript
methods for this page will be able to write log messages using a standardized logger naming
convention.
To support Javascript Client Logging, you should indicate what pages (URIs) that
a given controller provides. This is done with the variable taskMenuItems:
@Secured("ADMIN")
@Controller('/order')
class OrderController {

  def taskMenuItems = [new TaskMenuItem(folder: 'demand:50.order:100',
                                        name: 'order',
                                        uri: '/order',
                                        clientRootActivity: true,       (1)
                                        displayOrder: 101)]

  @Get('/')
  @Produces(MediaType.TEXT_HTML)        (2)
  String index() {
   . . .
  }

}| 1 | This URL is the client logger root for this controller. This means the logger 'client.order' logger will be used to control the logging level on the client for this controller’s pages. (Default: is true, so this value is normally not needed). |
| 2 | An index page handler. |
You can test your settings in the Controller Test Helper. You will need to specify the details on the Task Menu Item expected in the controller.
Standard Domain Model and Markers
This BaseCrudController stores the domain object being displayed/edited in the standard location for your .ftl/HTML pages to display. The domain object is stored in the [Markers] context data as described in [Markers and Models] under the domain name (e.g. 'order').
If you have your own controller methods that create a StandardModelAndView, then you should make sure your domain object is stored with this same naming convention.
You can access this in your .ftl/HTML files:
Order: ${order.order}  (1)
Qty to Build: ${order.qtyToBuild}
Due Date: ${order.dueDate}| 1 | The fields from the Order record are displayed in the page. |
Controller Method for Page Display
Most pages will be served up by some controller method. This is usually very simple, but needs some specific annotations to work with the browsers:
@Secured('OPERATOR')
@Controller("/work")
class WorkController extends BaseController {

  @Get("/startActivity")  (1)
  @Produces(MediaType.TEXT_HTML) (2)
  StandardModelAndView startActivity(HttpRequest request, @Nullable Principal principal) {
    return new StandardModelAndView("demand/work/start", principal, this)  (3)
  }

}| 1 | Defines the controller endpoint to render this page (e.g. '/work/startActivity'). |
| 2 | This tells the browser the type of data to expect (an HTML page). |
| 3 | Generates a page ('main/resources/views/demand/work/start.ftl') using the normal [StandardModelAndView] to provide access to common settings such as the logged in state. |
Services
Services are where much of your business logic will be implemented. Your service classes have a few requirements to be easily used within the framework. Your services should be in proper packages, but that is not required.
Service Transactions
All services that perform database changes should be marked as transactional:
  1
2
3
4
5
6
7
8
9
10
11

  package org.simplemes.mes.assy.floor

import javax.transaction.Transactional

@Transactional  (1)
class WorkCenterAssyService {

  void someMethod() {
   . . .
  }
}
| 1 | Makes all public methods as transactional. Can be called from within an existing transaction without creating a new session/transaction. |
Arguments and Return Values
Most services will need arguments passed in and will return values. These values should be Java/Groovy objects (e.g. Domains, POJOs or POGOs). Passing and returning JSON should be handled by the controllers.
In addition, most services that need multiple inputs should use a POGO to make a more readable API. This makes it much easier to pass a large number of objects in a clear way.
| Most service methods should be designed to take domain objects as inputs, when possible. This is done instead of passing key field (e.g. Strings) as parameters. This reduces the amount of database access, but also forces you to manage Transactions in the calling code. |
  1
2
3
4
5
6
7
8
9
10
11
12
13
14
15
16
17
18
19
20

  @Transactional
class WorkCenterAssyService {

  /**
   * This method adds a component...
   */
  WorkCenterComponent addComponent(AddComponentRequest addComponentRequest) {  (1)
   . . .
  }
}

/**
 * This class is the request to add a component to a work center's current setup.
 */
class AddComponentRequest {
  WorkCenter workCenter   (2)
  Product component
  String location
  BigDecimal qty
}
| 1 | A POGO is passed in and a domain object is returned. |
| 2 | The fields can be domain objects. This means the caller will populate this POGO within its own transaction. |
The above example uses POGO to receive a large number of arguments. It then returns a domain object (WorkCenterComponent) that was created by this request.
GUIs
Standardized GUIs are a key part of the user experience in enterprise applications. Customers expect your GUIs to work the same way across the entire application. To keep the GUIs consistent, the framework provides a set of common GUI components and support objects to reduce the developer complexity.
GUI Dependencies
The following client modules are used by the clients sub-modules:
GUI Philosophy and Decisions
Clean, functional GUIs are critical to any web application’s success. SimpleMES is no different. Since GUIs are so important to your application’s success, we made some key decisions on how to define the GUIs and how they work with the server-side.
Vue was chosen for the client-side display because of its support for multiple-page apps and for its reactive support. This makes for a very rich client-side experience.
Vue does complicate the developer process and makes for more complex GUI code. Because of this, we use a hybrid Gradle/Groovy and Node / npm development environment.
These decisions are based on some simple GUI philosophies:
None of these decisions are perfect. They all involve trade-offs. We tried to make sure the end result is a smooth operating application, even in slow environments. There are scenarios where the framework supports a more interactive approach such as [Dashboards].
You can do things differently if you prefer. It just means the framework won’t be helping as much as it could.
Solution
To overcome these issues, we decided to use Vue with PrimeVue components. This provides the best user experience with a larger developer base than the other choices.
Pros
The main benefits of this solution include:
-
Large developer base.
-
Extensive tutorials available.
-
Responsive UI easily implemented.
-
Modern look/feel.
Cons
The main drawbacks of this solution include:
-
Client development is different from the server-side. (Javascript/node vs. Java/Groovy).
-
Integrating the two environments causes issues.
-
Vue makes dynamic, end-user GUIs more difficult.
-
Vue makes re-use of code more difficult. Inheritance is discouraged. This means some common features (like localization) is copied to each page manually.
-
The Javascript Node/npm world is much more fragmented than the Java/Groovy world. For example, there are 6+ ways to handle localization.
-
Module loading in a browser is simply a mess.
Guidelines
To work around the drawbacks of this approach, some conventions will be followed:
-
Client Sub-Modules - Each module of your application should have a client sub-module.
-
Use eframe-lib - Your module will (should) use the eframe-lib for common features such as CRUD, server interaction and localization (GUI I18n).
-
GUI Testing - You should follow the general GUI Testing approach used by the framework. This means GUI testing is done in Geb/Groovy instead of in the node/npm world.
Development Process
In particular, all pages will be generated with the Vue/JS world. This means all UI features are built/configured in the node/JS world. The node/npm world will generate the client assets which will be served up by the server-side.
This means most development will be done while running the npm/VueCLI in development mode, then doing a build to create the assets for the server-side core to serve.
Integration During Development
The npm/VueCLI will run the app in developer mode. The access to the server-side will be to another process on a different port. This is done to keep the development mode code the same as the production as much as possible.
The axios module use a proxy for development mode to access http://localhost:8080/ while the client code is run on http://localhost:8081/.
GUI Development
GUI Module Structure GUI Development Tasks GUI Development Cycle GUI Entry Page Controller for GUI Entry Page CrudTable Service Requirements eframe-lib GUI Related Gradle/NPM Tasks
The GUI development environment is somewhat complex due to the hybrid nature. We use Groovy/Java on the server-side and Vue on the client-side. This forces us to develop the client-side GUIs in isolation from the server-side. The client is then served up by the server-side.
GUI Module Structure
The basic structure for the modular application will look something like this:
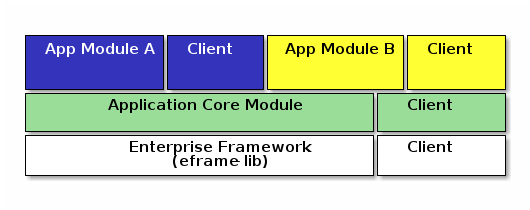
Each module can supply a client one or more sub-modules with the assets needed for the clients. These client sub-modules will be built using the npm processes typically used for Vue applications.
The application pages will be organized like this during the production deployment:
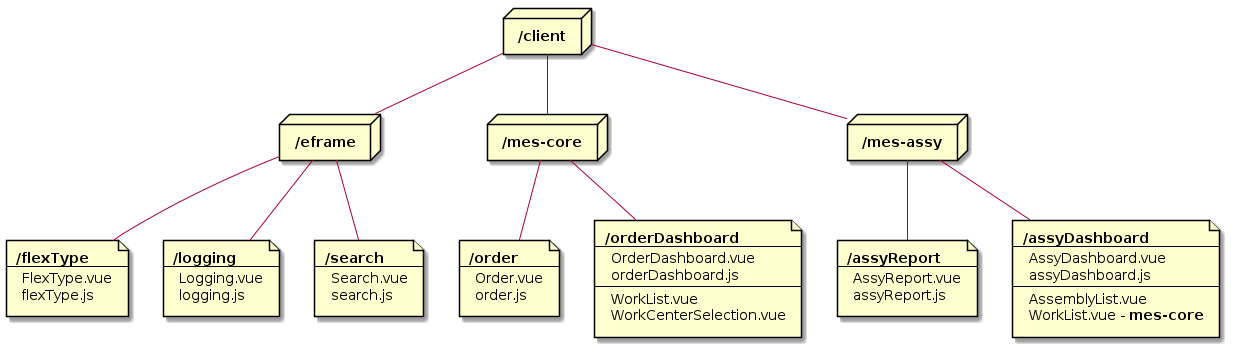
Each of these URIs is called a GUI Entry Page. It is an HTML page that is accessible directly from within the browser. Typically, these pages all show up in the [Task Menu].
GUI Development Tasks
GUI development involves working with the client sub-module and then moving it to the production server for deployment. The basic flow is:
-
Create a client module (if not done already for your module). See GUI Setup - New Client Module for details on creating the module from the templates folder. You will use the gradle npmInit task to install the vue and related client libraries.
-
Create a GUI Entry Page - Create/edit the client-side components code. This includes .vue and .js files. See the GUI Development Cycle for suggestions on how to edit/test your GUIs.
-
When you are ready to deploy to a server, you will use the gradle npmBuild to create the assets for production (runs npm run build command). This copies the client run-time files to the src/main/resources/client folder for the IDEA localhost process to use.
-
Then, you will need a controller that serves up these client assets from the server. See Controller for GUI Entry Page for details.
-
Build .jar - When ready to publish the module, the run-time .jar file is built and the assets are included in the .jar file. This is done by the Gradle task publishToMavenLocal task.
NOTE: You can use the _npm run server_ task to allow hot-updates to the running client-side
      application while you make changes.  *Highly recommended*.
GUI Development Cycle
-
Start localhost (server-side).
-
Start client side development mode: npm run server. Starting this after the localhost (server-side, port 8080) will force the client-side 'server' to run on port 8081.
-
Edit .js/.vue files.
-
Try in browser (on port 8081).
-
Repeat from #4 until satisfied.
-
Build using gradle npmBuild for use in production. Restart localhost (server-side) to use use the client module in 'production'. You may need to force a refresh of the IDEA out folder for the new client files (Gradle refresh seems to work).
-
Write GEB/Spock tests of the GUI (no javascript-based tests).
| After running the gradle task npmBuild, you may need to refresh the server-side with the new lib. This can be done manually of by simply using Intellij’s 'Reload All Gradle Projects' (refresh symbol in the 'Gradle' sidebar). |
GUI Entry Page
Vue supports multi-page applications. These are web applications that allow display of multiple pages at different URLs. This fits well with enterprise apps.
To make this work, you will need to define each entry page. For the most part, each domain object definition page is an entry page (e.g. Flex Type definition is page, User definition is a page, etc). Other complex pages (such as a dashboard) are also entry points. This framework does not directly support the Vue router concept for single page applications.
See GUI Module Structure for an overview of the client module layout and Entry Page Structure for details.
You will need to create some files for each page. The templates folder contains a sample GUI page and related files. See GUI Setup - New Client Module for details.
You will need to edit the vue.config.js for your module. It should have an entry like this (for the FlexType example):
 . . .

module.exports = {
  publicPath: process.env.NODE_ENV === 'production' ? '/client/sample' : '/',  (1)
  pages: {
    index: {  (2)
      entry: 'src/entry/index.js',
      template: 'public/index.html',
      filename: 'index.html',
      title: 'Index Page',
      chunks: ['chunk-vendors', 'chunk-common', 'index']
    },
    'flexType': {  (3)
      entry: 'src/entry/custom/flexType/flexType.js',
      title: 'Flex Type',
    },
  },
  . . .
}| 1 | The publicPath is where the generated client module is served-up by the server side
in production. The 'sample' in '/client/sample' should be changed to your module name. |
| 2 | The index page is usually only used for development mode (e.g. when run using 'npm run server' for hot-reloading during client development). This index.js will usually have simple HTML links to your pages for development uses. |
| 3 | This where your client page(s) will go. Each top-level entry page should be listed. |
You will need to change the publicPath and the 'flexType' entry above for your entry page(s).
Each entry page is made up of two main elements:
-
.js file - This file creates the page and displays it using the template public/index.html. This code links the .vue component with the HTML tag '<div id="app">'.
-
.vue file - This file defines what is displayed on the page. For simple CRUD definition pages, this usually just refers to [CrudTable] component with some configuration options.
The files for the Flex Type definition page is shown below.
Entry Page Structure
The client page defines a single endpoint (URL) for the application. For example, the CRUD page for the Flex Type records is at '/client/eframe/flexType'. It is made up of these elements:
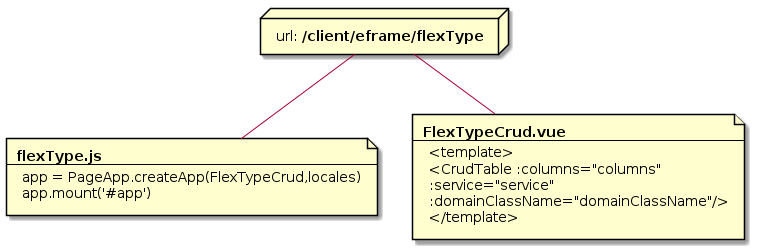
The .js file is fairly simple. Most of the common logic is provided by the PageApp:
import FlexTypeCrud from '@/components/eframe/custom/flexType/FlexTypeCrud.vue'
import PageApp from '@/eframe-lib/web/PageApp.js'
import '@/eframe-lib/assets/styles/global.css'

import Locales from "@/locales/Locales"               (1)


const app = PageApp.createApp(FlexTypeCrud, Locales)  (2)
app.mount('#app') (3)| 1 | Provides the locale-specific labels/etc for this module. See GUI I18n. |
| 2 | Uses standard features such as Toast, Axios and GUI I18n support. |
| 3 | Mounts the FlexType crud table in the standard page using the 'app' HTML ID. |
The .vue file for most Crud pages is also fairly simple. This uses the [CrudTable] component:
<template>
  <CrudTable :columns="columns" :service="service"  (1)
             :domainClassName="domainClassName"/>
</template>

<script>

import CrudTable from '@/eframe-lib/web/CrudTable'
import FlexTypeService from '@/components/eframe/custom/flexType/FlexTypeService'

export default {
  components: {
    CrudTable
  },
  data() {
    return {
      columns: [  (2)
        {field: 'flexType', header: this.$t('label.flexType'), sort: true},
        {field: 'category', header: this.$t('label.category'), sort: true},
        {field: 'title', header: this.$t('label.title'), sort: true},
        {field: 'fieldSummary', header: this.$t('label.fields')},
      ],
      service: FlexTypeService,   (3)
      domainClassName: 'org.simplemes.eframe.custom.domain.FlexType',  (4)
    }
  },
}

</script>| 1 | Defines the standard CRUD page with a header. This links the data elements below with the CrudTable component. |
| 2 | The columns displayed are listed with localized headers and related options. |
| 3 | The client-side (javascript) service that implements the list() and other CRUD-related methods.
See [GUI - CRUD Requirements] for details. |
| 4 | The domain class that is being maintained by this CRUD page. This is the class name from the server-side. |
Controller for GUI Entry Page
The GUI Entry Page needs to be served up by the server. The entry page assets are
packaged by the Gradle command npmBuild. See GUI Related Gradle/NPM Tasks
for more details on these tasks.
The controller is usually a sub-class of
BaseController .
This provide the standard index() method to serve-up the normal client assets.
The controller will look something like this:
@Secured("CUSTOMIZER")
@Controller("/flexType")
class FlexTypeController extends BaseCrudController {
  def taskMenuItems = [new TaskMenuItem(folder: 'custom:100',     (1)
                                        name: 'flexType',
                                        uri: '/flexType',
                                        displayOrder: 110,
                                        clientRootActivity: true)]

  String indexView = 'client/eframe/flexType'  (2)


}| 1 | The CRUD page is added to the standard [Task Menu]. |
| 2 | The URI location of the index page. |
You will need to change the value for the indexView to match where your entry page is
located. See GUI Entry Page.
| The BaseCrudController class also provides the normal REST API methods needed for the crud pages. These are accessed using the method from your client-side service object. See CrudTable Service Requirements. |
CrudTable Service Requirements
The service for FlexType CRUD pages is shown below. This particular service is needed for the CrudTable component. Other components may need other services. It is recommended that all interaction between the client and server be handled by a service-style script.
import ServiceUtils from '@/eframe-lib/domain/ServiceUtils'  (1)

export default {
  buildLabel(record, includeType = false) {  (2)
    return ServiceUtils.buildLabel(record.name, includeType ? 'label.sampleParent' : undefined)
  },
  find(uuid, successFunction, errorFunction) { (3)
    return ServiceUtils.find('/sampleParent', uuid, successFunction, errorFunction)
  },
  list(options, successFunction, errorFunction) { (4)
    return ServiceUtils.list('/sampleParent', options, successFunction, errorFunction)
  },
  delete(object, successFunction, errorFunction) { (5)
    return ServiceUtils.delete('/sampleParent', object, successFunction, errorFunction)
  },
  save(object, fields, successFunction, errorFunction) { (6)
    return ServiceUtils.save('/sampleParent', object, fields, successFunction, errorFunction)
  },
}| 1 | The standard ServiceUtils for the client-side access to CRUD methods for domain objects. |
| 2 | Builds the label/key value suitable for use in confirmation dialogs and similar uses. |
| 3 | Retrieves a record from the server. |
| 4 | Retrieves a list of matching records for the domain object. Supports paging/sorting/filtering. This is usually provided by the BaseCrudController class. |
| 5 | Deletes a single domain object. |
| 6 | Saves (create/update) a single domain object. |
The basic methods needed include:
-
list() -
buildLabel() -
find() -
save() -
delete()
Client Service Requirements
list() Parameters
The parameters for the list are:
| Argument/Option | Description | |
|---|---|---|
options |
A javascript object with the supported options listed here (Required). |
|
count |
The number of records (page size). |
|
start |
The first record in the page. |
|
search |
The search filter (optional). |
|
sort[fieldName]=asc |
Defines sorting on the given field name with (asc)ending or (des)cending. |
|
successFunction |
The function called when the list returns values.
The object passed to this function is result of the
list() request (converted from JSON). Values include:
|
|
eframe-lib
The common components provided by the framework are provided in the eframe-lib pseudo-module.
This is copied from the eframe source tree to the client module’s src folder
using the gradle command copyEframeLib. This does a simple copy to avoid the whole
npm package creation logic.
Normal client module developers will only need to run this gradle command when the eframe-lib changes. If you are developing inside of the eframe-lib, you will need to run this command more frequently.
Why Copy the eframe-lib?
Node/npm supports a quirky module system that is used to provide libraries for client applications. This seems to work well for other systems, but has proven to be a nightmare for this enterprise framework.
To avoid this nightmare, we chose to simply copy the library (eframe-lib) to the src tree of each client module. Since you would need to run some sort of gradle task to update the library for each client module, we decided to just use a simple copy.
Why not use the node/npm mechanisms?
Well, after losing a month of development time, we chose the simplest solution that worked. The biggest problem we had was that using Vue 3.0, Vue-CLI and Primevue together seems to cause problems with the production run-time. When using a normal npm library publishing mechanism, the rendered page was blank.
There seems to be some issue with getting those 3 libraries to work together in a production build. Why is that? We have no idea. There seem to be almost no examples of working with this combination in a published library or on Github.
So, rather than to continue spending time on this, we chose the simplest approach that worked in all scenarios/modules: copy the source to each client. The node/npm library world is simply too fragmented. For example, there are 6+ ways to publish a library. We tried most of them and could not find a way to get Primevue to work with any of them.
Someday, if we ever solve this, we will convert to a published library mechanism.
GUI Related Gradle/NPM Tasks
There are a number of npm and Gradle tasks used to run/build the client GUI pages.
-
npm run serve - Starts a local server for the client that allows hot-redeploy of the client code. Used for most client-side development.
-
npmBuild (Gradle) - Builds the client assets needed for the production application server. This is done to allow the Micronaut application server to provide the client GUI to the browser. See Controller for GUI Entry Page for more details on how this is served up by the application server.
-
copyEframeLib (Gradle) - Copies the eframe-lib source to the client module’s src folder. This makes it easier to re-use the library features such as [CrudTable].
-
npmInit (Gradle) - Runs the
npm installcommand on a client module. Typically only needed once on creation of cloning of the repository fro Git.
GUI Development Setup
GUI Setup - New Client Module GUI Setup - Existing Client Module GUI Setup - Common Setup GUI Setup - IDEA [GUI Setup - Build Eframe Library] Client Module Version Dependencies
If you have cloned the GIT repository for an existing client sub-module, then follow the GUI Setup - Existing Client Module instructions. For new client sub-modules, follow the GUI Setup - New Client Module instructions.
Some important notes about client development:
-
npm will install most modules in the sub-folder (node_modules). This tends to be a huge directory. You will want to make sure it is in the git exclude file.
-
Each client sub-module will use its own set of modules/versions. These will be packaged for each module separately.
-
Some packages are installed globally. This means they are not in the (node_modules) folder. You can see which ones are global with the command npm list -g --depth=0 .
GUI Setup - Install Node and npm
Install node and npm. This provides the npm tool, which is used to install all of the javascript modules such as Vue and related modules.
GUI Setup - New Client Module
Creating a new client module is somewhat complex. The easiest solution is to copy the eframe/src/templates/client/sample folder to a new client folder in your module. It should be copied to the module/src/client/module folder (replace module with your ne module’s name).
  cd src/client
  mkdir quality (1)
  cd quality
cp -r ../../../../templates/client/sample . (2)| 1 | Creates a sub-module named 'quality'. Use the sub-module name for your new client sub-module. |
| 2 | Use the correct source path for the eframe templates folder here. Linux command shown. Use drag/drop on Windows. |
Edit Copied Files
Some of the files created above will need to be changed for your new client module. The notes below assume the new client module name is 'quality'. Use your module name instead.
| While editing in Intellij, you will receive requests to run 'npm install'. Ignore these requests until you have finished editing the files below. |
-
package.json - Need to change the top-level name/version. You may need to adjust versions to match the current eframe package.json file.
-
vue.config.js - Change the '/client/sample' path to '/client/sample'.
-
vue.config.js - Change the 'GUIPage' section to the name of your page(s).
-
gradle.properties - Set the
clientModules=quality
The gradle.properties file should have an element like this:
clientModules=quality (1)| 1 | The list of client modules to init/build. This can be a comma-delimited list for multiple modules. |
See Entry Page Structure for more details on how the client pages are defined.
Run npm Init
Next, you will need to initialize the npm module system with this gradle option or let Intellij run it for you when prompted. The gradle commands are:
  cd quality (1)
  ./gradlew npmInit
./gradlew copyEframeLib| 1 | The new client modiel created above. |
GUI Setup - New Client Module without Template
Creating a new client module without the template is a complex task. Don’t attempt this without a good reason.
  cd src/client
  npm install -g @vue/cli (1)
  vue create moduleName (2)
  cd moduleName
  npm install vue@next --save (3)
  npm install primevue --save  (4)
  npm install primeicons --save
  npm install primeflex --save
  npm install vue-i18n@next --save
  npm install axios vue-axios --save
  npm install vuex@next --save
  npm install in-memoriam --save
  npm install compression-webpack-plugin@6.0.5 --save-dev
npm install webpack-bundle-analyzer --save (5)| 1 | Installs the command line tool as a global utility. This only needs to be done once for a given development system. This provides the vue command used next. |
| 2 | Select the Vue3 option if prompted. Creates a new module folder with an empty project structure. The moduleName should match the module name used for the server-side. See IDEA and the Client Folder if you see the error that vue.ps1 is disabled (on windows powershell). |
| 3 | Should install latest Vue 3.x. |
| 4 | The rest of the locally installed modules for use in your client module. |
| 5 | Analysis tool for exploring your package assets for production. |
To run your client project, you can run the local development server that was created by the vue create command above:
  cd quality
  npm run serve
This runs the template client for testing purposes. You will replace most of the template html, javascript and Vue files for your module.
GUI Setup - Existing Client Module
Once you have cloned the GIT repository, you will need to run these Gradle tasks:
-
(once) npmInit or npmInitAll - Runs the npm install command in the client module(s). This downloads the npm libraries used by the client.
-
(after updates) npmBuild or npmBuildAll - Runs the npm build command in the client module(s). This builds the production assets. Typically, this is run after client module code changes.
-
(after updates) copyEframeLib or copyEframeLibAll - Copies the current eframe-lib files to your module. This is needed whenever the source for the eframe-lib changes.
GUI Setup - Common Setup
These setup actions apply to new and existing installations.
Powershell on Windows
Many Vue/npm commands are shipped as powershell commands (*.ps1). By default, these are restricted in powershell. You will get an error like this:
vue --version (1)


vue : File ..\vue.ps1 cannot be loaded because running scripts is disabled on this
system. For more information, see about_Execution_Policies at https:/go.microsoft.com/...
At line:1 char:1
+ vue --version
+ ~~~
    + CategoryInfo          : SecurityError: (:) [], PSSecurityException
+ FullyQualifiedErrorId : UnauthorizedAccess| 1 | Command to print current version of vue in the client folder. Will fail on systems with Windows Powershell. |
To avoid this, you should add .cmd to the end of the command:
vue.cmd --versionYou could also just remove the .ps1 file from the global npm folder (C:\Users\XYZ\AppData\Roaming\npm) or enable execution of .ps1 files are described by Microsoft.
GIT Exclude File
Node/npm has a lot of files copied to your development folder. These should be excluded from the IDEA and GIT since they are generated files or open source libraries. This means you should have these lines in your project’s GIT exclude file:
/eframe/src/main/resources/client/         (1)
/eframe/src/client/eframe/node_modules/    (2)
/eframe/src/client/sample/src/eframe-lib/ (3)| 1 | The production files created by the npmBuildLib task. |
| 2 | The client module’s dependencies (huge). |
| 3 | The copied eframe-lib source for support code for each client module. |
GUI Setup - IDEA
The IDEA setup for npm development is fairly simple. There are two basic run configurations.
The first is to run the development server as localhost:8081. This lets you change your client code and the server will update with those changes without restarting.
| Setting | Value | Description |
|---|---|---|
type |
npm |
The task is created from the npm template (Add New Configuration). |
package.json |
package.json |
The package-json for the client module. |
command |
run |
|
scripts |
serve |
Starts the dev server with hot-updates for your changes. |
The second is the task to build the production assets for the client pages. You will run this and then start/restart the micronaut application server to test your client in a live server. This will build the assets and store them in the src/main/resources/client so the development server will have access to them for use in the live server.
| Setting | Value | Description |
|---|---|---|
type |
npm |
The task is created from the npm template (Add New Configuration). |
package.json |
package.json |
The package-json for the client module. |
command |
run |
|
scripts |
build |
Builds the production assets for a live micronaut server. |
arguments |
— --dest ../../main/resources/client/eframe |
This is where the assets will be created. This folder is the normal resource folder so that IDEA will copy them for use in the running development server. (The arguments starts with two hyphens). |
| Intellij doesn’t always copy the main/resources/client/ files to the out folder after a re-build. We found that a Gradle 'Reload all Gradle Projects' in the Gradle window works. After the reload, you will need to restart the localhost process. |
Excluding the Client Folder from Searches
Since the client assets are copied to the main/resources/client folder, the contents will show up by default in the IDEA searches. This is inconvenient. In the IDEA Project Structure dialog (module eframe/main) you can 'exclude' the resources/client/eframe folder. (Replace eframe with the client sub-module name).
IDEA and the Client Folder
After installing these packages, the IDEA Commit tab will contain thousands of files from the node_modules folder. You should exclude this folder. Select the folder in the Project tab and choose the Git → .git/info/exclude option to exclude these from the Git logic.
This will add it to the .git/info/exclude folder.
Client Module Version Dependencies
npm uses two files for version control:
-
package-lock.json - The main module version listing for all modules. This includes the exact version installed for all modules. This file supercedes the package.json when the npm install command is used.
-
package.json - The top-level modules used. Contains the general versions for the modules. This is usually something like '^3.0.7' which means any 3.x version.
The package.json and package-lock.json files are updated when you install a new module as we did above with the tasks in GUI Setup - New Client Module.
When building the client modules on other systems from the git source, we use the command npm install. This installs all of the dependencies specified in the package-lock.json file. This uses the exact version from the package-lock.json file. The version from the package.json is not used for this scenario.
| The package-lock.json is the primary source of the versioning for npm. Unfortunately, this is independent of the build.gradle files. |
GUI I18n
All GUIs must be localized. The client sub-module supports multiple locales, with varying support for languages. The fallback language (English) is fully supported. All text used on all display elements should be localized.
To support this localization, the client side of the framework supports locale files for each supported language. A typical set of files for a client module will include:
-
src/locales/en.js - The English language values. The fallback language.
-
src/locales/de.js - The German language values (Optional). Other languages can be used too.
-
src/locales/Locales.js - The combined language locales for the module.
For example, the English file will look something like this:
export default {
  getLocale() {  (1)
    return 'en'
  },
  getMessages() {  (2)
    return {
      label: {     (3)
        category: 'Category',
        fields: 'Fields',
        flexType: 'Flex Type',
        title: 'Title',
        searchStatusGreen: 'Green',
      }
    }
  }
}| 1 | Provides the locale (language only supported). |
| 2 | Provides the localized text. |
| 3 | The basic types include (e.g. 'label', 'title', etc.). The lookup key will be something like 'label.title'. |
These en.js, de.js, etc files are references in a single file for your module:
import en from './en.js'  (1)
import de from './de.js'

export default {
  getLocales() {  (2)
    return {en: en.getMessages(), de: de.getMessages()}
  },
}| 1 | Loads the specific locale files for each language. |
| 2 | Provides the locales to the I18n system. |
Using the Locales in your client app is farily simple. There are two approaches allowed:
<template>
  <Button>{{ $t('label.flexType')  }}</Button>  (1)
  <Button :label="$t('label.cancel')"/>         (2)
</template>


export default {
  methods: {
    getLabel() {
      return this.$t('label.flexType')}  (3)
    },
  }
}| 1 | Use the 'mustache' syntax in the template/HTML section. The localized text can’t be used as the content of an attribute. |
| 2 | Used as a property/data element on the component. |
| 3 | Used as a method call with the global $t() syntax within Javascript. |
| The 'mustache' syntax can’t be used in an HTML attribute. For example this won’t work: <Button label="{{ $t('label.flexType') }}"/>. You will need to use option 2 above (e.g. :label="$t('label.cancel')"). |
Lookup in GUI Tests
The BaseGUISpecification tests will need to verify that labels are looked up correctly from the en/de.js files. This is done with the utility WebClientLookup . The WebClientLookup class parses the en/de.js file(s) and uses the values from the .js files for the lookup.
This avoids two mechanisms for localization (.js and .properties).
Monitoring
This section covers general-purpose monitoring of your enterprise application. Some of the information here is useful for your users. You should document the specific areas monitored in your application.
Logging
Levels Logging Guidelines Micronaut logback.groovy Dynamic Logging Configuration Stack Trace Logging Javascript Client Logging Useful Logging Settings
Logging is a key part of monitoring and diagnosing enterprise applications. You should monitor the logs to find problems before your users do. This framework relies on the logging provided by Slf4j and JSNLog.
This logging is configured from Micronaut logback.groovy or from the Dynamic Logging Configuration page.
Levels
The framework uses the standard Log4j logging levels:
-
Fatal - A system-wide fatal error has occurred.
-
Error - A non-fatal error.
-
Warn - A warning. Something that should be investigated, but is not critical.
-
Info - Information on the execution of the application. Typically, performance timings are used here.
-
Debug - Debugging information. Depends on the class logging the information. Typically includes inputs, outputs and possible work arounds for bugs.
-
Trace - Detailed debugging information.
By default, Error and Fatal messages are logged. You can configure the system to log other messages for all classes or for specific classes.
The Info, Debug and Trace levels are normally documented in the Javadoc for the class that issues the log message.
Logging Guidelines
Logging can be a big performance drain if done incorrectly. The framework uses the simplest Slf4j approach for best performance and clarity:
import groovy.util.logging.Slf4j

@Slf4j

   . . .

log.trace("Summarizing Metric {}", metric) (1)| 1 | Uses replaceable parameter to avoid expensive toString() call if logging is not enabled. |
This also helps with code coverage metrics.
It is best to avoid using these approaches:
log.trace("Summarizing Metric $metric")

if (log.traceEnabled) {
  log.trace("Summarizing Metric $metric")
}
This works fine, but can hurt performance even if the log message is not written to the log. The second option is more verbose.
Micronaut logback.groovy
The framework uses the normal logging mechanism from Micronaut (logback.groovy). See Logback for details.
Dynamic Logging Configuration
The framework provides a GUI to display and temporarily adjust the logging levels for many elements. This allows you to set the logging levels for controllers, domains and services. It also provides other logger settings such as SQL tracing.
| Many loggers can produce a huge amount of data and can slow down your application. Please be careful when enabling logging on production servers. |
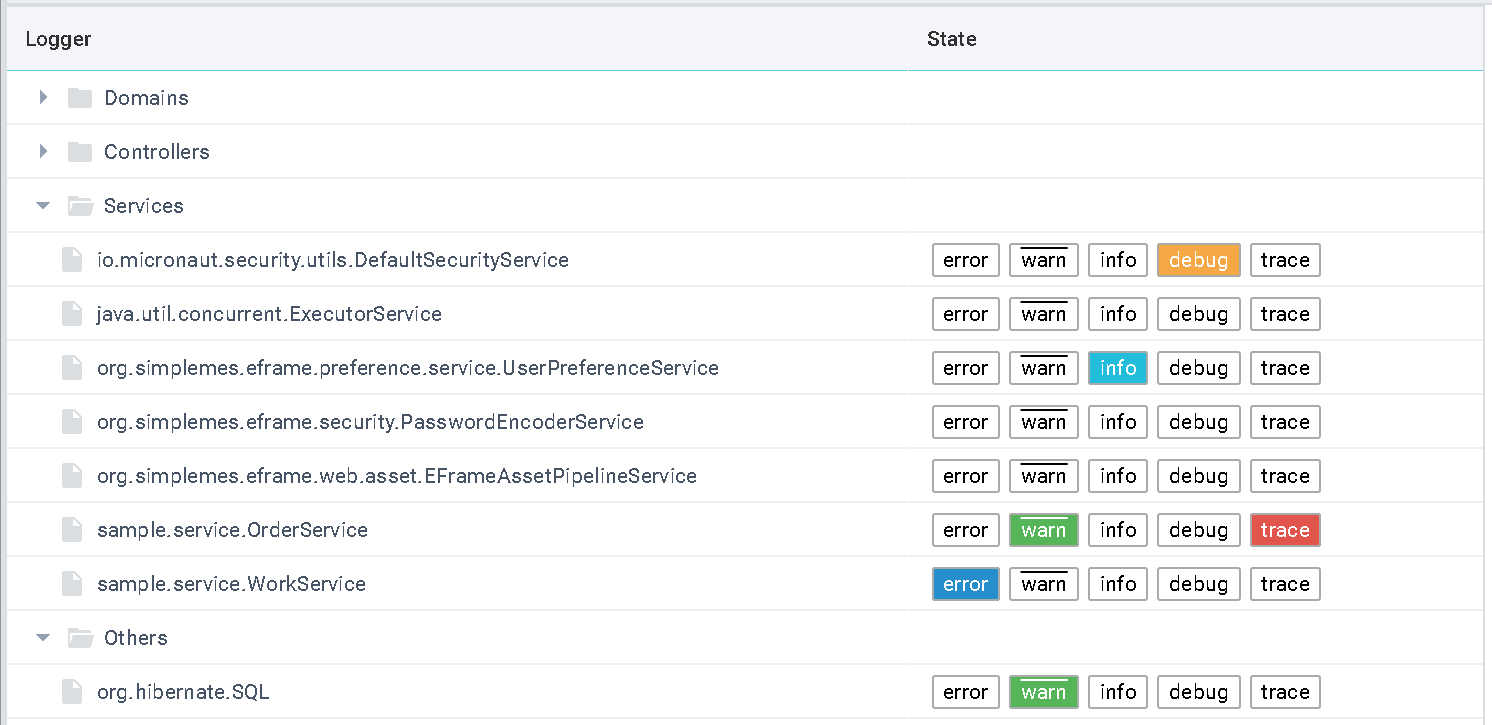
Logging changes made in this GUI are not persistent. You will need to use the Micronaut logback.groovy approach for persistent changes.
This dynamic logging page shows all possible domains, controllers,services and client pages that might have logging available. Not all entries listed have logging messages in their code.
Stack Trace Logging
During development and testing, you generally want stack trace logged. You can do this on specific controllers (or the BaseController) as needed.
If you want to see some exception stack traces, then you can set the logging level for 'StackTrace' to debug. This will make sure the stack trace is printed out in a number of cases (e.g. from BaseController).
Javascript Client Logging
Many of the framework’s javascript libraries and UIs use the JSNLog logging framework for this client-side logging. The messages are logged to the javascript console in the browser and optionally to the application server logs. The JSNLog library is part of the normal assets loaded into all pages by the header.ftl include file.
This [efGUISetup] will check the systems logging level for the given page and set it when the page is displayed. If the logging level is changed on the server, the page must be refreshed to use the new logging level.
The logging levels can also be configured from the standard Micronaut logback.groovy file or from Dynamic Logging Configuration page. There is a section that lists all of the views and their current levels. There are also two important entries at the top:
-
client - The default level for all clients. This is the parent logger for all client views. This works the same as the package-level logger setting for Java classes.
-
client.to-server - The logging level that means: send the client log message to the server log. This will echo the message in the server log.
| These two levels affect all clients. These two settings can generate a huge amount of log data on the server. Use Carefully!. |
An example use of the logging framework is shown below:
JL().info("log message");The default behavior of the client side logging is:
-
Logging is written to the browser’s javascript console.
-
Important messages are sent to the server (along with recent lower-level messages).
Searching
Details Search Configuration Searchable Domains Query String Adjustments Search Admin Search Engine Request Queue Troubleshooting Search Issues
Search Overview
Search is an important part of any modern web-based application. This framework provides built-in tools to index your domain classes and provide searching capabilities. The search feature has these key requirements:
-
Search all fields in a domain (used to find records in the standard list pages).
-
Global text search of all fields on all domains.
-
Search custom fields.
-
Search archived records for long-term traceability features.
-
An external search engine to allow scaling.
-
No significant impact on application startup or test startup.
Because of these requirements, we decided to implement a custom integration with the Elastic Search engine. The framework uses the Elastic low-level Java API to reduce dependencies. This should not cause problems with your application code since this is hidden from the application level code.
The main features involved in search are:
-
SearchService - Provides ability to search one or more domains. This is the main API access for most application code.
-
SearchController - Provides a GUI for these features and access to admin actions such as re-index all.
-
Domain search definitions - Defines how to index a domain.
-
Automatic indexing of domains on update/create.
The basic index updates are made by background threads to reduce the affect on the run-time application code. This background mechanism uses queues to allow multiple threads to request index updates as needed.
Search Layers
The search logic is broken into layers. Generally, most application code should start at the service/helper layers and let the lower layers handle the details. The layers and important objects involved are:
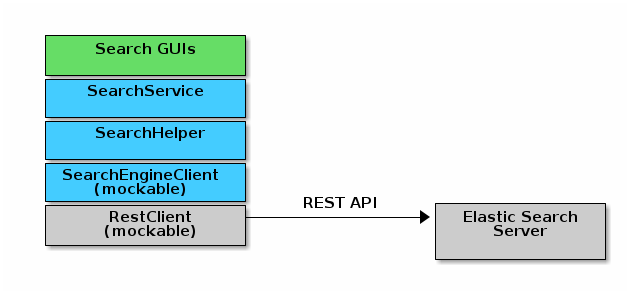
The SearchService provide the important search method:
-
globalSearch()- Searches all domains for the given string. Structured Elastic Search formats are supported.
If you need to unit test your application code, then refer to the existing search tests such as SearchHelperSpec. These tests use the MockSearchEngineClient to simulate most search engine actions.
Search Indexing
This framework’s use of Elasticsearch is designed around a single index for each domain class and an archive index for each archived domain class. This provides a structured way to search for data and still allows for a global search capability.
The search index name is the domain’s class name (minus package), in lower-case with a hyphen for a delimiter between words. For example, the index for FlexType is 'flex-type'.
The archive index has '-arc' added to it. Also, archived domains have a special field added: '_archiveReference' that stores the archive file reference.
Search Paging
The paging mechanism for searches is slightly different from the normal Toolkit and database paging mechanisms. This makes for confusing overlaps with the other paging values. The paging names and meanings are shown below:
| Feature | Field | Description |
|---|---|---|
Search |
from |
The index of the first result to show. |
size |
The number of results to show. |
|
GUI Toolkit |
start |
The index of the first result to show. |
count |
The number of results to show. |
|
Micronaut Data (DB) |
from |
The page number of the first result to show. |
size |
The number of results to show. |
Search ID
Elastic search uses a unique ID for all objects indexed. The enterprise framework uses the domain class’s UUID as this ID. It is stored internally in the search engined as _id.
Search Configuration
Your search configuration is set in the application.yml file as normal. The default settings are shown below:
eframe:
  search:
    threadInitSize:  4    (1)
    threadMaxSize: 10     (2)
    bulkBatchSize: 50     (3)
    hosts:
- {host: localhost, port: 9200, protocol: http} (4)| 1 | threadInitSize - The initial thread pool size for the background tasks. |
| 2 | threadMaxSize - The maximum thread pool size for the background tasks. |
| 3 | bulkBatchSize - The size of the batch for bulk index requests. Used when rebuilding all indices. |
| 4 | hosts - A list of search engine hosts that can process requests. |
threadInitSize
The threadInitSize value is the initial number of threads created to handle background search
indexing requests. This should be fairly small for most cases. (Default: 4).
threadMaxSize
The threadMaxSize value is the maximum number of threads created to handle background search
indexing requests. This should be no larger than your search engine server can handle. If it
is too small, then request may back up in the queue and indexing will lag. If it is too big,
then the search engine may slow down significantly. (Default: 10).
bulkBatchSize
The bulkBatchSize value max batch bulk re-index requests. Used when rebuilding all indices.
This helps reduce the load on the search engine server when forcing a full index rebuild.
A larger value may be needed with extremely big databases, but it will increase the load on the
the search engine server. (Default: 50).
If you set this to a very large value, then the each request will be large and may consume too much memory. If too small, then this will generate a huge number of small requests to process. The default is a good compromise.
hosts
These are the search engine servers that you will use. Only one is required for the search feature to work correctly. Multiples are supported. No default is provided. (Required).
eframe:
  search:
    hosts:
      - {host: localhost, port: 9200, protocol: http} (1)
- {host: elastic, port: 9200, protocol: http}| 1 | Multiple hosts can be defined. |
This defines the servers to connect to for the external search engine.
Fallback
To speed testing and reduce setup time, you don’t have to use a search engine. Instead, the places where the search engine is used will either be disabled or will fall back to simpler SQL-based searches.
The standard definition List pages will use SQL searches on the primary key field. Most other search features will be disabled.
The goal of the fallback is not to provide the entire set of search features. The goal is to make sure you can test other aspects of your application without the overhead of an external search engine. To make this even easier on you, the initial connection to the external search engine is only made when it is first used.
Searchable Domains
Index Domain Requirements Index Options Excluded Fields Indices Created Default Mapping Search and Child Record Updates
Index Example
By default, domains are not searchable. You will need to add a static field to the domain class to tell the framework that the domain is searchable. The simplest approach is:
@MappedEntity
@DomainEntity
@JsonFilter("searchableFilter")  (1)
class Order {
    . . .
  static searchable = true       (2)

}| 1 | The @JsonFilter defines the 'searchableFilter' for this domain when generating the
JSON document for the search engine. This is needed if you use the excludes
Index Options.
This will also filter out some un-searchable elements to reduce the size of the search
engine documents. This removes fields such as dateCreated, uuid and numerics. |
| 2 | The domain is marked as a top-level searchable domain. |
In general, you should make the important top-level objects searchable. You should not mark child elements of these top-level domains. They will be part of the nested JSON document sent to the search engine. This allows you to search for nested values more easily. It does have the drawback of using larger documents in the index. Of course, it means fewer documents in the index too.
Index Domain Requirements
The domains have some requirements to make indexing work:
-
@JsonFilter("searchableFilter") - Indicates the JSON filter used for the search content. See Index Example.
-
version - A version field in the domain. Must default to 0 for new records.
-
static searchable field - The domain must be flagged as searchable. See Index Options.
Index Options
When the domain object is indexed, there are other options.
static searchable = [searchable: false, exclude: ['title', 'releaseDate'], parent: Order]The following options are allowed in the searchable value:
-
exclude - The field(s) to exclude. These fields are excluded at this level of the index. The value can be a single string or a list of strings. This option requires the use of the @JsonFilter("searchableFilter") on the domain class, as mentioned above. (Optional)
-
parent - The immediate parent domain object that is searchable. This means that changes to this domain will trigger a re-index on the parent (or grand-parent, etc). The value is a Class. (Optional)
-
searchable - If true, then this is the top-level of the search document. This is the same as 'static searchable=true'. If false, then it will not be sent to the search engine, unless it is a child of another top-level document. You may need to set this to false to exclude fields from a child record (Default: true).
See SearchDomainSettings for the specific settings that can be defined for a domain.
Excluded Fields
As shown in Index Options, you can excluded specific fields from indexing in the search engine. This is done to speed up searches and to reduce the database size in the search server.
Some additional fields are automatically removed from the index:
| Field | Reason |
|---|---|
uuid |
The UUID is already the unique ID used by the search engine. There is no real need to search on this. |
version |
The version is a simple integer, so searches are not useful. |
dateCreated |
Dates are difficult to search on. This is better done in SQL. |
dateUpdated |
Dates are difficult to search on. This is better done in SQL. |
all fields that start with _ |
Most of these fields do not contain user-defined values for search. |
Indices Created
Elastic Search 6.x and above have deprecated the use of an index type. This means each domain will be indexed into its own index with a type set to doc. The name is the same as the domain class (hyphenated with all lower case letters). The domain Order will be indexed under the index order.
This means you need to never have domains that only differ in class case (e.g. two domains 'RMA' and 'Rma' is not allowed).
Default Mapping
The default mapping is the same as for the API Formats. This means child records will be indexed fully. Foreign references to other domains will be indexed with only their key fields. This means you can search for domains that have a foreign reference to the FlexType 'SERIAL' and the global search will find them.
Search and Child Record Updates
It is very common for the application to update a child record without updating the parent record. For example, an Order might have some order line item records. If one of those child records is updated without updating the parent, then the search engine logic won’t be automatically called.
Instead, you should explicitly let the framework know that you updated the child record. This is done for assembly records using logic like this:
  OrderAssembledComponent addComponent(AddOrderAssembledComponentRequest request) {

    . . .    (1)

    def orderAssembledComponent = new OrderAssembledComponent()
    orderAssembledComponent.save()                                (2)
    DomainEntityHelper.instance.childRecordUpdated(order, orderAssembledComponent)  (3)
    return orderAssembledComponent
}| 1 | Application logic to allow building the child OrderAssembledComponent record. |
| 2 | The child record is saved without saving the parent order for performance reasons. |
| 3 | Notify the framework and search engine that the order has changed. This normally triggers a re-indexing of the parent record. |
Query String Adjustments
The search engine is very versatile in finding data. However, some of the query strings the user must build can be very complex. For example, the search term must match the entire term that is indexed by the search engine. This means if the object contains 'Monitor', then the search string 'Mon' will not find the object.
Another more complex issue is when the data is deeply nested. To find a custom LOT value of
'87929459' in an assembled order (the MES-Assembly module) the user needs to use the
query string:
assembledComponents.assemblyData_LOT:87929459
We want to use a simpler format:
assy.lot:87929459
To make this possible, the MES-Assembly module will adjust the query string under the right scenarios to find the data the user wants.
The framework adjusts the query string using the method SearchService.adjustQuery() . This allows each module (see Module Additions) to adjust the string for its own data structures.
Most adjustments happen only on simple query strings. If the string contains a quote, then the string is usually not adjusted.
The framework performs a simple adjustment that adds '*' to the string if it does not have a '*' in the string. This allows partial searches to work easier. This is only done if the query string is simple. If the string has a space, parentheses or other query logic then the adjustment is not made.
Search Admin
The search admin page shows the current status of the external search engine and any background tasks that pending (including a background index rebuild tasks).

Rebuild Search Indices
The admin page displays a button to rebuild all search indices for the system. This will:
-
Ask the user: Are you sure?
-
Delete all indices in the external search engine.
-
Start rebuilding the indices for all searchable domain objects.
-
Start rebuilding the indices for any archive files found in the file system.
Since these tasks can take a long time, they are executed in the background. This admin page will show the current status of the rebuild tasks.
The bulkBatchSize setting is used to build the bulk index requests.
Each request will contain this number of records (batchSize). If you set this to a very large
value, then the each request will be large and may consume too much memory. If too small,
then this will generate a huge number of small requests to process. The default is a good
compromise.
Search Engine Request Queue
Whenever a searchable domain object is updated, a request is created to create/update the index in the external search engine. This can generate a huge amount of request on a heavily loaded system. To avoid application slow-down, the framework implements a thread pool executor SearchEnginePoolExecutor to handle these requests. This executor also handles bulk index requests and index delete requests.
This executor has an unlimited request queue and a finite number of threads to process these requests. In practice, this means you should not need to worry too much about the queue. The search admin page can give details on its status. The number of threads to handle these requests is configurable in the application.yml. See Search Configuration for details.
One of the drawbacks of using a queue is that it may take awhile for an updated record to be indexed. This is not a big problem, but you should be aware of it. In extreme cases when the external search engine is not available, then errors will be logged and the indexing will not take place. A re-index all action is available.
As an application developer, the executor is mostly hidden from you. Most of the application level actions should be triggered using the SearchService . Behind the scenes, a SearchHelper and a SearchEngineClient class handles the actual interface work. You should not need to use those levels of access.
Troubleshooting Search Issues
Search is a complex subject. Adding in the external search engine server makes troubleshooting a difficult task. To determine what is happening inside of the search logic, you can enable TRACE logging on the package org.simplemes.eframe.search. This will print performance data and all inputs and outputs used when talking to the search engine server.
Testing
Testing Philosophy Testing Overview Testing Guidelines BaseSpecification Detecting Test Mode Test Helpers Mocking Beans Creating Test Data Test Data Pollution Controller Testing Domains GUI Testing API Testing Dashboard Activity Testing
Automated testing of your application is critical to your success. The Enterprise Framework module helps you test your application with test support helpers.
Testing Philosophy
Our applications use the unit tests to test as much code as possible. These can be 'true' unit tests or more like integration tests. This is done for speed purposes.
GUI tests end with 'GUISpec'. These typically trigger an embedded server startup. Some tests will test domains, which will start the data store for testing the full domain stack.
What Type of Test
The automated tests for SimpleMES come in two flavors: unit/API and GUI tests. Since they are faster, unit tests are used whenever possible. GUI tests are run within a simple application server and will exercise the database and internal workings of the full application.
Here is a summary of when and where to use the types of testing:
| Objects | Unit/API Testing | GUI Testing |
|---|---|---|
Domain |
Constraints, Validations, Basic Persistence |
Rarely |
Controller |
Param Mapping, JSON Conversion, Results |
Rarely - API Access Testing |
Services |
Business Logic, Error Conditions Tests for all (most) supported scenarios. |
End-To-End Scenarios |
GUIs |
Rarely |
Most GUI Testing |
In general, any test is designed to cover just the code in one class (code under test). Some API and GUI tests cover many objects and their orchestration of complex business logic. These are usually noted as end-to-end (E2E) or GUI tests. These typically cover code that has already been tested in unit tests, but ensures that the end-to-end scenarios work as expected.
Most controller tests will test the logic using full API calls via an HTTPClient (e.g using BaseAPISpecification ). Since most controllers have little business logic, then only limited testing is needed (e.g. type conversions, error handling, response codes).
Testing Overview
The framework has a lot of support utilities to reduce your test code. In general, we want your tests to be as concise as your application code. For example, imagine you have a simple domain class:
@MappedEntity
class Order {
  @Column(length = FieldSizes.MAX_CODE_LENGTH, nullable = false)
  String order
  BigDecimal qty = 1.0
  @Nullable Product product  (1)
  BigDecimal qtyScrapped = 0.0

  static fieldOrder = ['order', 'qty', 'product']
}| 1 | Optional |
You can test this very concisely with this domain unit test DSL (Domain Specific Language):
class UserSpec extends BaseSpecification {  (1)

  static dirtyDomains = [User, Role]  (2)

  def "verify that user domain enforces constraints"() {
    expect: 'the constraints are enforced'
    DomainTester.test {                             (3)
      domain Order
      requiredValues order: 'M1003', qty: 2.0
      maxSize 'order', FieldSizes.MAX_CODE_LENGTH
      notNullCheck 'order'
      notInFieldOrder (['qtyScrapped'])
    }
  }
}| 1 | Uses the common Spock BaseSpecification. |
| 2 | Indicates that the embedded server and database are needed and that the User and Role objects will need to be cleaned up when the test finishes. See Test Data Pollution for details. |
| 3 | A Domain test helper to simplify testing. See Domains. |
This is much shorter than the equivalent unit test without the DomainTester.
Testing Guidelines
Tests are critical to complex enterprise applications. This means you will have many thousands of tests to maintain. These tests must be reliable and easily survive changes to the core classes.
To keep these classes in good shape, we follow these guidelines:
Treat tests as if they are production code
Tests will make up at least 50% of your code base. It is critical that the test code be of the same quality as the production code. This means following the same naming, commenting and coding guidelines as the production code.
Test organization
The main goal here is to keep all tests in obvious places. When a developer needs to add a test, the specification it belongs in should be obvious.
Some naming conventions for a SomeWidget test:
-
SomeWidgetSpec - Basic tests. Some may need real database for tests using domain objects.
-
SomeWidgetAPISpec - Non-GUI tests that need a live embedded server. Typically tests REST API via an HTTP client. See API Testing.
-
SomeWidgetGUISpec - The GUI tests for the widget. Runs a live embedded server and tests via GEB. See GUI Testing.
So basically, all SomeWidget tests should be in specifications that start with SomeWidget.
Use of core domain objects
It is tempting to use core domain objects such as User or FlexType as test classes. For example, when testing the SomeWidget, it was tempting to use the User domain as a test subject. Instead, we chose to use domains for the sample.domain package.
This allows us more flexibility to change the core classes without breaking dozens of tests.
During early development, we found that the same core classes were being used in un-related tests because the domain classes had the right fields we needed to test. Then, we could not easily change the core domain class because of dependencies in the test suite. These dependencies were unnecessary, so we decided to avoid them in the future.
We still have tests that exercise the core classes, but those are directly related to those classes behaviors.
No test spec for a single specific issue
We will not create a new test specification for a specific issue. Instead, we will find the correct test specification and add a new method. It is ok to use the Spock @Issue() annotation to document what issue the test verifies.
For example, we have a bug in SomeWidget with the localization of the column header. We would add a new test method to the SomeWidgetSpec such as:
  @Issue("http://www.simplemes.org/issues/3482")
  def "verify that the primary column label is localized"() {
    given: 'some test records'
    when: 'some stuff'
     . . .
  }
The main goal here is to keep all tests in obvious places. All SomeWidget tests should be in specifications that start with SomeWidget.
BaseSpecification
There is a common Spock specification class BaseSpecification that most tests should inherit from. This base class provides simple startup and mocking features to make your tests as simple as possible. It also performs checks after cleanup to make sure that your tests did not leave too much bad data around.
Some of the cleanup checks performed include:
-
Check for records in all domains.
-
Reset any utility instance variables.
BaseGUISpecification
There is a common Spock specification class BaseGUISpecification that provides support for GUI/GEB tests. This includes login/out and debug functions for GEB elements.
Detecting Test Mode
Sometimes, you need to detect when some piece of code is running in test or development mode. This should be rare, but you can use the Holders class:
// For unit tests without server active, we will not force a change to the admin user password.
if (Holders.environmentDev || Holders.environmentTest) {
  adminUser.passwordExpired = false  (1)
}| 1 | This logic is not triggered in production mode. |
Test Helpers
There are many helper classes that make your testing easier. The helper classes used to make testing easier include:
-
DomainTester - Tests Constraints and FieldOrder
-
GUI Test Helpers - Tests CRUD GUI pages for a domain class.
-
Controller Test Helper - Controller Test Utilities.
Also, there is a series of base classes used in Spock tests that simplifies testing of common features:
-
BaseSpecification - Base class for non-GUI testing. Includes support for a database and Embedded servers test.
-
BaseGUISpecification - Base class for GUI testing or non-GUI testing. Includes GUI login/logout and other common functions.
-
BaseAPISpecification - Non-GUI access to controller actions in integration tests.
Mocking Beans
Quite often, you will need to mock a bean for use in your tests. The framework provides a simple way to mock the bean.
given: 'a mock object mapper'
new MockBean(this, ObjectMapper, new ObjectMapper()).install() (1)

when: 'the bean is found in the context'
def bean = Holders.applicationContext.getBean(ObjectMapper)  (2)
bean instanceof ObjectMapper| 1 | The mock ObjectMapper instance is added to the context. This can be a real instance or a normal Spock Mock() class. |
| 2 | The bean is found the normal way from the Micronaut application context. This is normally done by collaborating code to find the desired singleton ObjectMapper. |
This will create a mocked bean instance from the concrete class for use in your tests.
Creating Test Data
Many tests rely on domain data to properly test your code. Creating this test data is a tedious process that can be simplified with this DSL (Domain Specific Language):
class UserSpec extends BaseSpecification {  (1)

  static specNeeds = SERVER (2)
  static dirtyDomains = [Order]

  @Rollback (3)
  def "verify that the order controller list method works"() {
    given: 'some test records'
    DataGenerator.generate { (4)
      domain Order
      count 10
      values qtyToBuild: 12.2, customer: 'CUSTOMER-$i' (5)
    }
    when: 'some stuff'
     . . .
  }
}| 1 | Uses the common Spock BaseSpecification. |
| 2 | Indicates that the Micronaut Data system needs to be started and that the Order objects will need to be cleaned up when the test finishes. |
| 3 | Rollback is supported, but not required. |
| 4 | The data generator. |
| 5 | Other values to populate the record(s). Supports G-String like replacements inside single quoted strings. |
This will generate 10 records like this:
order: ABC001
title: abc010
The primary key (if a string) will be loaded with a sequential value from 1..count. The title (if in the object) will be set to a similar value, but decreasing number will be used (e.g. count..1). This will be done in a transaction automatically, so no need to use Order.withTransaction in your test code.
See the DataGenerator for details.
To reduce the boiler-plate code in your tests, you can generate a single record with the same utility:
  def (Order order) = DataGenerator.generate { (1)
    domain Order
    values qtyToBuild: 12.2, customer: 'CUSTOMER-$i'
}| 1 | This generates a list with one element. The first record is stored in the variable
order with a type of Order. |
This relies on the ability to return multiple values from a method in Groovy.
Test Data Pollution
Test data pollution in the in-memory database can be a big problem in making tests reliable. This pollution happens when domain records are left over from earlier tests. These records can cause problems with the other tests that expect an empty database. This biggest problem is finding the test that left the data.
Most non-GUI tests can avoid this problem by using the @Rollback annotation for the test method. This works great for simple tests, but GUI tests must commit the data to the database to work.
All sub-classes of BaseSpecification will check for left over records. This checks every domain after every test and will cause the test to fail if any left over records are found.
To help you remove these records, most tests can use the simple dirtyDomains
static list of classes. After the test finishes, all records in those domains will be deleted.
Some core records such as the admin user and roles will be left in the database.
class UserSpec extends BaseSpecification {

  static dirtyDomains = [Order]  (1)

  def "verify that the order controller list method works"() {
     . . .
  }
}| 1 | Indicates that the Micronaut Data system needs to be started and that the Order objects will need to be cleaned up when the test finishes. |
If your domains support Initial Data Load, then your load method should return the list of records created as described in Initial Data Loading and Tests. This will be used to ignore those records during the test cleanup.
Multiple Record References
The dirtyDomains static value in most tests will clean up any records created in those tables.
This simplifies the cleanup process, but has some issues with complex cases.
For example, you might have a foreign key reference like this Product/Component relationship:
-
Product CPU
-
Product BOARD
-
Product DISK
-
Product PC - Has references to these components:
-
Product CPU
-
Product BOARD
-
Product DISK
-
When you delete all Product records, it might delete them in the wrong order. The delete will fail with an error like:
io.micronaut.data.exceptions.DataAccessException: Error executing SQL UPDATE: ERROR: update or
  delete on table "product" violates foreign key constraint "product_component_component_id_fkey"
  on table "product_component"
    Detail: Key (uuid)=(2e9aecd6-ab7b-4b7b-8281-dd9dec9eae84) is still referenced from table
    "product_component".
The BaseSpecification
cleanup() method will try to delete the Product records.
It may delete the CPU record first, which has a reference under the PC product, so the delete
will fail.
Sometimes this will work if the records are delete in the correct order (PC first, followed by the component records). Most of the time, it will fail.
How can you avoid this? You just need to force the cleanup() code to delete the child
records first.
static dirtyDomains = [ProductComponent, Product, MasterRouting]Ideally, the use of ProductComponent should not be needed, but it simplifies the cleanup()
logic.
Controller Testing
Controllers are the main entry point into your application from the outside world. These must be secured and rigorously tested. Test helpers are provided to make your life easier. The general philosophy of controller testing is to use real domain objects and test with a real (in memory) database. In general, most controller testing does not use the embedded server support provided by Micronaut.
Controller class testing can be tedious when you have a lot of controllers and fields to test.
Controller Test Helper
To reduce testing efforts for controllers, the framework provides a simple test helper (ControllerTester ) with a DSL suited for common controller testing actions.
The ControllerTester checks these features:
-
All methods are secured (with optional role).
-
Specific method requires a specific role.
-
Proper use of the [Task Menu] for the controller.
-
Error handling (TBD).
def "verify that controller has secured methods and meets standard requirements"() {
  expect: 'the controller follows the standard requirements'
  ControllerTester.test {
    controller OrderController
    role 'MANAGER'                 (1)
    secured 'release', 'ADMIN'     (2)
    taskMenu name: 'user', uri: '/user', clientRootActivity: false (3)
  }
}| 1 | The role required for all methods. Defaults to any annotation (even anonymous or not logged in). |
| 2 | The release method must require the ADMIN role using the Micronaut @Secured() annotation. |
| 3 | The task menu expected in the controller. The task menu 'user' must be defined with a
URI of '/user'. The URI must also not be flagged as the root URI for the logger for
the controller (default true). Other supported options include folder and displayOrder. |
By default, all public methods must be secured. If the controller is secured at the class level, then all methods are assumed to be secured.
If no role is specified for the test() method, then the test will make sure
all methods are covered by a role other than 'isAnonymous()'.
|
The most common options are shown below:
def "verify that controller has secured methods and meets standard requirements"() {
  expect: 'the controller follows the standard requirements'
  ControllerTester.test {
    controller OrderController
    role 'MANAGER'              (1)
    secured 'release', 'ADMIN'  (2)
    //securityCheck false       (3)
  }
}| 1 | The role required for all methods. Defaults to any annotation (even anonymous or not logged in). |
| 2 | The release method must require the ADMIN role using the Micronaut @Secured() annotation. |
| 3 | Completely disables the security check. |
Mock Controller Classes
To reduce coupling with the real controllers, the framework provides a way to create dynamic controllers quickly. These are compiled from source during the test and are not part of the shipped classes.
This relies on simple compilation into a local class that can be used like normal controller classes.
See CompilerTestUtils for details.
  def "verify that findDomainClass supports static domainClass value is supported"() {
    given: 'a mock controller'
    def src = """
      package sample

      import sample.domain.SampleParent

      class NotSampleParentController {
        static domainClass = SampleParent   (1)
      }
    """
    def clazz = CompilerTestUtils.compileSource(src)    (2)

    expect: 'the correct domain class is found'
    ControllerUtils.instance.getDomainClass(clazz.newInstance()) == SampleParent  (3)
}| 1 | This temporary class must refer to a real domain class. |
| 2 | Creates a temporary class from the given source. |
| 3 | The temporary class can be used in most places a real controller can be used. |
One of the big drawbacks of this approach is that the temporary class can’t refer to other temporary classes created this way. This means you will probably have to use real domain classes like SampleParent above.
Domain Testing
Domain class testing can be tedious when you have a lot of domain classes and fields to test. The framework provides a helper class (DomainTester) to make testing a little simpler.
For example, the ArchiveLog unit tests below will verify the string field max size limits and the non-nullable fields:
def "verify that user domain enforces constraints"() {
  expect: 'the constraints are enforced'
  DomainTester.test {
    domain Order
    requiredValues order: 'M1003', qty: 2.0       (1)
    maxSize 'order', FieldSizes.MAX_CODE_LENGTH   (2)
    maxSize 'password', 128
    notNullCheck 'userName'                       (3)
    notNullCheck 'password'
    notInFieldOrder (['authorities', 'password']) (4)
  }
}| 1 | Defines the required values for the domain record. |
| 2 | Verifies that the max length is enforced. |
| 3 | Verifies that null values are prevented. |
| 4 | Make sure the fieldOrder is defined for the domain class. |
These 9 lines of code replace about 60 lines of test code. You just have to define some values for the required (non-nullable) fields in your domain class and then create a sample domain object. Then you specify which fields sizes to check and which not-null constraints to check.
You will need to write any other tests for more complex constraints (such as unique value tests).
GUI Testing
Testing and Logging in GUI Test Helpers GUI Language Testing Testing lookup() GEB Page Modules Deleting Records After Tests Slowing Down GUI Tests
Integration testing is used to test the GUI-level functionality of your application in a live running system (embedded). A GUI test should exercise the features of one GUI or related GUIs. For example, testing the create/update/read/delete actions for the User domain/controller can be considered one GUI test. Most GUI tests that cover multiple domains, services or controllers should be considered an End-to-End Test.
You can use whatever functional/GUI testing framework that you prefer, but the framework and Micronaut support GEB. The GEB module is the easiest GUI testing framework to get up and running with your application.
The GEB framework uses the Selenium framework to work with the browser GUIs. This means you will need these dependencies in your build.gradle file. The framework uses these dependencies (version numbers will change):
dependencies {
  testCompile("org.gebish:geb-spock:2.1") {
    exclude group: "org.codehaus.groovy", module: "groovy-all"  (1)
  }
  testRuntime "cglib:cglib-nodep:3.2.9"
  testRuntime "org.objenesis:objenesis:3.0.1"
  testRuntime "net.bytebuddy:byte-buddy:1.9.5"

  testRuntime "org.seleniumhq.selenium:selenium-chrome-driver:3.6.0"
  testRuntime "org.seleniumhq.selenium:selenium-firefox-driver:3.6.0"
  testCompile("org.seleniumhq.selenium:selenium-support:3.6.0") {
    exclude group: "net.bytebuddy", module: "byte-buddy"
  }
  testCompile "org.seleniumhq.selenium:selenium-api:3.6.0"
}| 1 | The geb-spock module pulls in the wrong version of Groovy, so this exclude is needed. |
The framework also uses some compileOnly dependencies to allow us to build some of the test utilities and base specification classes for other module’s use.
GEB provides support for the Page Objects. The built-in test support classes make use of the Page concept and provides content references that GEB uses. A base page class AbstractPage is provided to make it easier to work with common framework elements. This includes methods to wait for all Ajax requests to finish when a page loads.
CRUDGUITester
Most definition GUIs provide the common CRUD actions in your application. These are fairly standardized and follow a consistent pattern that uses the common GUI markers such as [efDefinitionList]. GUI testing is where you test how your controller, views and domains work together. These pieces are usually tested separately in a unit test, so most of the GUI testing is done to test the mapping of your domain classes to the GUI and to verify end-to-end functionality.
To make automated GUI testing of these features simpler, the framework provides the test helper class (CRUDGUITester ) that greatly simplifies GUI testing of these pages.
The helper performs these basic tests on the GUIs:
-
List Page
-
All simple fields (string, date, boolean, number, enum)
-
Complex fields (hyperlinks, domain references)
-
Inline Grids
-
Search Ability
-
-
Show Page
-
Delete Action
-
-
Create Page
-
Save
-
-
Edit Page
-
Save
-
The helper will exercise these basic features to make sure the controller, views and domains all work together correctly. You will need to run the GUI tests with a command-line option to specify the language to be tested. See GUI Language Testing for details on testing in multiple languages.
For example, this can be used to test a simple set of definition GUIs that use the framework scaffolding:
class ProductGUITests extends BaseGUISpecification {
  static dirtyDomains = [Product] (1)

  def "verify that the standard pages work"() {
    expect: 'the pages work'
    CRUDGUITester.test {
      tester this
      domain Product
      htmlIDBase 'Product'
      recordParams product: 'PRODUCT1', name: 'First product', lotSize: 27.3 (2)
      minimalParams product: 'X' (3)
    }
  }
}| 1 | Records to be cleaned up when each test is done. UserPreference records are always deleted. |
| 2 | Defines the field values for a valid record. Most of your fields should be listed here. All fields listed here will be tested for creation/update. |
| 3 | The minimalParams defines the minimal required field values for a record. These will be
used to create a record for update testing. This record should show up after the
recordParams record. |
This example replaces 200+ lines of code in a normal GEB test. This example will test the list, show, create and edit pages for the Product domain class.
The test helper needs two sets of values for the domain record:
-
recordParams- Used to test the show, create and edit pages. -
minimalParams- Used to test the edit page and search action.
The top-level parameters listed in the recordParams or minimalParams are tested
in the GUI. Any fields not listed in these two parameter lists are ignored for the test.
|
The test helper uses the fieldOrder static list from your domain
object to determine which fields should be tested in the GUI. The display markers allow you work
on a different set of fields in your pages. If your field list is different from the
fieldOrder in some of the pages, then you can specify additional
fields to test with options in the
CRUDGUITester
using the readOnlyFields option.
Some other features of the tester allow you to tailor the test to your domain. See the CRUDGUITester for details. These includes options for:
-
Support for Dynamic Fields (using closures for the edit/create tests).
-
Ability to disable specific tests.
-
Tests for inline grids.
-
Multiple language support (see GUI Language Testing).
Disabling Test Phases
The CRUDGUITester tests all of the main CRUD definition pages: List, Show, Create and Edit. You can disable specific phases if there is a good reason. For example, to disable the Create and Edit page tests:
class ProductGUITests extends BaseGUISpecification {
  def "verify that the standard pages work"() {
    expect: 'the pages work'
    CRUDGUITester.test {
      tester this
      domain Product
      recordParams product: 'PRODUCT1', name: 'First product', lotSize: 27.3
      minimalParams product: 'X'
      enableEditTests false,    (1)
      enableCreateTests false
    }
  }
}| 1 | The two phases are disabled. |
The enable flags include (all default to true):
-
enableListTests
-
enableShowTests
-
enableEditTests
-
enableCreateTests
If you want to temporarily to run just a single test phase, you can use the -DtestOnly option:
-Dgeb.env=firefox -DtestOnly=showTesting Domains with Initial Data Loaded
The Initial Data Load feature will affect some CRUD GUI tests. These records will show up in the main list page and in drop-down lists. For this reason, it is best to make sure that your test data records show up before records loaded by the initial data loading.
For example, if the User object creates a user 'admin', then you should make sure that your tester data shows up before the admin record:
class ProductGUITests extends BaseGUISpecification {

  def "verify that the standard pages work"() {
    expect: 'the pages work'
    CRUDGUITester.test {
      tester this
      domain User
      recordParams user: 'ABC', password: 'secret', title: 'abc001' (1)
      minimalParams user: 'ABD', password: 'secret'(2)
    }
  }
}| 1 | This record will show up at the top of the list in the default short order. |
| 2 | This record will show up above the 'admin' user. |
Read-Only Fields
Some fields are defined as read-only (see [efCreate] and [efEdit]) in the page definitions.
This means the
CRUDGUITester
needs to know that those fields are read-only. This is done with the readOnlyFields option:
class ProductGUITests extends BaseGUISpecification {
  def "verify that the standard pages work"() {
    expect: 'the pages work'
    CRUDGUITester.test {
      tester this
      domain Product
      recordParams product: 'PRODUCT1', name: 'First product', lotSize: 27.3
      minimalParams product: 'X'
      readOnlyFields 'qtyReleased,qtyDone'    (1)
    }
  }
}| 1 | Defines the fields to be tested as read-only fields. |
If you forget to note the read-only fields, then you will see an error similar to:
java.lang.AssertionError: Field Value for qtyReleased is not correct. Found '', expected '0'.
Testing Inline Grids
Inline grids can be tested using the CRUDGUITester .
@IgnoreIf({ !sys['geb.env'] })
class FlexTypeGUISpec extends BaseGUISpecification {

  @SuppressWarnings("unused")
  static dirtyDomains = [FlexType]

  def "verify that the standard GUI definition pages work"() {
    expect: 'the constraints are enforced'
    CRUDGUITester.test {
      tester this
      domain FlexType
      recordParams flexType: 'ABC',  (1)
                   fields: [[fieldName: 'F1', fieldLabel: 'f1', maxLength: 23, sequence: 20]]
      minimalParams flexType: 'XYZ', (2)
                    fields: [[fieldName: 'F2', fieldLabel: 'f2', maxLength: 33, sequence: 30]]
      listColumns 'flexType,category,title,defaultFlexType,fieldSummary'
      unlabeledFields 'fields'
    }
}| 1 | Defines the fields (rows) added during the edit/create phases. |
| 2 | Defines the fields that will be in the initial value used during the edit. |
At the start of the edit phase, the rows from the minimalParams will be added to the
fields list above. Then record will be changed in the edit page by adding
the rows from the recordParams to the grid.
GUI Language Testing
Non-GUI tests frequently mock specific languages for testing the internal support for localization. For example, date input fields are tested for proper date formats in the various widget tests. This level of testing should cover most localization needs for a lot of your application.
Unfortunately, that type of widget-level testing does not verify that your app will be localized in a real browser. To verify this, the framework supports testing with multiple languages as sent by the browser to the server (using the header 'Accept-Languages'). This is done in GebConfig.groovy when creating the browser instance and in the some core classes to help you verify the localization.
This is done by re-running the GUI tests with the -Dgeb.lang option. For example, when run from the gradle command line:
./gradlew -Dgeb.lang=de-DE -Dgeb.env=firefox test
This language is used to create the browser instance. It is also used in the test helpers GUI Test Helpers and the base GUI specification class BaseGUISpecification .
Your test class can access this locale with the currentLocale property:
class ProductGUITests extends BaseGUISpecification {

  def "verify . . ."() {
    given: 'the date format to expect in the GUI'
      def format = DateUtils.getDateFormat(currentLocale)   (1)
    expect:
      . . .
  }
}| 1 | The current locale for the test from the -Dgeb.lang argument. Defaults to en-US. |
You can also change the JVM default locale using the -D option '-Duser.language=de'
instead of the currentLocale variable above.
|
Testing lookup()
The base specifications ( BaseSpecification and BaseGUISpecification ) are used in tests to compare values against the messages.properties values.
To make it clear when a looked up value is not in the .properties value, the base specifications
lookup() method will append '-missing.in.properties' to the result. This means
the test will fail until the entry is added to the .properties file.
GEB Page Modules
The framework supports many types of common GUI elements such as grids, input fields, buttons and drop-down lists. Interacting with them in GEB tests can be tedious. The [GUI Toolkit] has complex HTML structures for even simple elements like input fields.
To make working with these elements easier, we provide some GEB Modules to access them easier. For example, the Page content section for a grid looks something like this:
static content = {
  routingSteps { module(new GridModule(field: 'routingSteps')) }
}
In your test spec, you would access the routingSteps cells as:
routingSteps.cell(2,3).text() == 'M1001' (1)| 1 | Access the cell’s text at row 2, column 3. (0,0) is the first cell in the first row. |
This cell can support the text() and click() methods. The GridModule also has other content
elements that might be useful, such as headers and rows.
Some of the supported modules include:
Testing Messages Area using GEB
Many pages will display some sort of message using the Javascript function
displayMessage .
This is displayed in a standard <div id="messages""> section at the top of the page.
To make testing easier, the standard
AbstractPage
defines a messages content element as a
MessagesModule .
This messages content element can be used to test the content of the message and type:
to SomePage    (1)

then: 'the error messages are displayed'
messages.text() == lookup('error.message')
messages.isEerror()                         (2)
messages.error (3)| 1 | Some page is displayed that is a sub-class of AbstractPage. |
| 2 | Returns true if any message displayed is an error. |
| 3 | Alternate groovy property syntax. |
You should not use the messages.error (info or warn) checks when multiple messages
are displayed. The check will return true if any message is flagged as an error
(info or warning).
|
Using GEB Page Modules Outside of Pages
Most of the time, you will use GEB modules in a Page content section. Sometimes, you will need to use them in test code for dynamic fields. To do this, you create one like this:
def workList = $("body").module(new GridModule(field: 'theOrderListA'))  (1)
workList.cell(0, 0).text() == 'M1001' (2)| 1 | Create the workList GEB navigator object directly. |
| 2 | Access the cell’s text at row 2, column 'order'. (0,0) is the first cell in the first row. |
Testing and Logging in
The BaseGUISpecification base class is designed to use a single login and never log out during the tests. This speeds up tests significantly. This is accomplished by setting a configuration flag to NOT clear the cookies automatically.
Logging out is not needed for most tests. Your test should just call the login() function
(with or without a user argument). The method will automatically log out if you need a different
user/locale.
Since the framework uses cookies for JWT security, the BaseGUISpecification base class used for GUI testing is set to retain the cookies between tests.
To re-enable the clearing of cookies between tests, you may need to use this in your test
setup() method:
browser.config.autoClearCookies = true| This should only be used in special cases. Most security checks will fail without cookies. |
Deleting Records After Tests
Test data pollution can be a big problem in making tests reliable. This pollution happens when domain records are left over from earlier tests. These records can cause problems with the other tests that expect an empty database. This biggest problem is finding the test that actually left the data.
Most non-GUI tests can avoid this problem by using the @Rollback annotation for the test method. This works great for simple tests, but GUI tests must commit the data to the database to work.
See Test Data Pollution for details on simple ways to clean up these left over records.
Slowing Down GUI Tests
Sometimes, it is useful slow down GUI tests with strategic pauses. You can insert pauses in your test code but sometimes you need the server to simulate a slow execution.
A framework configuration setting is available for use in key places in the framework. For example,
the BaseCrudController list() method can wait for given number of milliseconds to simulate
a slow server response.
This setting is most easily set from the environment/command line with the given variable:
EFRAME_TEST_DELAY=1000This is a global setting and will affect all uses of the delay function.
See the delayForTesting() method in
ControllerUtils
for details.
You can also set the delay temporarily in a single test. This is done as below:
def "verify that . . ."() {
  given: 'simulate a slow server'
  Holders.configuration.testDelay = 500     (1)

  expect: 'some stuff'
  . . .

  cleanup:
  Holders.configuration.testDelay = null    (2)

}| 1 | Sets the delay to 500ms. |
| 2 | Resets the delay to none. You should normally save the original setting and
restore it in a cleanup() method. |
API Testing
Complex enterprise applications have many API entry points to test. Much of the API testing can be done by calling your controller methods directly from the test code. But you DO need to verify that these methods work in a real HTTP server environment. That testing should focus on handling of the inputs from the request and formatting the response.
You should not test every business scenario in an API test. The API tests mainly are used to verify that the controller is mapped with the correct URI and inputs/outputs. Your unit test (non-API test) should test the fringe cases and all business logic/paths.
This framework makes it easier to test the APIs by using the base specification BaseAPISpecification . This class provides some key features for testing real HTTP requests:
-
login()- Logs a user in for later API/REST test calls. -
sendRequest()- Sends a request to the server via HTTP.
These provide the ability to login to a running test server (embedded) and send requests to the server.
BaseAPISpecification
class UserPreferenceControllerAPISpec extends BaseAPISpecification {

  def "verify that findPreference works with real HTTP requests"() {
    given: 'a dialog state is saved'
    UserPreference.withTransaction {
      PreferenceHolder preference = PreferenceHolder.find {
        page '/app/test'
        user SecurityUtils.API_TEST_USER
        element '_dialogX'
      }
      def dialogPreference = new DialogPreference(width: 23.4, height: 24.5, left: 25.6, top: 26.7)
      preference.setPreference(dialogPreference).save()
    }

    when: 'the request is made for a logged in user'
    login()
    def res = sendRequest(uri: '/userPreference/findPreferences?pageURI=/app/test&element=_dialogX') (1)

    and: 'the response contains the right data'
    . . .
  }
}| 1 | The request is sent and the response should be Ok (200). |
The sendRequest() method has several options. See the Javadoc for
BaseAPISpecification
for details.
API Security Testing
All APIs are accessed via a controller. Each controller should have security defined for each public method. The Controller Test Helper provides a simple way to verify that each method has the right declarative security annotation (@Secured).
In general, you should not need to test these annotations in your controller API testing.
Dashboard Activity Testing
Dashboard activities can be complex and require some extensive testing. In particular, event handling is important to these activities. To make this testing easier, the framework provides a DashboardTestController that gives you some helpful activities for testing. These include:
-
Dashboard Event Display Helper - Displays the events triggered by an activity.
-
Dashboard Event Trigger Helper - Allows the test spec to publish any dashboard event.
-
DISPLAY_PARAMETERS_ACTIVITY - Displays the parameters passed to the activity.
Dashboard Event Display Helper
This helper displays any events triggered by the dashboard activities.
  def "verify that the selection activity sends the ORDER_LSN_CHANGED event"() {
    given: 'a dashboard with the activity'
    buildDashboard(defaults: ['/selection/workCenterSelection',                 (1)
                              DashboardTestController.DISPLAY_EVENT_ACTIVITY])  (2)

    when: 'the dashboard is displayed'
    displayDashboard([workCenter: 'WC137'])

    then: 'the order is changed'               (3)
    textField('order').input.value('ORDER1')
    sendKey(Keys.TAB)
    waitForDashboardEvent('ORDER_LSN_CHANGED')

    and: 'the event is triggered'   (4)
    def json = getDashboardEvent('ORDER_LSN_CHANGED')
    json.type == 'ORDER_LSN_CHANGED'
    json.source == '/selection/workCenterSelection'
    json.list.size() == 1
    json.list[0].order == 'ORDER1'
}| 1 | The activity under test. |
| 2 | Uses the DISPLAY_EVENT_ACTIVITY in the second panel of the dashboard. |
| 3 | Some user action triggers an event. |
| 4 | The event text is retrieved from the page, parsed and validated. The `getDashboardEvent()1 method parses the event display line with the given event type. |
This DISPLAY_EVENT_ACTIVITY will display the dashboard events in a <div> in the page
for easy access by the test spec. The UI will look something like this:
The event is rendered as JSON text that can be accessed by the test for verification.
Dashboard Event Trigger Helper
This helper lets your test trigger a dashboard activity.
  def "verify that the selection activity handles the WORK_LIST_SELECTED event"() {
    given: 'a dashboard with the activity'
    buildDashboard(defaults: ['/selection/workCenterSelection',                (1)
                              DashboardTestController.TRIGGER_EVENT_ACTIVITY]) (2)

    when: 'the dashboard is displayed'
    displayDashboard()

    and: 'the event is triggered'
    def event = [type: 'WORK_LIST_SELECTED', source: 'abc', list: [[order: 'ORDER1']]] (3)
    textField("eventSource").input.value(JsonOutput.toJson(event))
    clickButton('triggerEvent')  (4)
    waitFor {
      textField('order').input.value() == 'ORDER1'  (5)
    }

    then: 'the field is correct'
    textField('order').input.value() == 'ORDER1'
}| 1 | The activity under test. |
| 2 | Uses the TRIGGER_EVENT_ACTIVITY in the second panel of the dashboard. |
| 3 | The JSON for the event 'WORK_LIST_SELECTED' is placed in the input field. |
| 4 | The event is triggered with the button in the helper activity. |
| 5 | The test waits for the activity being tested to handle the event. |
This TRIGGER_EVENT_ACTIVITY will provide an input field to enter the JSON for the event to be triggered. The UI will look something like this:
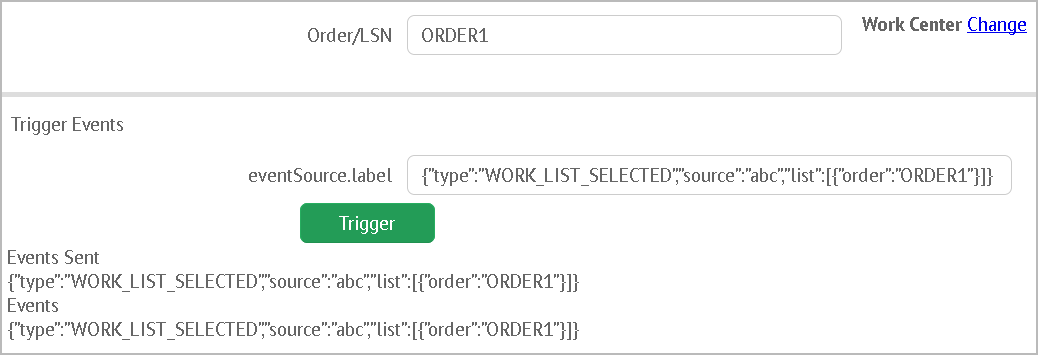
API
This section describes how you can create consistent and easy to use APIs for your application. The goal is to provide you with tools to create the APIs and avoid repeating yourself too much in the process.
Many of the default Micronaut/Jackson features come close to the proper enterprise approach, but they miss out in key areas. This includes dealing with domain references and other related issues. These issues are mostly hidden from you when you use the built-in Rest API support for this framework. It handles most of the strange database issues and supports the right formats (e.g. ISO Date formats, etc).
If you do not use the built-in Rest API, then you will need to handle these types of issues:
-
Create/Read/Update/Delete (CRUD).
-
Child records.
-
Date/time encoding (ISO).
-
Child record removal.
-
Clean key field handling (no database UUIDs needed).
-
Support for optional database UUID in references to other objects.
-
One-to-one relationship handling.
-
One-to-many relationship handling (children).
-
Standardized Controller/Service use for APIs.
JSON
Persistence Aware Module for Jackson UUID Support @JSONByKey @JSONByID Mapping Generic Objects to JSON (TypeableMapper)
The enterprise framework uses JSON for external API access over HTTP. We use the Jackson library for creating and reading JSON data.
Persistence Aware Module for Jackson
The EFrameJacksonModule provides a number of features that your application will use automatically:
-
Reduce chances of infinite recursion when serializing parent/child relationships.
-
Reduce JSON size for foreign references.
-
Support for Encoded Types
This means you will rarely need to add Jackson annotations to your code to handle JSON issues. There are a special cases you may need to use below:
UUID Support
The primary ID for most domain entities is a UUID. This is generated by the Micronaut Data
layer when a record is created. The UUID is always stored in a field name uuid.
This allows special-case handling that reduces the application level code.
One key area is in the JSON Rest API. The support classes will handle UUID in special cases
to avoid creation of duplicate UUID’s. In particular, the BaseCrudRestController will
ignore the uuid field when creating new records. This will force the persistence layer
to generate new UUID’s on creation.
@JSONByKey
In some cases, you may need to serialize/deserialize a POGO that contains domain objects. To make this JSON smaller, we provide an annotation that will use a single key field for the serialization/deserialization process. This makes things like the dashboard [Undo] capability more smaller/simpler for the client. The Undo feature use a JSON serialized POGO to define what needs to be done to undo an action.
| This feature currently only works with the first primary key that is a string value. |
class StartRequest {
  String barcode

  @JSONByKey
  Order order  (1)

  @JSONByKey
  WorkCenter workCenter

  BigDecimal qty

  Date dateTime
}| 1 | Will serialize this as "order": "ORDER_123". Just the primary key field will be used
to access the database record for the Order. |
This produces JSON similar to this:
{
    "barcode": "M1001",
    "order": "ORDER_123",
    "workCenter": "ASSEMBLY007",
    "qty": 1.2
}
When deserialized (in a transaction), this will find the Order and WorkCenter object and populate them in POGO.
Some notes on error conditions:
-
If the record can’t be found in the database, then an exception is thrown at run time (deserialize).
-
If the annotation @JSONByKey is used on a non-domain field (e.g. a String or other field), then an exception will be triggered at run-time (serialize and deserialize).
-
If the annotation @JSONByKey is used on a field with a name that can’t be converted to a domain class, then an exception will be triggered at run time (deserialize). (e.g. an
Orderfield with a name 'theOrder'),
These errors are not detected at compile time.
@JSONByID
In some rare cases, you may need to serialize/deserialize a POGO that contains domain objects. This is similar to @JSONByKey, but you need to use a record UUID instead of the key field. To make this JSON smaller, we provide an annotation that will use the UUID only for the serialization/deserialization process. This makes things like the JSON processing for other systems simpler.
class StartRequest {
  String barcode
  @JSONByID Order order  (1)
  @JSONByID WorkCenter workCenter
  BigDecimal qty
  Date dateTime
}| 1 | Will serialize this as "order": "dbb0c868-3ae5-4fd1-a0a4-e0ddda375e2b".
Just the database record UUID will be used from the domain Order. |
This produces JSON similar to this:
{
    "barcode": "M1001",
    "order": "dbb0c868-3ae5-4fd1-a0a4-e0ddda375e2b",
    "workCenter": 4567,
    "qty": 1.2,
    "dateTime": null
}
When deserialized (in a transaction), this will find the Order and WorkCenter object and populate them in POGO.
Some notes on error conditions:
-
If the record can’t be found in the database, then an exception is thrown at run time (deserialize).
-
If the annotation @JSONByID is used on a non-domain field (e.g. a String or other field), then an exception will be triggered at run-time (serialize and deserialize).
-
If the annotation @JSONByID is used on a field with a name that can’t be converted to a domain class, then an exception will be triggered at run time (deserialize). (e.g. an
Orderfield with a name 'theOrder'),
These errors are not detected at compile time.
TypeableMapper
The Jackson JSON mapper is very flexible, when the Class of the object being de-serialized is know ahead of time. It does not easily handle reading generic object when the Class is not known by the caller. To work around this, the framework provides a TypeableMapper that will handle these scenarios.
To avoid security issues, this mapper will only read objects that are:
-
Domain Entities - Must have the @MappedEntity annotation.
-
Implements TypeableJSONInterface - Specific classes marked with this interface
These objects can be in a list or a map. To handle these scenarios, the mapper creates/reads a JSON array with pairs of elements that specify the class name and the value. Maps also use a third element for the map entry name.
For lists, the array looks something like this:
[ "org.simplemes.mes.demand.Order",  (1)
  {
    "order": "SC1",                  (2)
    "dateCompleted": "2013-05-11T18:29:50.307Z",
    "lsnTrackingOption": "ORDER_ONLY"
  },
  "org.simplemes.mes.action.ActionLog",  (3)
  {
    "action": "RELEASE"
  }
]| 1 | The class name for the first element. |
| 2 | The value for the first element. |
| 3 | Other class/value pairs. |
An example that writes and reads the objects from a JSON file is shown below.
def writer = new File("out.json").newWriter()
TypeableMapper.instance.start(writer)
TypeableMapper.instance.writeOne(writer, object1, true) (1)
TypeableMapper.instance.writeOne(writer, object2, false)
TypeableMapper.instance.finish(writer)
writer.close()| 1 | First object is written. |
def reader = new File("in.json").newReader()
def list = TypeableMapper.instance.read(reader) (1)| 1 | A list of the objects is de-serialized from the file. |
Rest API
The enterprise framework supports a standard REST (Representational state transfer) API where appropriate. The domain objects are exposed by controllers for CRUD actions. API Actions - Non-CRUD are implemented as services that are also exposed by controllers, but with specific URL endpoints.
| Only JSON is supported in these Rest API methods. |
The authentication is handled by logging in to the '/login' page and then use the response cookies (JWT and JWT_REFRESH_TOKEN) in the REST requests for authentication. See Security for details.
CRUD
In general, Create, Read, Update, Delete (CRUD) actions are handled by REST-style URLs and HTTP methods on the object’s controller page. Most of the time, you will use the BaseCrudRestController in your controller to support REST-style JSON API for your domain classes. An example is shown below:
@Secured("MANAGER")
@Controller("/somePath")
class SomeController extends BaseCrudRestController { (1)

  . . .

}| 1 | Handles standard Rest CRUD API actions (GET, POST, PUT and DELETE). |
An HTTP GET request on the URI /product/crud/BIKE27 will read a Product and return the given JSON response:
{
  "uuid":"dbb0c868-3ae5-4fd1-a0a4-e0ddda375e2b",
  "product":"PRODUCT_XYZ",
  "description":"Standard 27-inch Bicycle"
   . . .
}
GET (read)
A GET is used to read data for a specific record. The record to read is identified by the URL.
For example, to read a Product, use a an HTTP request like this below:
uri: /product/crud/PRODUCT_XYZ (GET)
The record’s JSON is returned as the response content. It is also possible to perform a get with the record’s internal ID with a URI:
uri: /product/crud/dbb0c868-3ae5-4fd1-a0a4-e0ddda375e2b (GET)
The response is shown below:
{
  "uuid":"dbb0c868-3ae5-4fd1-a0a4-e0ddda375e2b",
  "product":"PRODUCT_XYZ",
  "description":"Standard 27-inch Bicycle"
   . . .
}
POST (create)
A POST request is used to create a record in your application. An example creation is shown below:
uri: /product/crud (POST)
{
  "product":"PRODUCT_XYZ",
  "description":"Standard 27-inch Bicycle"
  "operations" : [
    "sequence": 10,
    "title": "Install Wheels",
      . . .
  ]
}
PUT (update)
A PUT is used to update the data for a specific record. The record to read is identified by the URL. For example, to update a Product, perform a PUT with this URL:
uri: /product/crud/PRODUCT_XYZ (PUT)
The record’s JSON is passed in as the content. A sparse update is performed on each record, but all child records must be present. This sparse update means only fields provided in the JSON content are updated. The updated record is returned in the response in JSON format.
You can also perform a get with the record’s internal ID with a URI similar to:
uri: /product/crud/dbb0c868-3ae5-4fd1-a0a4-e0ddda375e2b (PUT)
A sample request is shown below:
uri: /product/crud/PRODUCT_XYZ (PUT)
{
  "product":"PRODUCT_XYZ",
  "description":"Standard 27-inch Bicycle"
   . . .
}| You may update the key field(s) of an object but this is not recommended in most scenarios. |
Child Updates
Many domain classes have child records that belong to a parent. These can be created and updated with the REST API in a single request. It is important that these child records have a belongsTo relationship to the parent. See Parent/Child Relationships (One-To-Many) for more details.
When you send a PUT request to a domain object, the child records are updated with a 'flush and fill' approach. This means all of the child records are deleted and the replaced with the records from the input JSON.
Also, if the children element is not mentioned in the input JSON, then the child records will be left untouched.
Removing Child Elements with One-To-One Relation
If a domain object has a single child element, you can clear this child element with JSON as in this example below:
{
  "orderCode": "10102-23",
  "customer": {}  (1)
}| 1 | Clears the customer. |
This assumes the customer is part of the order with a hasOne relationship. This will remove the customer from the order and delete it from the database.
DELETE (delete)
A DELETE HTTP method is used to remove entire records from the database. The record to delete
is identified by the URL. An example delete is shown below:
uri: /product/crud/PRODUCT_XYZ (DELETE)
| The response code for a successful delete is 204 (successful, no content). |
API Formats
Common Element Formats ISO 8601 Date/Time Formats Enumerations References to Domain Objects Custom Fields
The REST APIs support JSON for the objects processed. The formatting and parsing is handled by Jackson, with some help from framework logic. This section covers the common text formats supported for things like dates and numbers. It also covers how references to domain objects are handled and specific limitations of various formats.
Common Element Formats
Since JSON is a text-based format, you must follow specific formats for some internal data types. A short example is shown below:
{
  "orderCode": "10102-23",
  "qty": 12.2,
  "enabled": false,
  "dateOrdered": "2009-02-13T18:31:30.000-05:00",
  "dateToBeDelivered": "2013-08-04"
}
The normal JSON primitive field formats allowed are:
| Type | Description |
|---|---|
Number |
Numbers with fractions must use the decimal point as the decimal separator. |
Booleans |
Booleans are encoded as true or false. |
Dates |
Dates are in ISO date format: yyyy-mm-dd. |
DateTimes |
Date/Times are in ISO date/time format: yyyy-mm-ddThh:mm:ss.sssZZZZZ. (The Z is the timezone offset). |
ISO 8601 Date/Time Formats
The framework can read and write ISO date/time formats. There are a few variations supported:
| Format | Example |
|---|---|
yyyy-mm-ddThh:mm:ss.sssZ |
2009-02-13T23:31:30.000Z (Always in UTC Timezone) |
yyyy-mm-ddThh:mm:ssZ |
2009-02-13T23:31:30Z (Always in UTC Timezone) |
yyyy-mm-ddThh:mm:ss.ssszzzzzz |
2009-02-13T18:31:30.000-05:00 (Format used when writing a date/time). |
yyyy-mm-ddThh:mm:sszzzzzz |
2009-02-13T18:31:30-05:00 |
The first format is used when writing date/times for JSON.
Enumerations
The Java Enums typically have an internal ID that is stored in the database and a toString()
representation that is more human-readable.
The framework expects both values to be unique within the enumeration.
For JSON, the output is the human-readable format (not localized):
"fieldFormat": "STRING"References to Domain Objects
Foreign keys within domain objects are stored with their IDs in a column in the database. The JSON format for these references can use the 'id' format:
{
  "orderCode": "10102-23",
  "customer": {
    "uuid": "dbb0c868-3ae5-4fd1-a0a4-e0ddda375e2b"  (1)
  }
}| 1 | The internal ID of the customer record. |
You can also use the key fields for these foreign references:
{
  "orderCode": "10102-23",
  "product": {
    "product": "BIKE_27"  (1)
  }
}| 1 | The primary key of the foreign record to reference. |
You can also use the key fields in a simple format using the simplified @JSONByKey format:
{
  "orderCode": "10102-23",
  "product": "BIKE_27"  (1)
}| 1 | The primary key of the foreign record to reference. |
| You must mark the reference using the <json-by-key,@JSONByKey>> annotation. |
Custom Fields
Field Extensions and Configurable Types are special fields that are added by your users and sometimes by module programmers. These are accessed via the JSON like normal fields.
For example, a custom Order with two custom fields ('promiseDate', 'caseColor') would be
accessed like this:
{
  "order": "M10102-23",
  "qty": 12.2,
  "_fields": {
    "promiseDate": "2009-02-13T18:31:30.000-05:00",
    "caseColor": "BLUE"
    "_config": {
      . . .   (1)
    }
  }
}| 1 | The custom field configurations. This is stored with the field values to allow the definitions to change without los of data/type information. See Custom Field Storage for more details. |
These will be stored in the normal storage location for Field Extensions.
If you use Configurable Types for an RMA object, you might have a field that the uses Flex Types that lets the customer define their own data fields. The RMA domain object might look like this:
class RMA {
  String rma
  String product
  BigDecimal qty
  Date returnDate
  FlexType rmaType  (1)

  @Nullable
  @ExtensibleFieldHolder  (2)
  @MappedProperty(type = DataType.JSON)
  String fields

}| 1 | The field rmaType will hold the reference to the appropriate flex type. The actual
values will be stored as described in Custom Field Storage. |
| 2 | Defines the column that will hold the JSON values of the custom fields. |
The API format for this type of data field would be:
{
  "rma": "R10102-23",
  "qty": 12.2,
  "_fields": {                  (1)
    "retailerID": "ACME-101",
    "returnCode": "DEFECTIVE"
  }
}| 1 | The fields are stored with the Custom Field Storage location
(fields in this example). |
| Custom Child List will use the API format described in Custom Child List Storage. This follows the normal JSON array format, but the element is stored at the top-level, under the name of the custom field. |
Updates are allowed for the _fields element, but the _config element
(Custom Field Storage) are ignored.
Custom Fields - Provide Type via CRUD API
Creations and updates via the Rest API can define the field type on creation. This is normally not needed for the normal JSON field types (string, number, boolean). For example, if you need to create a custom field that is a DateOnly type, you can specify the field type in the JSON. The format is identical to the Custom Field Storage format. You can create these types using the JSON below:
{
  "rma": "R10102-23",
  "qty": 12.2,
  "_fields": {
    "dueDate": "2021-01-31",   (1)
    "_config": {
      "dueDate": {
        "type": "D",           (2)
        "tracking": "ALL"        (3)
      }
    },
  }
}| 1 | The value for the dueDate custom field. ISO Date formatted string. |
| 2 | The custom field type. This type is defined as the DB value in Field Types. |
| 3 | The history tracking option. See Custom Field History for details. |
| Any changes to the type are not allowed on existing fields. The update will fail if the type is changed. |
API Actions - Non-CRUD
The framework supports many types of API calls that are not related to Create, Read, Update, Delete
(CRUD) actions. These follow the general REST approach, but primarily use the HTTP POST method.
These APIs also do not use the HTTP URL to identify the objects being processed in most cases.
The HTTP request content is assumed to be JSON and it will contain the objects to be processed.
These types of API calls are always implemented as a normal Service that is exposed by a controller. You must implement a controller associated with the service and provides the REST-style HTTP access. Internal programs running within the application server should use the service directly. The HTTP API is only intended for access from external clients (GUIs, machines, etc).
An example of this service might be an Order charge() method. This method might charge the
customer’s credit card for the given order. The JSON content is a POGO that the controller knows how
to process.
To perform this charge, the following request is used:
url: /order/charge (POST)
{
  "order": "10102-23",
  "total": 50.00
}package orders
Class ChargeRequest {
Order order (1)
BigDecimal total
}| 1 | A reference to a domain class by key (Order). See References to Domain Objects for details. |
@Secured("ADMIN")
@Controller("/chargeAPI")
class ChargeController {
  def orderService  (1)

  @Post(value = "/charge")
  ChargeResponse charge(@Body ChargeRequest chargeRequest, @Nullable Principal principal) {  (2)
    return orderService.charge(chargeRequest)       (3)
  }

}| 1 | The OrderService will handle this request. It is injected by Micronaut here. |
| 2 | The content will be parsed into our POGO ChargeRequest by Micronaut. |
| 3 | The OrderService.charge() method will process the request and return a POGO as the results. |
API Error Handling
Exceptions encountered during these CRUD and other service calls will be returned to the caller. When the REST-style API is used over HTTP, any exception will be returned in a standardized JSON an HTTP 'bad' response code (typically 400). In most cases an error code will also be part of the response. Below, the code 1001 refers to an error message in the standard messages.properties file. An example error response is shown below:
{"message":
  {"level": "error",
   "text":"Order 'M1657334' cannot be worked.  Status='Done'",
   "code":"1001"}
}
Most errors will be triggered as an exception. The exception’s toString()
method is typically used to get the displayable error message string.
Multiple messages and other levels can be returned by other controller methods as described in Responses.
To return these responses consistently, you can use the
BaseController
. This base class adds a standard Micronaut error() method
for the controller.
@Secured("ADMIN")
@Controller("/charge")
class ChargeController extends BaseController {  (1)
 . . .
}| 1 | All exceptions will be handled consistently and returned to the caller as an error response. |
Archiving
Archive Overview
In enterprise applications, old data can build up and slow down runtime performance. To reduce this, the framework provides a simple mechanism for archiving old data from the production database. The framework also provides the unarchive mechanism.
Multiple types of archive mechanisms are possible. The framework provides an implementation for JSON File Archiver, but you can provide your own archiver(s). See the bean ArchiverFactory for details.
| When exposed via your controllers, the archive action takes place in a single database transaction. This means very large archive transactions may happen if you archive a lot of records at one time. |
[ "org.simplemes.mes.demand.Order",   (1)
    {
        "order": "SC1",
        "dateCompleted": "2013-05-11T18:29:50.307Z",
        "lsnTrackingOption": "ORDER_ONLY",
        "overallStatusId": "2",
        "qtyToBuild": 1.0000,
        "qtyDone": 1.0000
    },
    "org.simplemes.mes.action.ActionLog",
    {
        "action": "RELEASE"
        . . .
    }
]| 1 | The archive is made up of pairs of entries in an array. The first part of the pair is the class name. The second is the JSON of the object itself. |
This format relies on the ability of Jackson to parse in stages. The TypeableMapper utility bean provides access to the archive by reading the JSON and then converting the payload(s) to the right type.
Archive Design Decisions
Some of the key requirements of archiving are:
-
Handle large number of un-related elements in an archive.
-
Support JSON format of all supported Field Types.
-
Prevent any security holes.
-
Allow extension by customers.
-
Support JSON format for User Preferences in secure way.
These requirements forced us to consider how to configure Jackson to meet these requirements.
We investigated Jackson’s Polymorphic Deserialization capability. That approach allows the JSON payload to instantiate almost any Java class. This can be a vector for attacks on your servers.
Instead, we chose to use a simple array representation of of the objects being archived. Then, we have a white list of allowed classes that can be stored in this JSON. This list includes:
-
All Domain Entities (persistent domain objects).
-
Classes marked with the the special interface TypeableJSONInterface .
This is done because we never want to allow any client to create an arbitrary class via a REST API. To help reduce this risk, we also only allow the Typeable logic for archive files and for User Preferences.
Archive References
The archive process returns a string reference that can later be used to unarchive the object(s). With File archives, this is a relative path name for the archive file itself. You can use this reference as you need.
Archiving Related Records
The framework archive mechanisms will archive the top-level object and any direct children. It does not archive foreign objects that your classes refer to. For example, an order will be archived with its order line items. The Product the order refers to will not be automatically archived. This is because the Product will probably be re-used for other orders.
You can change this default behavior. Usually, when you archive a top-level domain object, there are other,
related records that you want to archive with it.
To support this, the framework looks at your top-level domain class and looks for the findRelatedRecords() method.
If the method exists, it will be called and those returned objects will be archived along with your domain object.
This clean up of related records is critical for keeping your database size manageable.
An example findRelatedRecords() is shown below:
List<Object> findRelatedRecords() {
  return ActionLog.findAllByOrder(order)
}
This finds all ActionLog records related to the order being archived and returns them for archiving. You do not need to include child records for your domain object. Just the objects that are related but are not true children.
When this findRelatedRecords() method is called, the record(s) in your top-level domain class have
not been deleted. All deletes take place after the archive has been successfully written to the file.
|
Archive Configuration
application.yml Options Automatic Verification of JSON Archive Logging Archiver to Use File Archiver Options
Archiving needs some basic configuration to perform your archive tasks periodically. You can also use the programmatic API to trigger the archive/unarchive under other conditions.
Periodic Archive Tasks
TBD
Most archiving is done automatically when records reach a specific age. For example, the MES Core Production Log records are archived after they reach a user-configurable age.
The MES Core module configures a background task record, which the user can edit to adjust the archive window and other options.
When creating an archive task, you can define what elements are needed to control the archiving. For example, the MES production log archiving has two main options: age (days) and batch size. This helps reduce the load on the system when archiving large numbers of records. The batch size makes sure that only one JSON file is created for a large number of those small records.
Typically, you add records to the default archive task table with an initial data load domain class in your module:
class InitialData {

  static mapWith = "none"   (1)

  static initialDataLoad() {
    if (!BackgroundTask.findByTask('PROD_LOG_ARCHIVE')) {   (2)
      def handler = new SampleBackgroundTaskHandler(ageDays: 180, batchSize: 500)   (3) (4)
      def task = new BackgroundTask(task: 'PROD_LOG_ARCHIVE', backgroundTaskHandler: handler)
      task.backgroundTaskHandlerData = handler.data
      task.runInterval = TimeIntervalEnum.DAYS_1  (5)
      task.save()

      log.warn("Loaded test data BackgroundTask: PROD_LOG_ARCHIVE")
    }
}| 1 | Marks this domain as non-persistent. It just supports the initialDataLoad() method. |
| 2 | Checks to see if the task exists already. |
| 3 | Your task should implement the BackgroundTaskInterface . |
| 4 | The defaults are set to archive records after 180 days, with a batch/file size of 500. |
| 5 | This task is run once per day. |
| The execution run interval is approximate. It is only checked every 5 minutes, so more frequent execution is not supported. |
Automatic Verification of JSON
The archiver will delete your domain objects after successfully writing the archive. By default, the file will be verified. If you wish to turn this off, then set this application.yml option:
eframe.archive.verify: false (1)| 1 | Disables verification of the JSON file. Enabled by default. |
This is a simple verification. In the case of JSON file archives, it verifies that the file contains valid JSON, but it does not actually restore the object(s). There may be other reasons that the object(s) can’t be restored.
Archive Logging
By default, all top-level archived records are logged to the ArchiveLog domain class (database). This provides a link to the actual archive file for later recovery. You can disable this logging with the option:
eframe.archive.log: false (1)| 1 | Disables the creation of the ArchiveLog records. |
It is also possible to log to the server logs using the normal Logback logging mechanism using standard Logging mechanism for the class org.simplemes.eframe.archive.FileArchiver
Archiver to Use
The default archiver is the File Archiver, which has its own configuration options.
You can provide your own archiver(s). If you wish to use a custom archiver, use this option to point to you custom class:
eframe.archive.archiver: org.sample.custom.ArchiverArchive API
The Archive API is available for your application’s use. You can use is directly through programmatic calls or via the Archive Configuration options to register your archive logic. This archiver generally writes simple text (JSON) versions of the objects to a text file for later un-archiving.
Programmatic Archiving
Sometimes, you have scenarios that require specific archive or unarchive actions. You can use the ArchiverFactory directly when needed:
import org.simplemes.eframe.archive.ArchiverFactory

def archiver = ArchiverFactory.archiver
archiver.archive(domainObject)           (1)
archiver.archive(relatedObject1)
archiver.archive(relatedObject2)
def reference = archiver.close()

 . . .

archiver = ArchiverFactory.archiver  (2)
archiver.unarchive(reference)| 1 | Archive a domain object and two related objects. |
| 2 | Later, unarchive the object(s) |
This creates an JSON file in a configurable directory and deletes the archived objects. Later, this example uses the
archive reference to unarchive the domain objects.
File Archiver
The FileArchiver mechanism built into the framework lets you archive domain objects to an JSON file and have the objects deleted from the production database. This is the default archiving mechanism in the framework.
File Archiver Options
This file archiver is fairly flexible in how it names the archive files and where it stores them. The full capability is covered in the Groovy doc FileArchiver .
| These configuration options all support the normal Groovy GString capabilities, but dollar signs ($) are always expanded in the application.groovy file. To get around this, the framework uses hash (#) as a temporary placeholder for dollar sign ($). The # is replaced with a $ before evaluation of the string at run time. The $ is supported in the application.yml file. |
The behavior of the file archiver can be tailored to your needs. For example, the directory(s) the archives are stored in can be configured in your application.yml file. The defaults used by the framework are shown below:
eframe.archive.topFolder = 'archives'
eframe.archive.folderName = '#{year}-#{month}-#{day}'
eframe.archive.fileName = '#{key}'
This makes the archive folder vary over time to avoid filling up a directory with too many files. This will create a top-level directory archives with a sub-folder for every day:
archives/2013-08-13/M1012.arc
archives/2013-08-13/M1013.arc
archives/2013-08-13/M1014.arc
archives/2013-08-13/M1015.arc
archives/2013-08-14/M1016.arc
The default file name for the archive is to use the toString() value from the first object
(M1012, etc above) as the basic file name. This assumes the toString() returns the key
fields for your domain object and the value is
unique. If the file already exists, then a 'dash' number will be added to the end as needed:
archives/2013-08-13/M1012.arc
archives/2013-08-13/M1012-1.arc
archives/2013-08-13/M1012-2.arc
Archive File Name
It is also possible to use other elements from the archived object in the JSON file name/path. See FileArchiver for details on the Config options. This could be used to create a folder structure with your customer ID in the path and use the order number in the file name.
# Define file/path for archiving based on customer ID and order number.
eframe.archive.topFolder = '../archives'
eframe.archive.folderName = '#{order.customer}/#{year}'
eframe.archive.fileName = '#{order.orderNumber}'
This makes the archive folder vary over time and uses the customer and order number to organize your archives:
../archives/ACME/2010/6571012.arc
../archives/ACME/2010/6571013.arc
../archives/ACME/2010/6571014.arc
../archives/ACME/2010/6571015.arc
../archives/ACME/2011/6571016.arc
For example, the default location for March 2016 is /archives/2016-03.
The configurable values that can be used in the folderName option are:
| Value | Description |
|---|---|
year |
The current year (4 digits). |
month |
The current month (2 digits). |
day |
The current day of the month (2 digits). |
hour |
The current hour (2 digits, 24 hour notation). |
key |
The primary key of the object being archived (e.g. order). The TypeUtils.toShortString() is used. |
object |
The object being archived (e.g. order). The object’s |
If a filename already exists, then a sequence number will be added to the end to avoid conflicts. This means it is possible to have multiple archive files for a given order. For example, for order A0001, it is possible to have two archive files such as A0001.arc and A0001-1.arc. This is one of the many reasons to avoid duplicate orders.
Customizations
Fields Field Types Field Extensions Field Extension GUI Configurable Types Flex Types Extension Points
Module Additions Module Additions
Field Types
This framework supports a large number of field types (e.g. String, Date, other domain classes, etc). The enterprise framework works with a subset of these types to reduce the boiler-plate code you must write. Most of the time, these types are used internally in the framework and you won’t need to use them directly.
| Class | Name | DB Value |
|---|---|---|
String |
StringFieldFormat |
S |
Integer/int |
IntegerFieldFormat |
I |
BigDecimal |
NumberFieldFormat |
N |
DateOnly |
DateOnlyFieldFormat |
D |
DateTime |
DateFieldFormat |
T |
Boolean/boolean |
BooleanFieldFormat |
B |
Long/long |
LongFieldFormat |
L |
Domain Reference |
DomainReferenceFieldFormat |
R |
List of Refs |
DomainRefListFieldFormat |
Q |
List of Children |
ChildListFieldFormat |
C |
List of Custom Children |
CustomChildListFieldFormat |
K |
Enumeration |
EnumFieldFormat |
E |
EncodedType |
EncodedTypeFieldFormat |
Y |
Configurable Type |
ConfigurableTypeFieldFormat |
G |
Each type is represented by a class in the data.format packages and implements the FieldFormatInterface.
The framework automatically maps these type of fields to the correct database type, but sometimes the domains need a hint.
Field Extensions
Design Decisions Custom Field Design Custom Field Storage Custom Field Usage ExtensibleFieldHolder Annotation Extension Logging Field Extension Example Field Types Single Domain Reference Custom Child List Custom Child List - Integration/GUI Testing
The Enterprise Framework module lets the user define custom fields for most domain objects. These are stored in a single string column in the domain object. You (as the application developer) must enable this feature on the domain classes that need this ability. Once enabled, the end user can add custom fields and adjust the definition GUIs as they like.
The Configurable Types, Flex Types and Module Additions are based on features of these field extensions. These features share a lot of common code.
| This feature is not yet compatible with clustering. A manual restart of all nodes in the cluster is needed when changes are made to this definition. |
Design Decisions
All of the decisions below are based on a number of assumptions on the use of custom fields:
-
Most use cases will need a few custom fields at any given time (5-10).
-
In extreme cases, users may define a large number of custom fields in each domain (100+).
-
Most use cases will likely be reading the value (80% read, 20% write).
-
Users will not be able to restart the server to add a custom field. Downtime is not allowed.
-
Configuration objects (e.g. Products) and production objects (e.g. Orders) will both need user-defined fields added. The configuration objects will use one type of customizations (Field Extensions) and production objects will tend to use another type (Flex Types).
-
Users may need to collect custom fields without pre-configuration.
-
Users will want to track all changes made to custom values, record who/what/when/where.
When designing the custom field support, we had hoped to store each custom field value in its own database column. Unfortunately, that was not possible with Micronaut Data. Micronaut Data requires that persisted fields be compiled into the domain classes. This would force a recompilation/restart of the application just to add a custom field. Instead, we chose to store all custom fields into a single text column. Each custom field still appears as a dynamic field in the domain class, but they are all persisted to a single text column.
This leads to some limitations. We feel these limitations are worth the extra flexibility. Most importantly: The user can change the fields on the fly without restarting the application server.
Another key decision was made to use JSON for the encoding of the fields into the database column. This allows most database engines to extract the values as needed in ad-hoc SQL. This JSON is a little more verbose than the absolute minimum, but it is best for compatibility with the external tools.
Another decision was to keep the custom value in the JSON field instead of creating a new field in the domain class itself. This avoids double storage.
Custom Field Design
Custom fields are used by many different parts of the framework to allow customization of your application. The features that are associated with custom fields include:
These all use the common ExtensibleFieldHelper helper methods to access the field values.
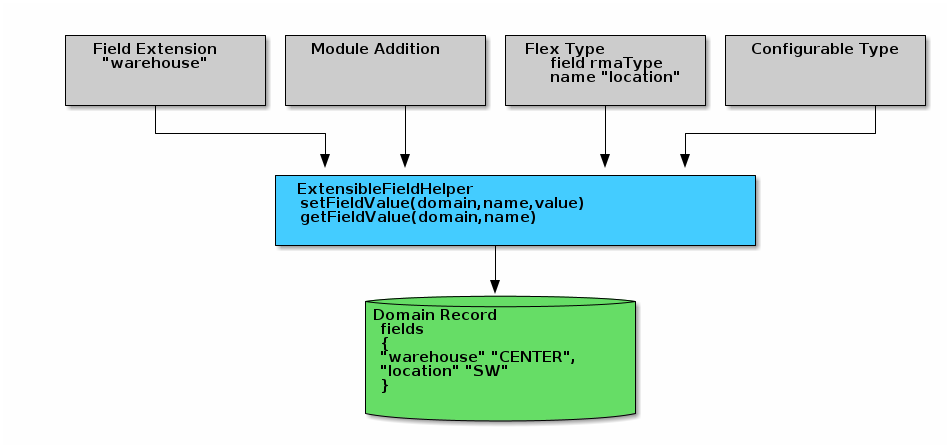
All of these types of custom fields store the values in the JSON column fields
in the domain record. See <<>>
The FieldExtension (user-defined and additions) are stored with the field name as-is.
Custom Field - Internal Design
These custom fields are complex. They can be huge with a large number of fields and large values. Customers may log the data to the object without a pre-defined field definition (e.g. without a Flex Types or Configurable Types).
The user requirements are covered above in Design Decisions. These user requirements force us to use this type of implementation:
-
A Map front-end to hide the JSON text field from the application code.
-
Added getters/setters to synchronize the Map with the text field.
-
Dirty flags to indicate if the values are out of synch. Reduces the number of times the JSON os serialized/deserialized.
The implementation uses FieldHolderMapInterface and its Groovy implementation FieldHolderMap . This Map works with the ExtensibleFieldHelper to synchronize the Map/Text with the database actions (save/retrieve).
To support this, the structure and related methods are shown below.
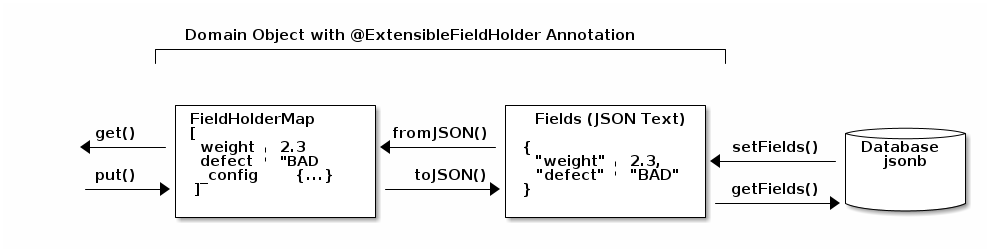
The Map is the primary interface used by
ExtensibleFieldHelper
to put/get values from the custom fields.
This Map is synchronized with the JSON text fields using the set/getFields() methods
and with the to/fromJSON() methods.
The basic life cycle of these objects is orchestrated by the ExtensibleFieldHelper class:
-
The domain object is created. All fields are null.
-
A method calls
put()to store a custom value into the Map. The Map is marked as 'dirty'. -
Some method then calls
save()on the domain. -
The
getFields()method is called to get the string value for the database. -
This calls the
toJSON()method. The record is saved. -
Later, the record is read from the database.
-
The
setFields()method is called. This sets the Map to null, indicating that the JSON needs to be deserialized. -
A method then calls the
get()to get the value. If the Map is null, then the JSON is deserialized into the Map. The value is returned.
After this, updates to the Map will force the JSON to be re-created before the next save.
Custom Field Usage
The user can define custom fields on most domain classes that are marked to allow this. These can appear in the framework definition tags such as the [efEdit] tag. By default, the custom fields are not shown in the web pages, but the user can configure the pages to show any of the custom fields.
The custom fields do not appear to be normal fields on the domain class. They do NOT have a getters and setters. Instead, the framework uses the FieldDefinitionInterface to access the value in the domain.
Custom Field Storage
Custom fields of all types are stored in a text (JSONB) column in the database for supported
domain classes. These use the ExtensibleFieldHolder Annotation to mark the field as
the holder for the values. By convention, this field is almost always named fields.
This holder field will store these types of fields:
-
Configurable Types - Configurable types such as FlexTypes.
-
Field Extensions - Fields added by the user or by other modules (see Addition).
-
Data collected by the Data Entry module (name TBD).
-
Other data added programmatically or via APIs.
Custom child lists are handled somewhat differently. The JSON format of these fields looks like this:
{
  "rma": "R10102-23",          (1)
  "qty": 12.2,
  "_fields": {
    "weight": 2.3,             (2)
    "_config": {               (3)
      "weight": {
        "type": "I",
        "tracking": "ALL",
        "history": [           (4)
          . . .
        ]
      }
    },
  }
}| 1 | The normal domain fields. |
| 2 | The latest value for the weight custom field. |
| 3 | The configuration for the fields. This is only used when non-standard JSON types are used (e.g. dates) or if tracking is needed. The type and tracking option is stored here when needed. |
| 4 | The history for the weight. See Custom Field History for details. |
Custom Field History
It is possible to collect values for a given field name multiple times. This means you might
collect the weight 3 times during manufacturing. To keep all these values, the
Extensible Field support logic can optionally keep the old values. These old values
are stored in the same JSON field in an history element.
This is configured at the Flex Types, Field Extensions and other configuration levels (e.g. the Data Entry module (name TBD)). It is off by default. The tracking options include:
-
Latest Value Only - Only the latest value is saved (Default).
-
All Values - All values are saved to a history element, but no context info is saved.
-
All Data and Values - All values are saved to a history element, along with who/what/when/where (if possible).
| Tracking historical values can produce a lot of data, so only enable this tracking when absolutely required. |
For example, tracking using the All Data and Values option would result in a
fields JSON that might look like this:
{
  "rma": "R10102-23",          (1)
  "qty": 12.2,
  "_fields": {
    "weight": 2.3,             (2)
    "_config": {               (3)
      "weight": {
        "type": "I",
        "tracking": "ALL",
        "history": [           (4)
          {
            "weight": 2.3,
            "user": "PWB",
            "dateTime": "2009-02-13T18:31:30.000-05:00"
          },
          {
            "weight": 2.1,
            "user": "RLB",
            "dateTime": "2009-02-14T17:23:53.000-05:00"
          }
        ]
      }
    },
  }
}| 1 | The normal domain fields. |
| 2 | The latest value for the weight custom field. |
| 3 | The configuration for the fields. Set for non-default configuration settings such as this example. |
| 4 | The history for the weight, if configured to track the history. Includes values and date/user/etc.
The current value is added here when it is set in the fields. Only for Tracking
option All Data and Values. |
Custom Child List Storage
When the custom field is a Custom Child List (CustomChildListFieldFormat), the data is not stored in the holder as JSON. Instead, it is stored in a custom database table. This means the JSON format is different:
{
  "rma": "R10102-23",         (1)
  "qty": 12.2,
  "customComponents": [       (2)
     { "product": "BIKE-27", "qty": 1.0 },
     { "product": "WHEEL", "qty": 2.0 }
    ]
  }
}| 1 | The normal domain fields. |
| 2 | The list of custom child records. Stored in another database table.
In the domain object itself, these custom records are stored in a
special Map. The values can be accessed with the normal custom field
getters/setters: such as getCustomComponents(). |
This is a fairly complex feature that is only supported in a limited number of scenarios as described in Custom Child List. It is very useful for Module Additions so that a module can add a list of custom values for a core domain object.
Why put these in another element in the JSON? Because the Jackson JSON mapper automatically creates/parses the JSON for the standard Custom Field Storage mechanism. To use the same storage mechanism, we would have to write a lot of complex logic to extract and insert the custom child lists.
This is not ideal, but it is the best compromise.
Custom Field Name Collisions
These fields are stored in the JSON text as simple name/value pairs. This means there is a chance of name collisions. Since most of these features won’t be used on the same domain, the chance is low. If it is a problem, then we recommend that customers used a field name prefix to avoid this issue. For example, use the prefix 'rmaType'_ for all fields collected for an RMA flex type.
| Preventing name collisions is the responsibility of the system integrator and users. |
ExtensibleFieldHolder Annotation
You, as the application developer, must mark your domain classes that you wish to allow custom fields. A simple domain class might look like this:
@MappedEntity
@DomainEntity
class SampleDomain {
  String key
  String name
  . . .

  @Nullable (1)
  @ExtensibleFieldHolder  (2)
  @MappedProperty(type = DataType.JSON) (3)
  String fields  (4)

}| 1 | The field should allow no custom fields. |
| 2 | The extensible fields requires a place to store the values (in JSON). |
| 3 | The data type is a native JSON type (jsonb in Postgres). This allows direct queries on the custom values. |
| 4 | The suggested field name is fields. This is a short name for use in complex
SQL queries on the custom fields. Also, this field name will be used for
JSON access to the custom fields (e.g. a sub-object "_fields" will be used). |
| You should not change the column name for custom fields on a production database. There is no automatic database migration to handle a column name change. |
This will use the field fields in the domain class and save it in the database with
an unlimited jsonb column.
===== Accessing Custom Field Values
Now that your domain supports custom fields, how do you access them? The core framework supports setting/displaying the values via the [Definition Pages] and the Rest API. The fields are configured using the Field Extension GUI.
To access the fields in your code, you can use the convenience method for the custom field as if it was a property. For example, if you have the custom field 'caseColor' on the domain, you can access it using this syntax:
def order = new Order(order: 'M1002')

order.caseColor = 'Red'   (1)
def color = order.caseColor = 'Red' (2)| 1 | Set a custom field 'caseColor' to 'Red'. |
| 2 | Gets the custom field 'caseColor' from the order. |
Alternately, you can also use the setFieldValue() and getFieldValue()
methods that are added to your domain classes. This is used in framework code internally.
def order = new Order(order: 'M1002')

order.setFieldValue('caseColor', 'Red')   (1)

Date promiseDate = order.getFieldValue('promiseDate') (2)| 1 | Set a custom field 'caseColor' to 'Red'. |
| 2 | The set and get methods support the field extension data types such as Date and other supported Field Types. |
Deleting Fields
You can delete the field definition. Existing records will not have the value removed from the
fields column, but the the support logic won’t process them for display/editing.
Also, the data in the fields column will no longer be validated, but it is part of the
stored values.
You can also change the custom field name, but existing values in domain records will not be changed.
Extension Logging
You can enabled several levels of logging for the org.simplemes.eframe.custom.FieldExtensionHelper class to track what field extensions are loaded and how they are performing. The levels used in the extension process are:
-
Debug- Lists custom fields added to core objects. -
Trace- Logs whenever a value is added/retrieved from the custom field storage. Also logs when the child records are stored for custom child lists.
Field Extension Example
A simple example domain class may help you understand how these custom features can be used. In this example, you, as the application developer, provide an Order domain class. This class represents a customer order:
public class Order {
  String order             (1)
  String product
  BigDecimal quantity
     . . .
  @Nullable
  @ExtensibleFieldHolder  (2)
  @MappedProperty(type = DataType.JSON)
  String fields
}| 1 | The order name, product and quantity ordered. |
| 2 | Defines the column that will hold the JSON values of the custom fields. |
The end user of your application wants to add some custom fields to help them process orders more easily. The fields needed are:
| Field | Format |
|---|---|
|
Date |
|
String |
In this example, the user added promiseDate and caseColor fields.
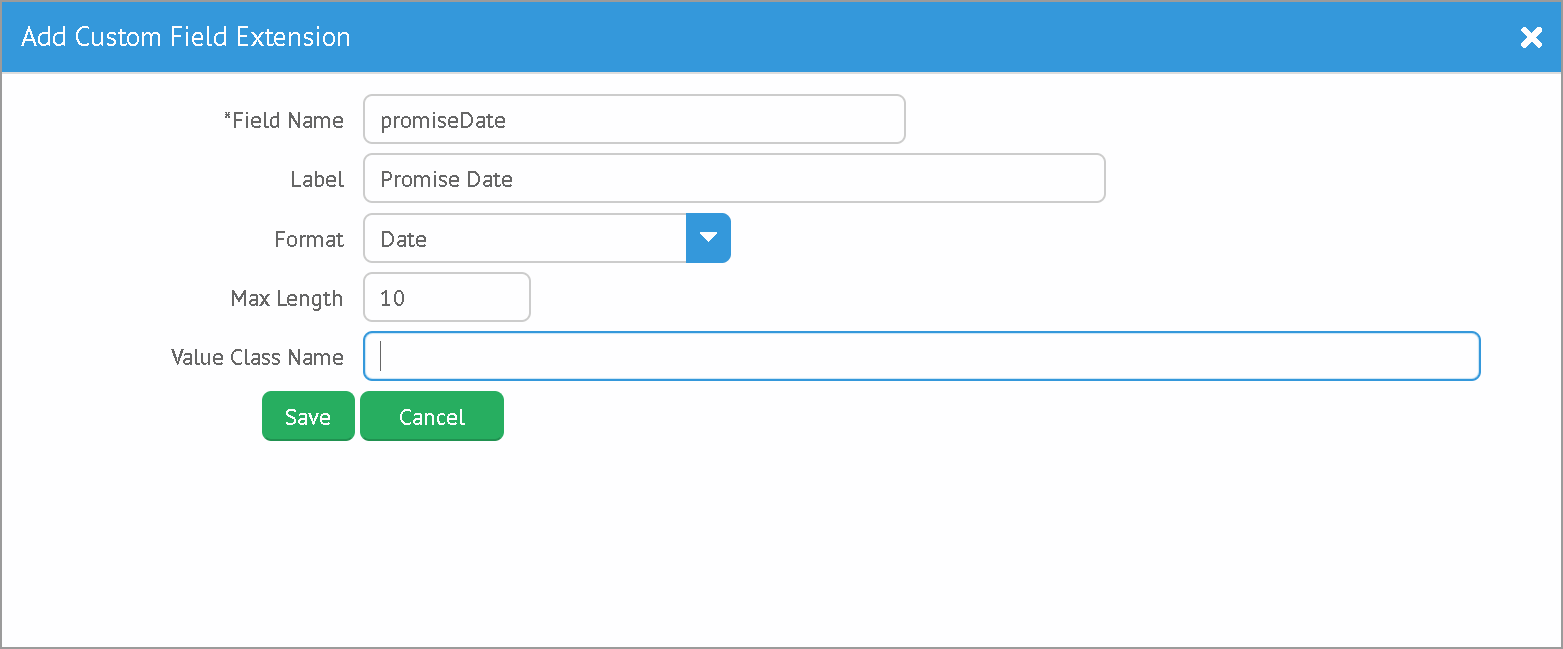
The user can put these fields anywhere on the core Order displays by moving the fields in the add/remove panel shown below:
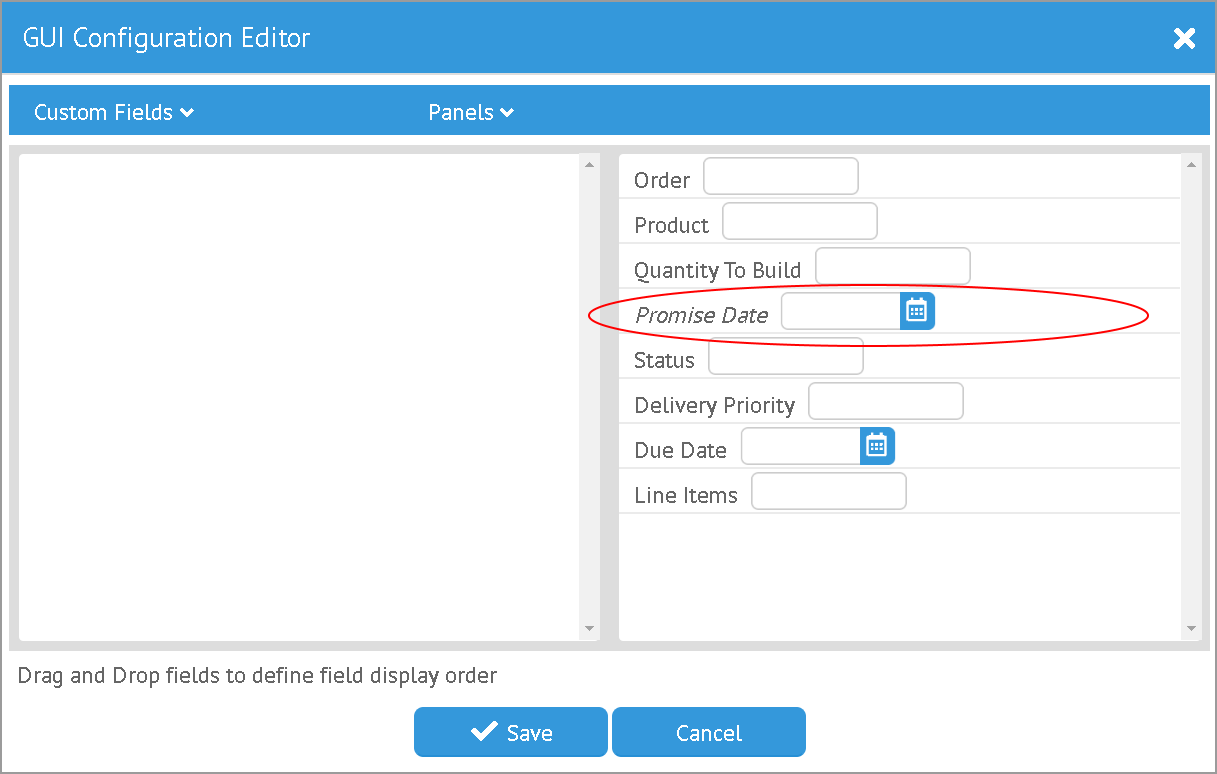
See Field Types for the list of supported field types.
Data Type Changes
The setValue() method will enforce the type, but the type can be changed after data is created. If the defined type changes and there are existing records with the old type, then the new data type will be used for the getter. When conversion is not possible, then the string value will be returned. Data will normally not be lost, but automatic conversion to the type may not happen.
For example, you store the value 'XYZ' in a String custom field. If you later change the field’s type to Number, then you will not be able to return a BigDecimal form of the number. Instead, the string 'XYZ' will be returned to avoid data loss. This may trigger exceptions in your code, but the framework will allow this.
| One exception is Booleans. These will return a boolean object, if the string value starts with 't' (any case). This can result in loss of data. |
If a custom field is no longer defined for the object, you can still get the value. You can’t
set values when the custom field definition for the specific field is deleted. This setValue()
method will trigger an exception.
Single Domain Reference
You can add a custom field that is a reference to a single foreign domain record. The reference is stored in the JSON using the record UUID.
The field definition defines a valueClassName that is used to find
the actual record. It is important that this valueClassName not be changed if data
already exists for it. If changed, then the record will not be found.
|
Custom Child List
A Custom Child List can be defined as a custom data field in a domain object. This list of custom children is stored in its own custom domain object (table), not in the normal JSON storage field. This allows a large number of custom sub-objects to be defined for a core domain object.
How is this implemented? A custom field _complexCustomFields is added to the domain class to store
the transient list of the records. The actual custom domain objects are saved like any normal
domain class. Various portions of the framework support these custom lists of objects:
-
JSON Parsing and Formatting.
-
CRUD actions in the controller base classes Controller Base Classes.
-
The GUI tags [efDefinitionList], [efShow] , [efCreate] and [efEdit].
-
Support for save/delete from core Domain Entities.
-
Normal custom
getFieldValue()andsetFieldValue()access. ThegetFieldValue()method will perform a load of the values. -
The specific get/set method for the custom field (e.g.
getComponents()).
This means your core code and custom lists of objects in complex scenarios will work with little or no coding in your core application. A common application of this is in Module Additions. Sub-modules can add some very complex sub-objects to core domain objects.
For example, a core Product object needs a custom list of components that can be assembled into the product.
public class Product {
  String product
     . . .
  @Nullable
  @ExtensibleFieldHolder
  @MappedProperty(type = DataType.JSON)
  String fields
}
To support this, the @ExtensibleFieldHolder creates a transient Map _complexCustomFields to
hold the list from the database.
Then in a module or other extension, you decide you need to add a list of components to the Product definition:
public class Component {
  @ManyToOne
  Product product (1)
  Long sequence
  BigDecimal qty

  static keys = ['product', 'sequence'] (2)

}| 1 | The parent Product reference. It is a normal ManyToOn reference (much like a foreign reference). It is stored as a UUID in the DB. |
| 2 | Your custom child needs to have some keys defined. This allows the JSON update capability. |
The list will contain a list of Component sub-objects.
To use this custom child list in a domain, you can define it in Module Additions:
  AdditionConfiguration addition = Addition.configure {
    field {
      domain Order
      name 'orderLines'
      label 'Line Items'
      format CustomChildListFieldFormat
      valueClass OrderLine
      fieldOrder {
        name 'orderLines'
        after 'dueDate'
      }
    }
  }
This addition will add an inline grid for these child order line items in the standard Order definition pages.
When testing using GUI/GEB testing, remember to delete your custom child classes first.
| See Custom Child List Storage for details on how these are stored and how the API works. |
Custom Child List - Integration/GUI Testing
Testing lists of child records in Integration/GUI tests is a little more complex than we would like. The simplest approach for most non-GUI testing is to use the @Rollback notation.
For GUI testing and other scenarios, you may need to use explicit transactions in your tests. For example:
  def "test additions to Work Service start action - works in integration"() {
    given: "An order to start"
    Order order = null
    Order.withTransaction {        (1)
      order = new Order(order: 'M001', product: product)
      setFieldValue('components',[new OrderComponent(product: aProdct, qty: 1.0)])  (2)
      order.save()
      new OrderService().release(new OrderReleaseRequest(order))
    }

}| 1 | All database access in the test must be within a transaction. |
| 2 | The custom child list is set using the normal setFieldValue() method. |
Field Extension GUI
Once you have a field added to a domain class, you will normally need to display them in a GUI. This is done with the normal [gui-configuration] icon in a domain definition GUI. Opening the configuration editor for a domain GUI shows a dialog like this:
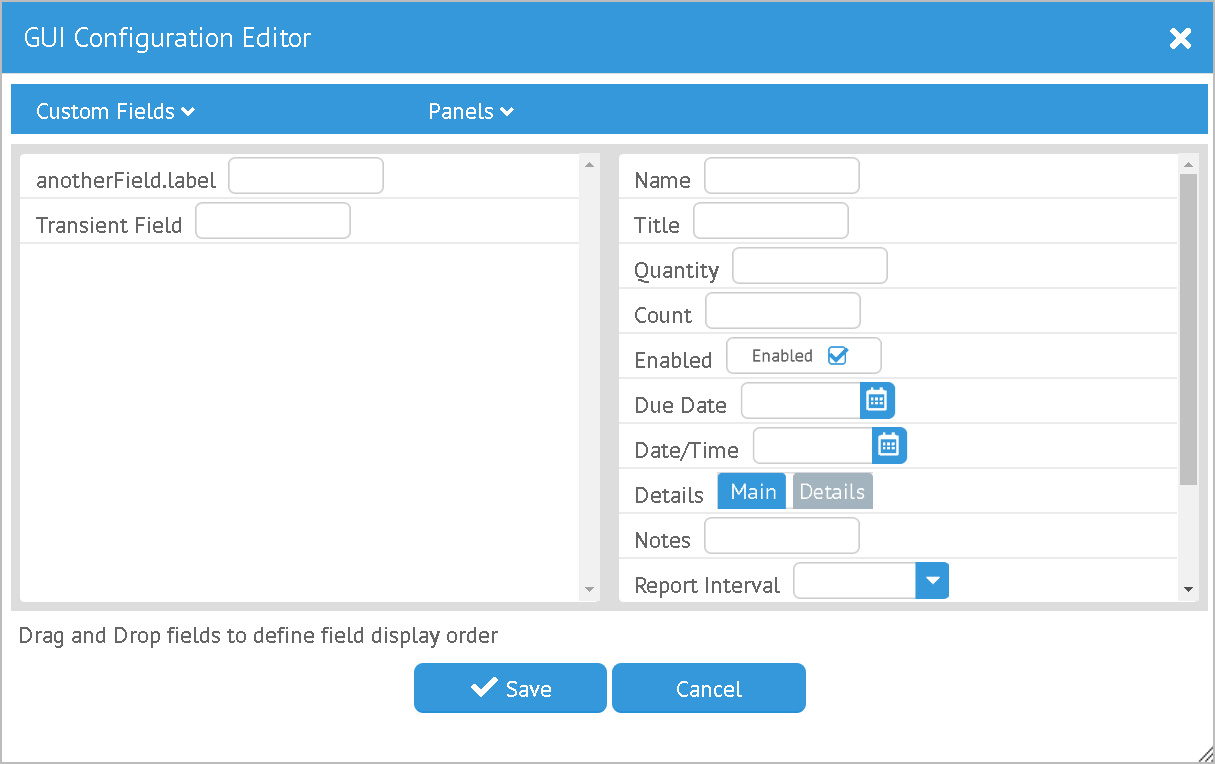
This dialog allows you to add custom fields to the definition GUIs. It also allows you to move or remove base fields from the display.
Definition Configuration Dialog
The configuration dialog for definition GUIs (above) allows you to add new custom fields to a domain object, change existing custom fields or remove them. This GUI also allows you to re-order the fields and create tabbed panels for organizing complex definition objects.
Configuration Actions
The actions allowed are:
-
Add Custom Field
-
Edit/Delete Custom Field
Edit/Delete Custom Field
You can edit the custom field by selecting it in either list and using menu entry 'Edit Custom Field'. You can also double-click the entry to open the custom field editor dialog.
| Changes made in this dialog are immediately saved in the database and affects the current domain objects in the system. Deleting a custom field does not remove the field values from existing domain objects, but the values are no longer visible in the definition GUIs. |
Custom Field Editor Dialog
This custom field editor dialog allows you to change the details of this custom field. You can’t change the field name since this is a key value for data in the database and also affects the field order described below.
FieldOrder
The Field Ordering defined for a domain class controls what order fields are shown in the definition GUIs and lists. You can customize the appearance of a GUI by manipulating this field order. The configuration editor makes it easy to manipulate the order and even add new custom fields to the domain class.
The fieldOrder list will look something like this:
class User {
  . . .
  static fieldOrder = ['userName', 'title', 'enabled', 'accountExpired',
                       'accountLocked', 'passwordExpired', 'email', 'userRoles']
  . . .
}
An example User edit page is shown below:
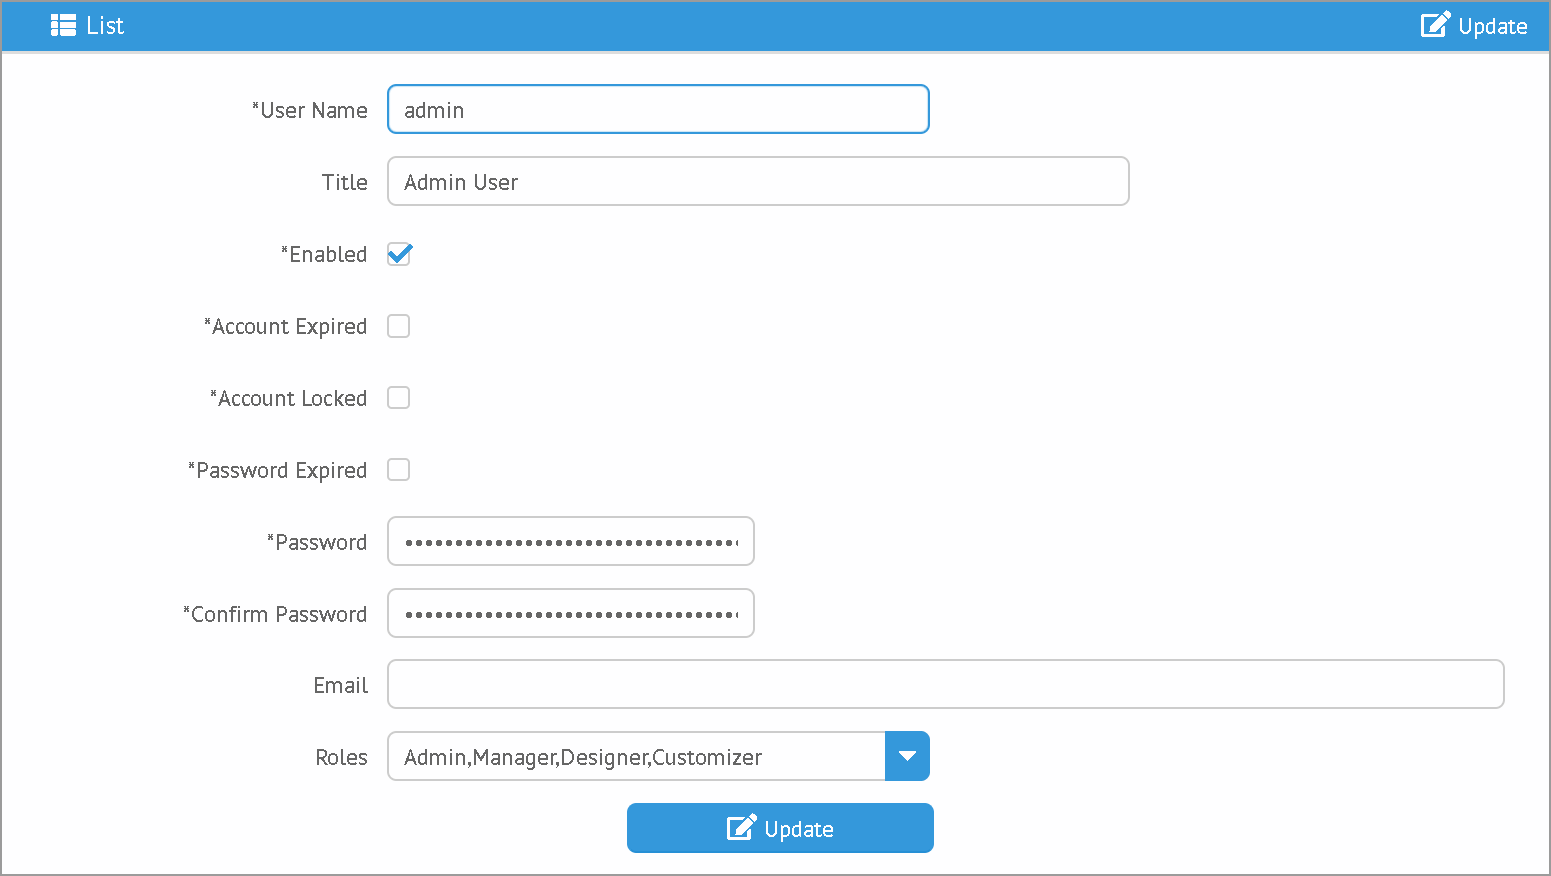
This gives the default ordering seen above. You can customize the field ordering using the configuration dialog.
This shows how someone added a custom field (legacyCode) to the user GUIs. The user wants the
legacyCode field to be added to the FlexType object and be displayed before the title.
This is stored in the FieldGUIExtension object to persist this customization for the domain class. In the FieldGUIExtension object, there is a list of adjustments made to the field order in a list format. This is portrayed in the diagram below for the example customizations above:
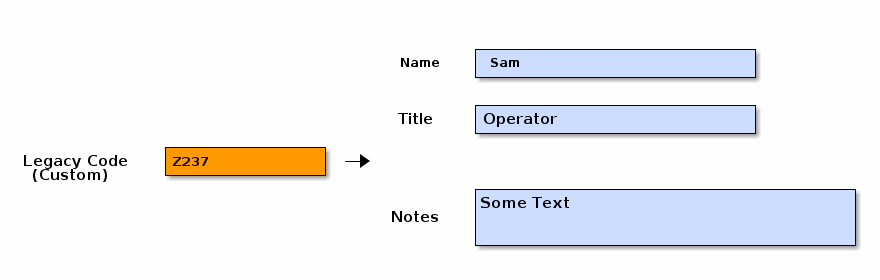
The FieldGUIExtension is created for the domain class to be customized (User in this case).
Inside of this FieldGUIExtension is an extensionsJSON field that holds the JSON form of the
extensions list. This is a list of
FieldAdjustmentInterface
elements
that define what adjustments are made to the default field order for the domain class.
In this case, the legacyCode is inserted before the title field. The class
relationships are shown below:
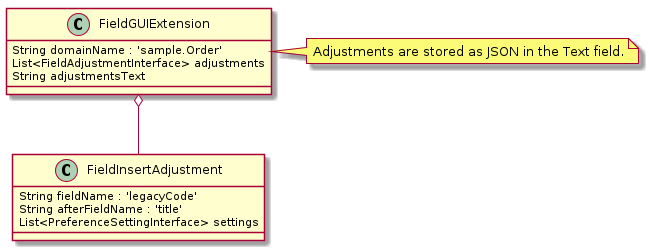
Other GUI field placement actions are allowed:
| Adjustment | Description |
|---|---|
Insert |
Insert custom field/group after a core field/group. |
InsertAll |
Insert all custom fields after a core field/group. |
MoveAfter |
Move a core field/group to after another core field/group. |
It is possible to add a group (tabbed panel). If the core GUI doesn’t use tabbed panels,
then this will create a 'Main' panel for first fields in the fieldOrder list.
These adjustments are implemented as action classes that implement the FieldAdjustmentInterface . These adjustments manipulate the effective field order for the domain class.
Flex Types
A Flex Type is one implementation of the Configurable Types. Flex Types are used to define custom fields needed for specific domain records and special-purpose POGOs. These allow your users to define a list of data fields to collect for each object (e.g. Order). This allows your users to add custom fields in specific scenarios. Your users can define a different set of custom fields for each record if needed.
For example, your application may support multiple order types such as Production or RMA.
The production orders may require a custom field promiseDate.
The RMA order may require different custom data fields such as receivedDate and rmaId.
Flex types allow you to define this order type and make the data fields dependent on the type.
Flex Type Field Names - Uppercase or Lowercase?
The Search Engine and the Postgres JSON SQL queries use the flex type field names in case-sensitive queries. If you define a field name as 'LOT' and then try to query on 'lot', then the values won’t be found.
You should make sure you use a consistent field naming convention. In particular, make sure to use the same case for all field names. Use all upper case, all lower case or consistent mixed case.
Flex Types vs. Configurable Types
One question that frequently comes up as developer is:
When do I use Flex Types and when do I use Configurable Types?
You generally use Flex Types when you want your end-user to create and choose the data fields to be collected in a specific case. For example, you have an RMA scenario. You want the user to choose the RMA Type and the user can change the data collected for that type. You don’t need to use any logic based on the data. This is a good fit for the Flex Types.
You will need too look at the flexibility needed by your customer and decided which approach is easiest that still meets your customer’s needs. If you just need to collect and the data and have no logic to operate on the values, then Flex Types might be the best approach.
The Configurable Types usually involve more programming to add new fields or types: The basic limitations/features of each approach is shown below.
Feature |
Flex Types |
Configurable Types |
Programming Needed for New Fields? |
No |
Yes |
User-Defined New Fields? |
No |
Yes |
Used Frequently? |
Yes |
No |
Encoded Types are also a consideration for this discussion. New encoded type values can be added in Module Additions. In terms of flexibility and complexity, they fall in between the Flex Types and Configurable Types.
Extension Points
Extension Point Design ExtensionPoint Annotation ExtensionPoint Supported Scenarios Extension Point Documentation
Frequently, you will need to extend core methods with logic that applies to specific additions and modules. The framework provides support for extension points. These are methods in the core code that are marked as allowing extension by other modules. These extension are discovered as Micronaut beans and support execution before or after the core method.
Originally, the flexible Groovy meta-class ability to modify the was used for method extensions. This was great, but caused issues with many of the annotations used by Micronaut (e.g. @Transactional).
Extension Point Design
Extension points methods are marked with the @ExtensionPoint annotation. This inserts code before the method logic and at return points. This extra code executes custom methods that are defined as Micronaut beans. This is handled by the ExtensionPointHelper methods to execute any matching beans.
A basic example with two custom beans is shown below:

The core release() method is marked as an @ExtensionPoint. There are two additions
that provide Bean1 and Bean2. These beans extend the release method. Bean1 is executed as
a pre method and Bean2 is a post method. The post method may alter the response from the
core method, if needed.
ExtensionPoint Annotation
You, as the application developer, must mark your methods as extension points. A simple service class might look like this:
@Singleton
class OrderService {

  @ExtensionPoint(value=ReleasePoint, comment = "The Order release() method") (1)
  ReleaseResponse release(ReleaseRequest request) {  (2)
    . . .

    return new ReleaseResponse(...)   (3)
  }
}| 1 | The extension point uses a ReleasePoint (interface) to define the pre/post method
signature. This must match the release() method’s signature. All beans that implement this
interface will be executed for all calls to the core release() method.
The annotation also includes an optional comment that is used for the Extension Point Documentation
file as noted below. |
| 2 | The method accepts a POGO argument. |
| 3 | The method returns a POGO. |
The ReleasePoint interface is used to flag which beans will be executed for each call to
the core release() method.
interface ReleasePoint {
  void preRelease(ReleaseRequest request)  (1)

  ReleaseResponse postRelease(ReleaseResponse response, ReleaseRequest request)  (2)

}| 1 | The preRelease() method is passed the input(s) that are later passed to the core method. |
| 2 | The postRelease() method is passed the response from the core method and can alter the
returned value (if not null). |
Finally, other modules can provide beans with these methods to alter the core logic.
@Singleton
class OrderService implements ReleasePoint {

  void preRelease(ReleaseRequest request) {  (1)
    request.order.qtyToRelease = 1.2
    . . .
  }
}| 1 | The preRelease() method does some extra processing on each release() method execution. |
ExtensionPoint Supported Scenarios
Due to the nature of the AST transformation logic, the @ExtensionPoint annotation is written to handle specific structures in the core methods. These cases are tested and supported:
@ExtensionPoint(value=ReleasePoint)
ReleaseResponse release1(ReleaseRequest request) {
  . . .
  return new ReleaseResponse(...)   (1)
}

@ExtensionPoint(value=ReleasePoint)
ReleaseResponse release2(ReleaseRequest request) {
  . . .
  if (...) {  (2)
    return new ReleaseResponse(...)
  } else {
    return new ReleaseResponse(...)
  }
}

@ExtensionPoint(value=ReleasePoint)
ReleaseResponse release2(ReleaseRequest request) {
  . . .
  if (...) {  (3)
    return new ReleaseResponse(...)
  } else if (...) {
    return new ReleaseResponse(...)
  }
}| 1 | Simple return at the end of the method. |
| 2 | If/Else with return at the end of each block. |
| 3 | If/ElseIf with return at the end of each block. |
Other cases may be supported some day.
| A return statement is required in the method marked with @ExtensionPoint. |
Extension Point Documentation
The modules will each need to document what extension points are available. To make this easier, the ExtensionPoint Annotation creates an .adoc file with all of the extensions listed. This file is 'build/generated/extensions.adoc'. This file can be included in your ASCII doctor files like any other include file. The result will look like this:
Unresolved directive in guide/custom/extensionPoints.adoc - include::../../../../../../build/generated/extensions.adoc[]
| The OrderService example above is from the extension points in the framework sample code. This is not a real extension point. The other extension point(s) above are real. |
This file is generated when the Groovy classes are compiled. It is also removed by a clean
action.
The comment option on the @ExtensionPoint annotation is used to generate the comment for each
extension point in this file.
Module Additions
Details How to Modularize Addition Example Addition Addition Top-Level Options Encoded Types Provided By Additions Addition Field Extensions Initial Data Loaders and Additions Assets Provided by Additions Addition Errors
| This modularization is complex. Only use it when needed see When to Modularize. |
Overview
Module composition allows you to modularize your application into one or more modules that work together. This can help you provide simplified configurations of your application for specific customer groups. It also gives your customers flexibility in customization and deployment of your application.
These modules can work with each other and provide new features to your core application. This provides the ability to add fields to core domain objects, extend the functionality of service methods, ask questions in core GUIs and to participate in database transactions with core objects.
An example set of modules used to create an application might look like this:
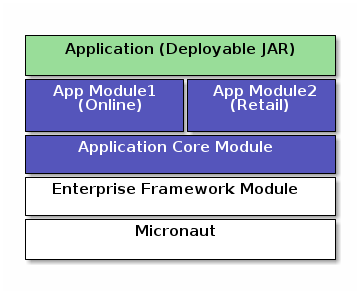
This application can be deployed with the optional Online module and/or the optional Retail module. This allows your customers to streamline the application to suit their needs.
For example, you could deploy the application without the Retail module for customers that have only an online business model.
When to Modularize
This modularization is complex and increases your testing needs. You need to decide if this
flexibility is worth the cost. Like all features, you need to decide if the flexibility for
your customers is worth the extra effort. Sometimes, a simple toggle such as OrderType
might meet your needs. Modularization is normally used when the module adds significant
overhead or complexity to your application.
Modularization is also useful when a module’s features are needed by a small subset of your customers. This allows you to hide this complexity from most of your customers to simplify your app.
Module Terminology
In general, a module adds features using Field Extensions Extension Points added to the core features.
The enterprise framework supports a declarative way to define these extensions using an Addition feature that is discovered at run-time. The framework uses the term 'addition' to avoid confusion with field and method extensions. An addition is basically a way for a module to extend another module with minimal coding. The additions are beans that are created by the framework upon startup and a stored as singletons. The addition can also specify new data types and choices for many drop-down lists.
Inheritance?
Why not use inheritance to add features to domains, controllers and services? The main reason is that you may need multiple optional modules. An inheritance hierarchy can’t be configured as optional. For this reason, the Field Extensions and Extension Points mechanisms are used.
How to Modularize
So, you have decided to implement a portion of your application in a module. How do you do this? The basic steps are:
-
Create a Micronaut Module. See the MES Core Module for an example.
-
Create an Addition.
-
Add any beans to execute addition code at Extension Points.
Design and Name Your Module
The module’s name should be short, simple and descriptive. This is not always easy. If needed, use a longer name. In most IDEs, you won’t have to type this name too often.
The design of your module should follow normal Guidelines for domains, controllers, etc. This means a simple package scheme and class naming approach.
You will also need to decide how you will extend the core (and other) modules with additional fields and behavior.
Create a Micronaut Module
Create a new module involves a number of steps. Some are automatic and others require manual adjustments to many files. The basic steps are:
-
Create the module:
mn create-app module1 -l groovy
This just creates an empty application, which we will adjust below. You an include other features, but the build.gradle will be changed to include the appropriate dependencies.
-
Create a 'New Project from Existing Sources' in your IDE.
-
Import/Refresh the Gradle settings.
-
Edit build.gradle to match the MES-Core build.gradle. This includes updating the dependencies as needed:
compile ("org.simplemes:mes-assy:0.5") (1)
mainClassName = "org.whatever.Application"  (2)

jar {
  exclude "logback.xml"
  exclude "application-test.yml"
  exclude "/org/whatever/Application.class" (2)
}
1 You will need to include the modules you depend on. Most of our provided modules depend on eframe and mes-core, so you don’t need those modules in your build.gradle. 2 Your application name. -
Update application.yml. as needed. Create application-test.yml (for test mode). Create application-dev.yml (for development mode, if needed).
-
For Intellij IDEA, create a 'Run Application' for the Application.class you created. This will need an environment variable: MICRONAUT_ENVIRONMENTS=dev.
-
Create a JUnit template in Intellij to make testing easier. Set the VM Options to:
-Dgeb.env=firefox -Dgeb.lang=en-US -Dnashorn.args="--no-deprecation-warning"
This makes it easier to quick-run a test using Spock/JUnit (Ctrl+Shift+F10 in Intellij on Windows).
After creation, you can add logic and tests for your module. Later, you will need to use the publishToMavenLocal Gradle target to publish your module for use by an application.
Addition
When you create a new module for the framework, you will need to create an Addition class that describes a few key parts of your module. This allows for faster startup since the framework won’t have to search the class path for all of you modules features.
The Addition describes elements including:
-
Where to find your domain classes.
-
Field Extensions
-
Encoded Types
-
Initial Data Loaders
Additions are classes with a simple DLS (Domain Specific Language) to define these elements. Not all are required.
Example Addition
Below is a simple addition that adds some fields, domains and other features that an addition can provide.
@Singleton   (1)
class SimpleAddition extends BaseAddition implements AdditionInterface {
  AdditionConfiguration addition = Addition.configure {
    encodedType OrderStatus
    initialDataLoader InitialDataLoadRoles
    field { domain Order; name 'warehouse'}  (2)
    field {
      domain Product         (3)
      name 'productCode'
      format LongFieldFormat
      fieldOrder { name 'group:components' }  (4)
      fieldOrder { name 'components'; after 'group:components' }
      guiHints """label="Legacy Code" """   (5)
    }
  }
}| 1 | Exposes this addition as standard bean. |
| 2 | Single-line format for a field definition. |
| 3 | The custom field added to the Product domain. |
| 4 | Adds a new panel in the Product GUI for the components. This panel added at the end of the field order. The custom field itself will also be added at the end, so it will appear on the components panel. Assumes the label 'components.panel.label' exists in the messages.properties file. |
| 5 | Provides a GUI display hint for the display [Markers]. |
This example defines the global features such as where to find domains for the module, any loader additional Encoded Types and some custom fields added to the Order domain.
Addition Top-Level Options
The Addition supports these top-level options:
| Option | Description |
|---|---|
name |
The name of the addition (Default: The addition class’s simple name). |
field |
Defines a single field added to a domain. See Addition Field Extensions (Optional). |
encodedType |
One of the Encoded Types Provided By Additions (Optional). |
initialDataLoader |
An initial data loader class. See Initial Data Loaders and Additions (Optional). |
asset |
An asset needed for a specific page. See Assets Provided by Additions (Optional). |
Addition Field Extensions
One of more important reasons to use additions is to add custom fields to core domain classes in other modules. This definition creates normal Field Extensions for the defined fields. This means your module can add fields to GUIs in core domains and import/export the values.
@Singleton   (1)
class SimpleAddition extends BaseAddition implements AdditionInterface {
  AdditionConfiguration addition = Addition.configure {
    field {  (2)
      domain Order
      name 'priority'
      format LongFieldFormat
      fieldOrder { name 'priority'; after 'notes' }
      guiHints """label="Order Priority" """
    }
  }
}| 1 | Exposes this addition as a standard bean. |
| 2 | Defines a single priority field added to the Order class. |
These field extensions provide a lot of configuration options:
| Option | Description |
|---|---|
domain |
The domain class (Required). |
name |
The name of the field to add to the domain (Required). |
label |
The label for the field (Default: |
format |
The domain class (Default: String - no limit). |
maxLength |
The max length of the value (Optional). Only applies to String fields at this time. |
valueClass |
The class for the value (Optional). This is used mainly for DomainReferences, Enumeration and EncodedTypes. |
fieldOrder |
Defines a Field Ordering entry for the domain (Optional). See below. |
guiHints |
GUI Hints to add to the display of these additions. (Optional). These are typically attributes supported by [Markers] such as [efCreate]. These must be in the form of name/value pairs with quotes. For example: name1="value1" name2="value2" |
The options supported by the fieldOrder element above are:
| fieldOrder | Description |
|---|---|
name |
The field to add to the field order (Required). |
after |
The new field will be added after this field in the display order (Default: the end). |
Encoded Types Provided By Additions
Encoded Types are used to store encoded values in a column in the database. These encoded values are short strings that are resolved by the base class. Your addition may provide more encoded types by specifying the encodedType element:
@Singleton
class SimpleAddition extends BaseAddition implements AdditionInterface {
  AdditionConfiguration addition = Addition.configure {
    encodedType OrderStatus  (1)
     . . .
  }
}| 1 | Defines a single base class for a new encoded type. |
Initial Data Loaders and Additions
Sometimes, a module will need to add records to a core module’s database using the framework’s Initial Data Load mechanism. This is common with user Roles. To avoid creating dummy domain classes, you can specify a list of classes that perform the initial data load like normal domain classes.
@Singleton                            (1)
class SimpleAddition extends BaseAddition implements AdditionInterface {
  AdditionConfiguration addition = Addition.configure {
    initialDataLoader SetupRoles  (2)
     . . .
  }
}
. . .

class SetupRoles {
  static initialDataLoad() {  (3)
   . . .
  }
}| 1 | Registers this addition within the application context for discovery at runtime. |
| 2 | Specifies the initial data loading class. |
| 3 | Performs the actual initial data loading. |
Assets Provided by Additions
Some modules have specific client assets (Javascript or CSS files) that are needed on specific core pages. The addition logic lets you add assets to specific views as needed. These assets are added to the page using the Standard Header include file.
@Singleton                            (1)
class SimpleAddition extends BaseAddition implements AdditionInterface {
  AdditionConfiguration addition = Addition.configure {
    asset {    (2)
      page "dashboard/index"
      script "/assets/mes_dashboard.js"
    }
    asset {    (3)
      page "dashboard/index"
      css "/assets/mes_dashboard.css"
    }
  }
}| 1 | Registers this addition within the application context for discovery at runtime. |
| 2 | Specifies the javascript asset (mes_dashboard.js) to add to the page (dashboard/index.ftl). |
| 3 | Specifies the CSS asset (mes_dashboard.css) to add to the page (dashboard/index.ftl). |
The supported types include:
-
script: - A Javascript file.
-
css: - A CSS file.
| The module needs to make sure the asset can be found. See [efAsset] for examples. |
Addition Errors
The Addition syntax can be somewhat complex. Most errors are caught by the framework at run-time. This means the first error will usually show up when you deploy your addition with the application.
You will probably need to monitor the log files for any ERROR level messages. Most errors will be logged, but the application startup will still be attempted.
To catch these errors earlier, we suggest that you unit test your addition. For example:
def "verify that the addition is valid"() {
  expect: 'the validation passes'
  new MyAddition().addition.validate()
}
Appendix
Appendices for the enterprise framework. This section contains detailed topics that don’t fit in elsewhere in the user guide.
Troubleshooting
Logging Useful Logging Settings
Useful Logging Settings
Logging is a useful tool for trouble-shooting problems with the application. Some useful logging settings include:
| Object | Setting | Description |
|---|---|---|
io.micronaut.data |
debug |
SQL statement execution. |
io.micronaut.data |
trace |
SQL statement execution with values used in statement. |
io.micronaut.context |
trace |
Bean creation issues. |
org.simplemes.eframe.application |
debug |
Logs all bean names defined. |
org.simplemes.eframe.controller |
trace |
Logs all suppressed exceptions (e.g. BusinessException) caught by BaseController sub-classes. |
org.simplemes.eframe.preference |
trace |
Logs a stack trace to help identify all uses of PreferenceHolder with null |
client.to-server |
any |
Sets the level for echoing all client-side logging messages to the server log. |
client.dashboard |
debug |
Logging of events send by dashboard. |
client.dashboard |
trace |
Verbose logging of definitions used by the client dashboard libraries. |
Potholes
Micronaut and the other tools are great, but they have some pot holes you need to avoid. These pot holes are not terribly bad problems, but we have lost some time discovering them and working around them. This section is meant to help you avoid some of those pot holes.
groovy.lang.Singleton Used
Groovy provides the groovy.lang.Singleton annotation without an explicit import.
This annotation is not compatible with the one needed by Micronaut (javax.inject.Singleton).
You must explicitly import the correct one:
import javax.inject.Singleton
If you use the wrong annotation, then your bean will not be created.
Intellij will not flag the wrong @Singleton annotation. You will have to manually
insert the above import statement.
|
Beans Defined in .java Files
Micronaut works well with Java or Groovy source trees. It gets a little confused when you have beans (e.g. @Singleton or @Controller) in Java and Groovy in the same module. This causes Micronaut to create two 'META-INF/services/io.micronaut.inject.BeanDefinitionReference' files. When the module is used, the run-time logic can’t always find the beans from the Java tree.
This usually only affects the contents of the .jar file that your module is distributed as.
This means you should never define beans in the Java source tree if you use Groovy for other beans.
Sessions Lost Randomly
If you experience logon sessions being lost randomly, then you may have a problem with your cookie definition. By default, then path defined for the security session cookie is the path of the page being displayed. This means you get a cookie for each page.
| This does not seem to be a problem for JWT Cookie security that is used by the framework. |
When you logout and come back in or browse to other pages, you get multiple cookies. This confuses the authentication logic and it thinks the page needs authentication again. This means you will get logon pages after you have logged on.
To avoid this, make sure your application.yml sets the cookiePath:
micronaut:
  application:
    name: eframe
  session:
    http:
      cookiePath: /
@Transactional Used in Wrong Class
Micronaut provides support the normal javax.transaction.Transactional annotation. This works great in bean classes that are processed by Micronaut (e.g. @Singleton, @Repository or @Replaces). If @Transactional is used in other places then nothing is added to the method.
To work around this, you can use the withTransaction closure on a domain (see Transactions).
Key (xyz)=(xyz) is still referenced from table "abc".
This is a 'chicken or egg' scenario in some tests that triggers the 'still referenced' errors. See Multiple Record References for details.
io.micronaut.data.exceptions.DataAccessException: Error executing SQL UPDATE: ERROR: update or
  delete on table "product" violates foreign key constraint "product_component_component_id_fkey"
  on table "product_component"
    Detail: Key (uuid)=(2e9aecd6-ab7b-4b7b-8281-dd9dec9eae84) is still referenced from table
    "product_component".
HTTP Requests return Forbidden Status
With the Micronaut security, if a request’s URI is not valid for any reason, then the server will typically return the HTTP Forbidden status. This happens, even if the user has permissions for the URI.
If this happens in a unit test in your IDE, then try rebuilding the the project and re-running the test.
Traits and AST
Early attempts to use the really nice Groovy traits instead of base classes failed. It seems Groovy does not guarantee the Annotations such as @Secured will work with traits. This means we had to place common CRUD/Rest methods in the controller base classes such as BaseCrudController.
The symptoms of this problem was inconsistent evaluation of the @Secured annotation in other modules that resulted in the annoying FORBIDDEN HTTP response. This seemed to be worse when used in modules that depended on the framework (e.g. MES-Core Module). See Groovy Documents for details.
Geb/Selenium/Webdriver and moveToElement Issues/Messages
Under Firefox (and maybe others), the moveToElement() method moves relative to the element’s
center. This is noted in an INFO message logged to stdError, but we suppress this in
the default GebConfig.groovy file:
Logger.getLogger("org.openqa.selenium").setLevel(Level.WARNING)
You can change the logging level as needed.
There may also be other info messages from Selenium/Geb world that are suppressed.
Beans not defined for GEB/Spock Tests
When running a GEB/GUI test, the test spec starts an embedded server. Sometimes, the micronaut run-time doesn’t see the controllers and other beans in your application. If this happens, make sure your build.gradle has this dependency:
compileOnly "io.micronaut:micronaut-inject-groovy"
This is in addition to the standard testCompile entry. You need both.
One other symptom is in GEB tests, the page is not found.
Dates with Groovy MONTH Syntax
Groovy has a nice array-based syntax for dates such as:
d[YEAR] = 2010
d[MONTH] = NOVEMBER
d[DATE] = 14
This is simple and easy to use, but the month values is zero-based (January=0) and the dates are 1-based. This inconsistency causes problems. There are also issues with round trip access to the values that causes troubles. For example, the code below fails unpredictably:
import static java.util.Calendar.*

def d = new Date()
d[YEAR] = 2010
d[MONTH] = NOVEMBER
d[DATE] = 14
d[HOUR_OF_DAY] = 13
d[MINUTE] = 24
d[SECOND] = 56
d[MILLISECOND] = 987

assert d[MONTH] == NOVEMBER
The failure of this code is dependent on the date that the test is run. For this reason, we have chosen to avoid this convenient approach to dates.
Constructors with more than One Optional Argument
Groovy provide a nice way to define optional arguments. This is great, but the automatic class reloading does not seem to work properly when 2 or more arguments are optional on constructors. Groovy fails to call the constructor on class recompilation. Also, 2 optional arguments are a little confusing, so we avoid that scenario. Traditional Java method overloading is used in those cases.
GridWidget(Class domainClass, Collection list, Map options=null, List<String> columns=null) {To solve this, we moved the columns list to the options map to eliminate the columns argument.
GStringTemplateEngine is Slow
When you need to evaluate a Groovy String with specific parameters, the standard way is to use the GStringTemplateEngine. This is needed when you build the Groovy String from other elements or the user can provide their own string format.
def parameters = [day: 'Monday', object: ...]
def engine = new groovy.text.GStringTemplateEngine()
def value = engine.createTemplate('${day}').make(parameters).toString()
This works and handles almost all cases, but it can be quite slow. 20-30 milliseconds per execution. Even caching the
engine above does not help much.
To solve this, the enterprise framework provides a convenience method (evaluateGString) in
TextUtils to speed up the execution when possible:
def parameters = [day: 'Monday', object: ...]
def value = TextUtils.evaluateGString('${day}',parameters)
This supports the normal Groovy String syntax such as "${day} $day ${object.method()}". If the method call format is used,
then the evaluateGString() method will use the slower GStringTemplateEngine approach if needed.
| Use the simple format such as "$day" for speed. |
@Canonical and @TupleConstructor Issues
We try to avoid these two. The tuple constructor will create a constructor that frequently overlays the default value for fields. For example:
@Canonical
class Preference {
  String element
  String name=''
  List details = []
}

def preference = new Preference('ABC')
This will create an instance that has null as the name and details element. The framework will avoid this tuple constructor in most cases.
Map.class vs. Map.getClass()
This is a well-known quirk of Groovy. In general, Groovy allows you to use the shorter variable.class to get the Class of the variable. This works for most types of variables, but not for Maps.
When you have a map variable, the map.class returns the entry 'class' from the map. This means you need to use variable.getClass() instead.
Stub Compiler issues with .java
Symptom:
C:\Users\mph\.IntelliJIdea2016.1\system\compile-server\eframe_3d005332\groovyStubs\eframe_main\java-production\org\simplemes\eframe\custom\SomeClass.java Error:(10, 8) java: java.lang.Comparable cannot be inherited with different arguments: <> and <org.simplemes.eframe.custom.SomeClass>
This happens when compiling the Java stubs. It happens when a true Java class calls some Groovy code.
Solution
Move the Java source files to the Groovy directory. The groovy compiler can handle them correctly.
Alternate Solution
Don’t call Groovy code from Java in application code.
StackOverflowException and StackOverflowError
Symptom:
A stack overflow exception is thrown in unit tests and production when validating a top-level object with a parent reference. You can also get a StackOverflowError in a unit test when toString() is used by debugging or other testing mechanisms (e.g. Spock or IDE-based testing).
This can happen under these conditions:
-
Both child and parent have
hashCode()ortoString()methods. This can be the @EqualsAndHashCode annotation or a normal method. -
The child uses the parent reference as part of its hash code.
-
The parent uses the child reference as part of its hash code.
This can happen if you use the simple @EqualsAndHashCode or @ToString:
@EqualsAndHashCode
@ToString
class Parent {
  String code
  @OneToMany(mappedBy = "parent")
  List<Child> children
  . . .
}


@EqualsAndHashCode
@ToString
class Child {
  @ManyToOne
  Parent parent
  . . .
}
This triggers a stack overflow in creating the hash codes since one level references the other. The default behavior of the @EqualsAndHashCode is to include all fields in the hash code calculation. This causes the recursion and the stack overflow.
The solution is to make sure the parent hash code does not depend on the child’s hash code:
@EqualsAndHashCode(includes=['code'])
@ToString
class Parent {
  String code
  @OneToMany(mappedBy = "parent")
  List<Child> children
  . . .
}

@EqualsAndHashCode(includes=['parent'])  (1)
@ToString(excludes = ['parent'])
class Child {
  @ManyToOne
  Parent parent
  . . .
}

. . .| 1 | This needed to make sure no other fields get pulled into the hash code. |
| This can also happen with @ToString(). You may need to add the option excludes = ['order'] to the @ToString() annotation. |
Cannot set property 'Q' of undefined
When this happens deep in the [GUI Toolkit] library, it usually means a syntax error in the Javascript object passed to the toolkit constructor.
_B.display = {
  view: 'form', type: 'clean', margin: 0,
  rows: [
    {height: 10},
    ,                   (1)
    { margin: 8,
      cols: [
        {view: "label", id: "rmaLabel", label: "rma.label", width: tk.pw(ef.getPageOption('labelWidth','20%')) , align: "right"},
        {view: "text", id: "rma", name: "rma", value: "RMA1001"  ,inputWidth: tk.pw("22em"),attributes: {maxlength: 40} }
      ]
    }
  ]
};| 1 | This extra comma causes problems with the parsing of the object and the toolkit attempts to use an undefined GUI element. Remove this extra comma to solve the problem. |
NoSuchMethodException on Repository - Method Really Exists
If you use primitive method arguments (e.g. boolean instead of Boolean), you will probably get a NoSuchMethodException like this:
NoSuchMethodException: sample.DashboardConfigRepository$Intercepted.findByCategoryAndDefaultConfig(java.lang.String, java.lang.Boolean)
This happens when you use a primitive type (boolean) as an argument in the repository interface.
If you try to use the domain convenience method (DashboardConfig.findByCategoryAndDefaultConfig()),
you will get the exception. For example:
interface DashboardConfigRepository extends BaseRepository, CrudRepository<DashboardConfig, UUID> {
  Optional<DashboardConfig> findByCategoryAndDefaultConfig(String category, boolean defaultConfig) (1)
}| 1 | A primitive is used. |
To fix this, use the object (Boolean) instead of the primitive (boolean).
This is caused by logic in the enterprise framework that delegates static method calls on the domain to the repository. If you use the repository method directly, then this is not a problem.
Forbidden (403) Response from Controller
When you make an HTTP request to the controller, it returns 403 (Forbidden). This can be caused by many reasons:
-
No @Secure annotation.
-
User does not have the require Role specific in the @Secured annotation.
-
Method is not correct (Get vs. Post).
-
The controller is not deployed as a bean (e.g. no @Singleton annotation or wrong import. Always use: 'import javax.inject.Singleton' ).
You can turn on TRACE logging for io.micronaut.http or io.micronaut.routing to help debug this. You can also turn on TRACE for io.micronaut.
Nashorn
Some tests will use the built-in Javascript engine to validate the generated Javascript. This results in this warning message every time it is used:
Warning: Nashorn engine is planned to be removed from a future JDK release
To avoid this warning, run your tests with this option:
-Dnashorn.args="--no-deprecation-warning"
NoSuchBeanException - SynchronousTransactionManager Bean Cannot be Created
The exception is:
io.micronaut.context.exceptions.NoSuchBeanException: No bean of type [io.micronaut.transaction.SynchronousTransactionManager] exists. Make sure the bean is not disabled by bean requirements (enable trace logging for 'io.micronaut.context.condition' to check) and if the bean is enabled then ensure the class is declared a bean and annotation processing is enabled (for Java and Kotlin the 'micronaut-inject-java' dependency should be configured as an annotation processor).
This exception is caused when the datasources section in the application.yml file is not found. The SynchronousTransactionManager bean is created for each datasource listed in the application.yml file. If there is no section or the fiel can’t be found, then the bean won’t be created.
The possible causes include:
-
No application.yml file defined.
-
The resources folder is not on the class path.
If running from IDEA as an application, then the output resources folder must be on the classpath. Normally, performing a Gradle resynch in IDEA solves the problem.
Sometimes, you will have to manually add the output folder’s class path to the dependencies. This is done in the Modules part of the 'Project Structure' dialog.
By default, you would add this folder as a Classes directory:
simplemes-core\eframe\out\production\resources
This assumes you have IDEA handling the build (not gradle) and the output path is simplemes-core\eframe\out.
Vue - Invalid prop: type check failed for prop
This happens when you pass a string to a property that expects a numeric value. The javascript console message in the browser is:
Invalid prop: type check failed for prop "xyz". Expected Number with value 9999, got String with value "9999".
When used with a Vue reference like this:
<Toast baseZIndex="9999"/>The CORRECT syntax is to bind the value to a JS expression like this:
<Toast :baseZIndex="9999"/>asciidoctor-version |
2.0.10 |
safe-mode-name |
unsafe |
docdir |
/home/runner/work/simplemes-core/simplemes-core/eframe/src/main/docs/asciidoc |
docfile |
/home/runner/work/simplemes-core/simplemes-core/eframe/src/main/docs/asciidoc/guide.adoc |
doctype |
book |
imagesdir-build |
images |
imagesdir-src |
images |
imagesdir |
images |